The shipping rate template is a spreadsheet where you enter shipping cost options that will be offered to your customers. It contains information such as ZIP code ranges, shipment weight limits, and the service fee charged by the company in charge of deliveries.
Please fill in the template according to the shipping service contract agreed between your store and the carrier/courier.
To add shipping costs to the template, you have to:
You can also add shipping costs in the Shipping rates module. We recommend using the shipping rate template to include multiple ZIP code ranges and using the Shipping rates module to manage existing shipping costs and add ZIP code ranges individually.
Fill in the fields in the spreadsheet
To fill in the fields in the spreadsheet, consult the terms agreed with the company responsible for shipping your products. Make sure the information you enter follows these terms.
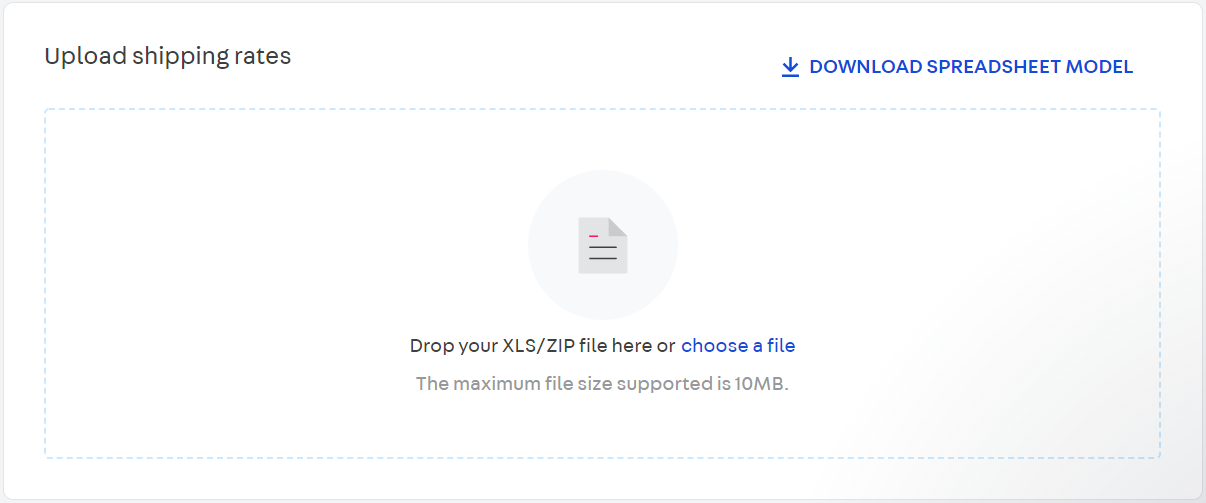
To download the template, go to Shipping > Shipping strategy > Shipping policies > Create shipping policy. In the Upload shipping rates section, click on Download spreadsheet model.
Fill in the columns considering that for each location there are:
- An associated ZIP code (or geolocation) range
- Accepted weight ranges
- Fixed and additional shipping costs
- Maximum shipment volume
See below the spreadsheet columns content to understand each field in detail.
| Colum | Description | Details |
|---|---|---|
ZipCodeStart | The first part of the ZIP code range. | You should add code ranges only if the PolygonName field is empty, as they contain equivalent function data. ZipCode fields must contain up to 8 digits. Do not use special characters, only numbers and letters. You must fill in the fields according to the following rules: - For numerical ranges, the accepted values are from 0000000 to 99999999.- For alphabetical ranges, the accepted values are from AAAAAAAA to ZZZZZZZZZ.- For alphanumerical ranges, the maximum value is ZZZZZZZZ. |
ZipCodeEnd | The second and last part of the ZIP code range. | |
PolygonName | The polygon identification defined in the geolocation function. | To use geolocation, after filling in the PolygonName column with the desired values, fill in the ZipCodeStart and ZipCodeEnd columns with the value 0.You should fill in this field only if the ZipCodeStart and ZipCodeEnd fields are used, as they contain equivalent function data. |
WeightStart | The minimum weight allowed, in decimal number. | Consider the same weight unit informed when adding a SKU. For example, if you added SKUs using grams, this will be the default unit for WeightStart and WeightEnd. |
WeightEnd | The maximum weight allowed, in decimal number. | |
AbsoluteMoneyCost | The fixed shipping cost to be charged, in decimal number. | If there are additional charges, the total cost will be composed of the fixed cost plus additional costs. |
PricePercent | Price-based additional shipping charge calculated in decimal number based on the total price of the products in the shopping cart. You must fill in this field with a percentage value. For example, for an additional charge of 10%, fill in the table with 10. | Additional shipping costs will be added to the fixed cost. |
PriceByExtraWeight | Weight-based additional shipping charge, calculated based on the total weight of the order, in decimal number. | Additional shipping costs will be added to the fixed cost. Consider the exact weight unit informed when adding a SKU (examples: gram, kilogram, or ounce). |
MaxVolume | Maximum volume allowed, in decimal number. | Consider the same unit of volume informed when adding a SKU. For example, if centimeter is the unit of measurement for height, width, and length, the MaxVolume field must be in cm³. |
TimeCost | The delivery time frame informed by the carrier, in the format DD.HH:MM:SS. | For example, if the delivery time frame is 4.5 days, fill in the field as follows: 04.12:00:00. |
Country | Country where the delivery will take place. Fill it in with a three-letter ISO country code. | You can check the ISO country code at Country Codes. |
MinimumValueInsurance | Additional insurance charge, in absolute value and decimal number. | This value will be added to the shipping cost. However, it only applies when the price-based additional shipping charge is lower than the MinimumValueInsurance. For more details, see the article What is the Minimum Value Insurance field?. |
We used the term "weight" when referring to "mass" in this documentation for readability.
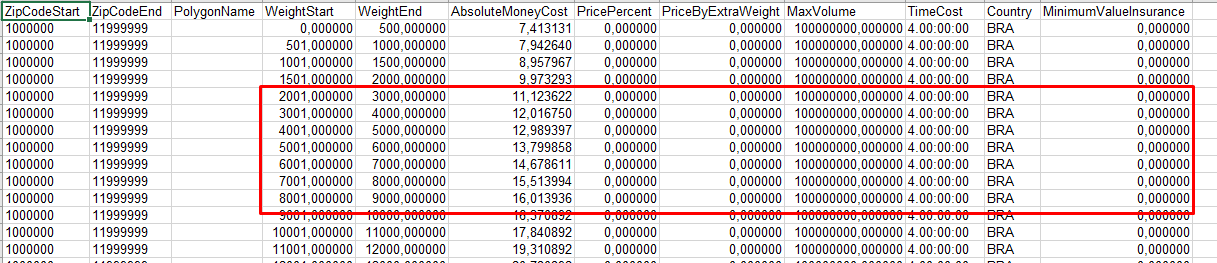
Here is an example of how to fill in the fields in the spreadsheet.
Upload the spreadsheet in VTEX Admin
Once you have completed the spreadsheet, save it as .xls or .zip file format and upload it via VTEX Admin.
Follow the steps below:
- In the VTEX Admin, go to Shipping > Shipping Strategy > Shipping Policies, or type Shipping Strategy in the search bar at the top of the page.
- If you want to use a new shipping policy, click on the
Create shipping policybutton. If you want to edit an existing shipping policy, click on the pencil icon next to it. - In both cases, download the spreadsheet and complete its fields. Then, upload the file in the Upload shipping rates section, as illustrated in the image below.
- After completing these steps, click on
Save changes.
For new shipping policies, other steps are required. Check out the article Shipping policy for more information.
Each tab in the spreadsheet supports a maximum of 65,536 rows. You can create as many tabs as you want on the same worksheet, provided that it does not exceed the limit of rows and the maximum file size of 10MB. You can compress the file by saving it as .zip, if necessary. If the file is still too large to upload, you can split it into two files and create another shipping policy to upload the second file.
In the event that the spreadsheet contains an error, you will receive an email with details about the error. Make sure you have reviewed all the fields before uploading the file again.
Uploading the file and receiving confirmation may take a while because file processing may not occur immediately depending on the volume of data.