When adding a product, you can use the specification field to include characteristics applicable to all its variations (SKUs).
At VTEX, a specification is always included in a specification group, associated with a category. Therefore, to create a product specification (field), you must first create at least one category and one specification group.
Example: Consider a fashion store. In the T-shirts category, the specification group can be named Characteristics and include the Fabric field and its values, **Cotton **and Polyester.
In this article, we explain how the specification inheritance works for the added specifications, detail the process of adding product fields and show how to fill in product specifications. Check out the following sections:
To create a product specification using Catalog API, follow the How to create a specification developer's guide.
Product specifications inheritance
Before creating any specifications, it's important to understand that they follow a "inheritance" logic, i.e. when you create a specification for a higher category level, it will appear in all the sublevels of that category. Therefore, if you want to create a product specification applicable to one category only, you must create it at that category level.
Consider the TV product for example. In Catalog > All products > Edit > Specifications, as illustrated in the page below, we can see that the specification group called Characteristics is associated with the TV's category. This group includes a field named Inches and a field named Age group, which are mandatory.
Since this is a product specification, the information selected on that page will apply to all TV product variations. All products added to the TV's category must have these specifications filled out, since they are required fields.
Step-by-step instructions on VTEX Admin
To see product specifications while creating or editing products, besides having previously created a specification group associated with a category, you must also create the fields and fill in their values. Next, you will be able to fill in your product specifications.
See the step-by-step instructions below.
Creating a product field
To create a product field, follow the steps below:
-
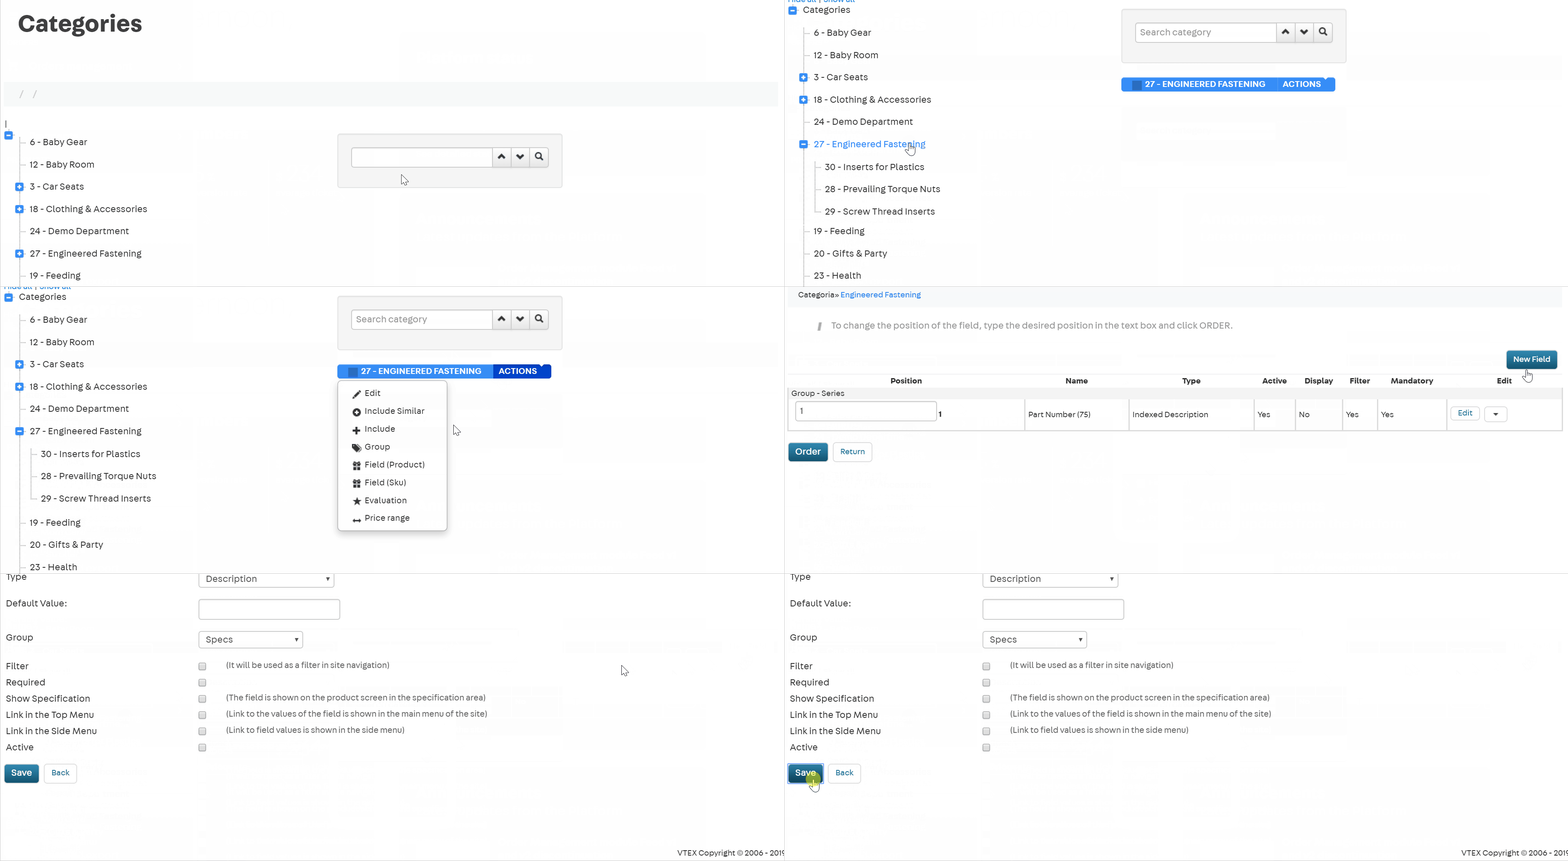
In the VTEX Admin, go to Catalog, or type Catalog in the search bar at the top of the page.
-
Click on Categories.
-
Click the category associated with the specification group you want to create the field.
Please note that when you create a specification for a higher-level category, it will appear in all the sublevels of that category.
-
Click
Actions. -
Click
Field (Product). -
Click
New field. -
Fill in the information related to the field you are creating:
- Name: Name of the product specification (field).
- Text: Field description.
- Type: Field type, which can vary between Text, Large Text, Number, Combo, Radio, CheckBox, Indexed Text and Large Indexed Text. For more information on each option, read the Field types section.
- Default Value: Value already defined when creating the field.
- Group: Name of the previously created specification group in which the field will be included.
- Filter: Defines if the specification will be used as a filter when navigating the website.
- Required: Defines if a value is mandatory when adding a product. In the case of a required field, the product will be activated only after filling in this specification.
- Show specification: Defines if the field is displayed on the product details page in the Specifications tab.
- Link in the Top Menu: Defines if the link for the field values is displayed in the website's main menu.
- Link in the Side Menu: Defines if the link for the field values is displayed in the website side menu.
- Active: Inserts or removes this field when adding the product (Specifications tab).
-
Click
Save.

Product field types
See the table below for details on the product field types you can select in the Type option:
| Field type | Description |
|---|---|
| Text | Content as free text, recommended for short texts and simple formatting. Not recommended for large HTML structures. |
| Large Text | Content as free text, recommended for large HTML structures. For example, size charts, frequently used in the fashion segment. |
| Number | Content with whole numbers only. For example, indicating shoe sizes (39, 41, 42...). |
| Combo | Content with two or more preset values selected out of a dropdown list. For example, a home appliance voltage, which can be 110v or 220v. |
| Radio | Content with two or more preset values checked as options from a value grid. For example, choosing the colors of product components (red, yellow, blue, black...). |
| CheckBox | Option with values equivalent to true (checked) or false (unchecked). For example, a field named Outlet will be checked only when the product is part of the store selection for outlet (clearance sale). The field must remain unchecked if it's not part of the selection. |
| Indexed Text Large Indexed Text | Technically, these field types follow the same rule as the Text field, except for one difference: their values will be interpreted by the **Catalog **indexer and will influence the search results for the store customers. For more details, please see the article How VTEX search works?. |
Adding values to the product field
The product field values will vary according to the field type. For the Text and Number field types, no preset values are created — the values will be filled in individually in the Specifications tab, when adding the product.
For the Combo, Radio and CheckBox field types, you must add preset values for the selection when adding the product. Follow the instructions below:
-
In the VTEX Admin, go to Catalog, or type Catalog in the search bar at the top of the page.
-
Click on Categories.
-
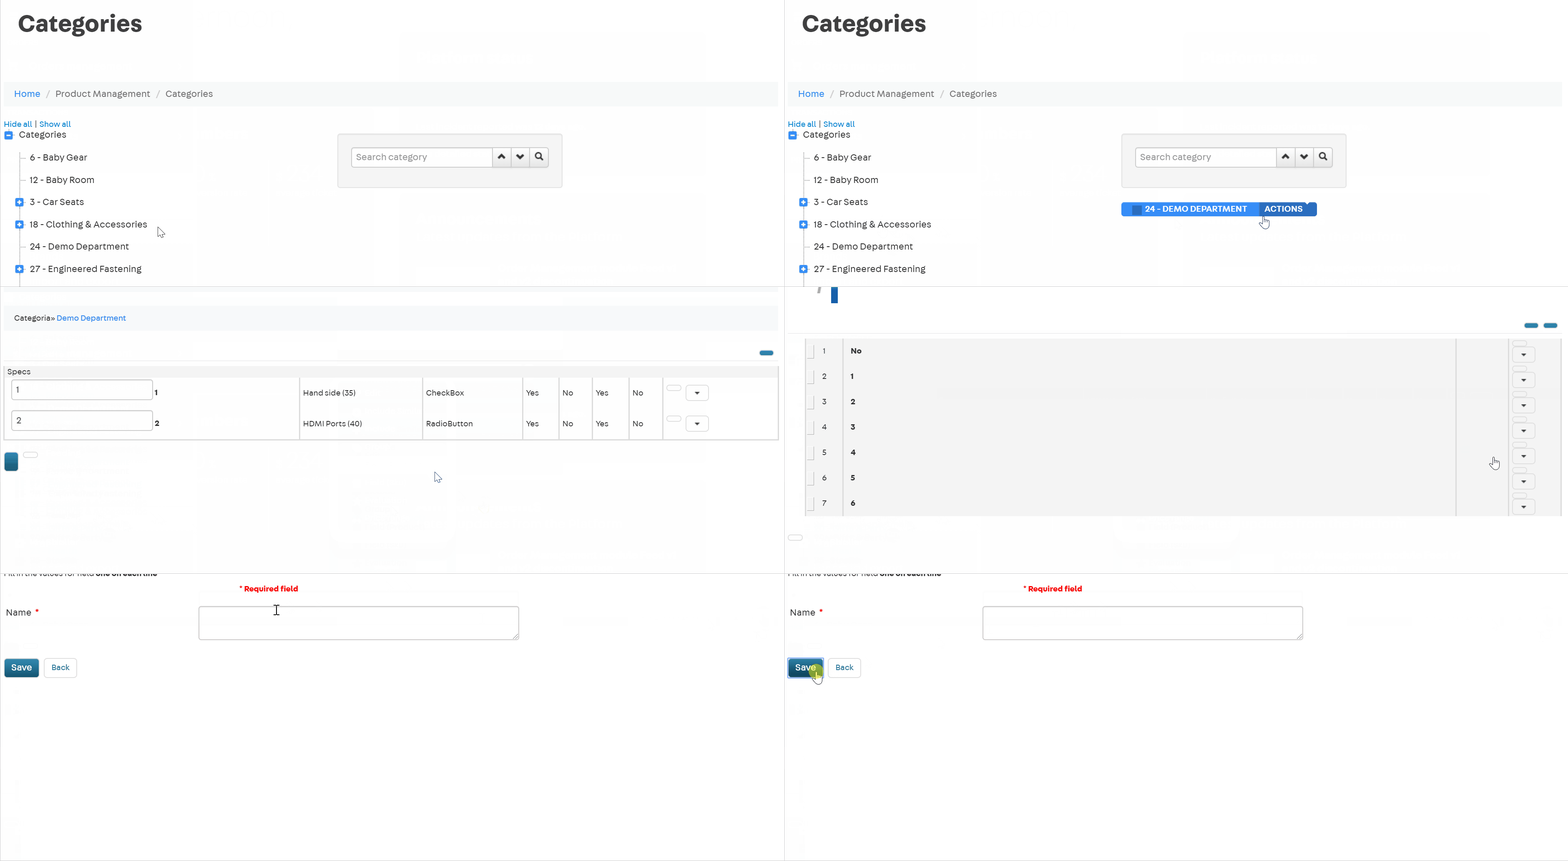
Click the category in which the product has been saved.
-
Click Actions .
-
Click Field (Product).
-
Click the down arrow .
-
Select Values.
If there are values already added, you must click
New value. -
Fill in the Name field with the values you wish to create for that field. Enter one value per row and press
Enterafter each value. -
Click
Save.The created values will be displayed in the Product Specifications tab.

If you are adding values for the first time in a field, you must return to the form of that specific field and check the Active option.
Accessing or editing values
To access or edit values in a product field, follow the steps below:
-
In the VTEX Admin, go to Catalog, or type Catalog in the search bar at the top of the page.
-
Click on Categories.
-
Click the category in which the product has been saved.
-
Click Actions .
-
Click Field (Product).
-
Click the down arrow .
-
Select Values.
On this page, you will see the values filled in, and you can choose between the following options:
- Order Alphabetically: Organizes the value list alphabetically.
- New value: Create a new value.
- Edit: Allows changing the value text and opting for activating or deactivating it.
- > Delete: Delete a value.
Filling in product specifications
Finally, you need to fill in the specifications for each product, according to the fields and values you have created. You can do this individually via the product registration page or massively via spreadsheet.
Product Registration
To fill in the specifications for each product individually, follow the instructions below:
-
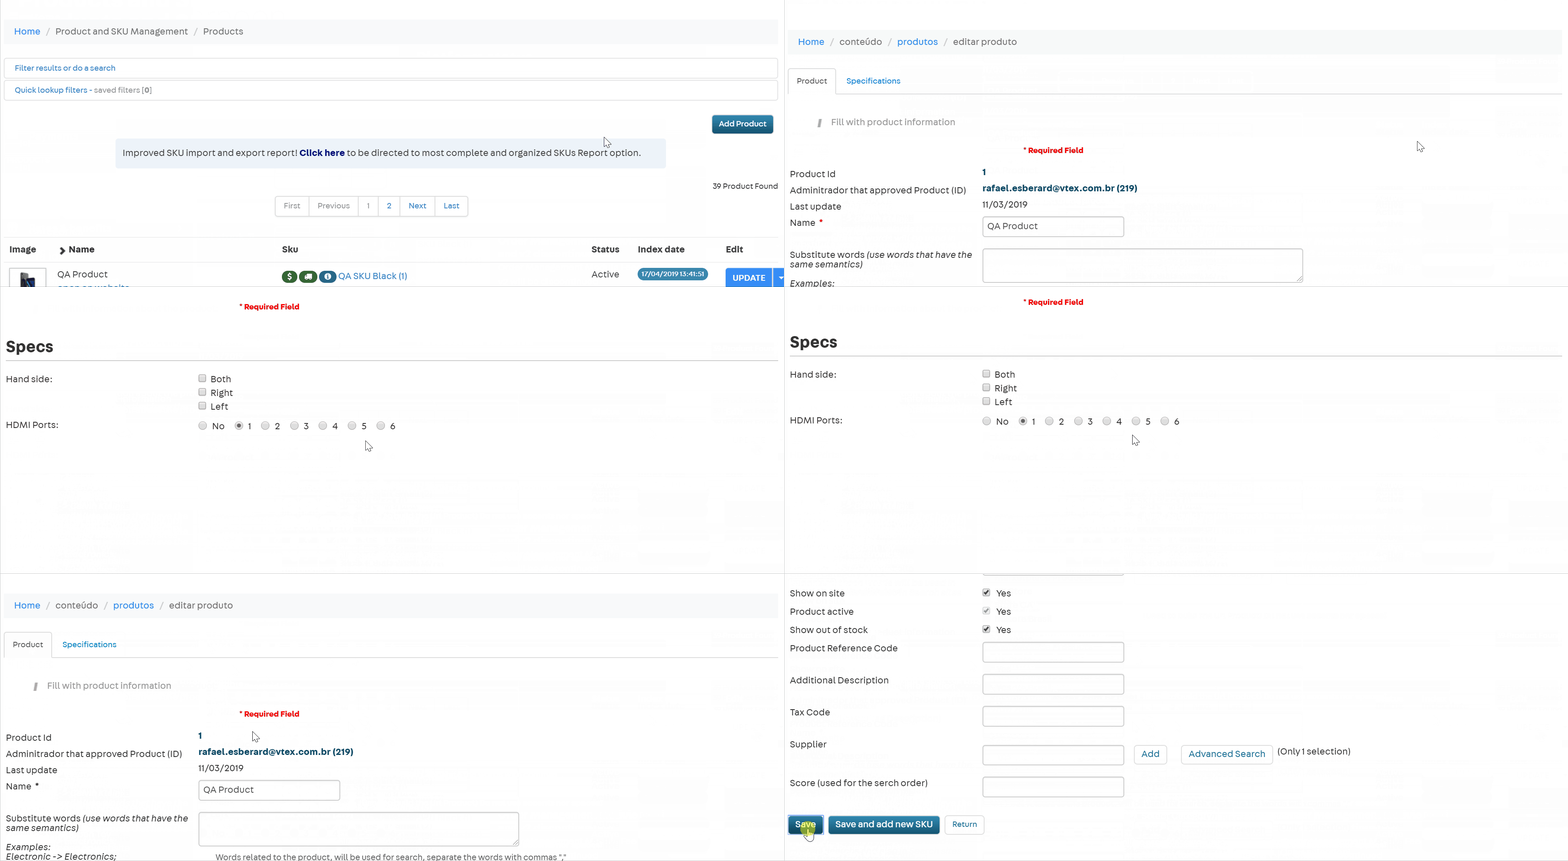
In the VTEX Admin, go to Catalog, or type Catalog in the search bar at the top of the page.
-
Click on All products.
-
In the product row, click
Edit. -
Access the Specifications tab.
-
Fill in the fields you created with the desired values.
Required fields will be marked with
*. -
Click
Save.

Spreadsheet
To fill in product specifications in bulk by spreadsheet, you need to export the template VTEX spreadsheet, populate it and import it into the platform. To do this, follow the instructions below:
-
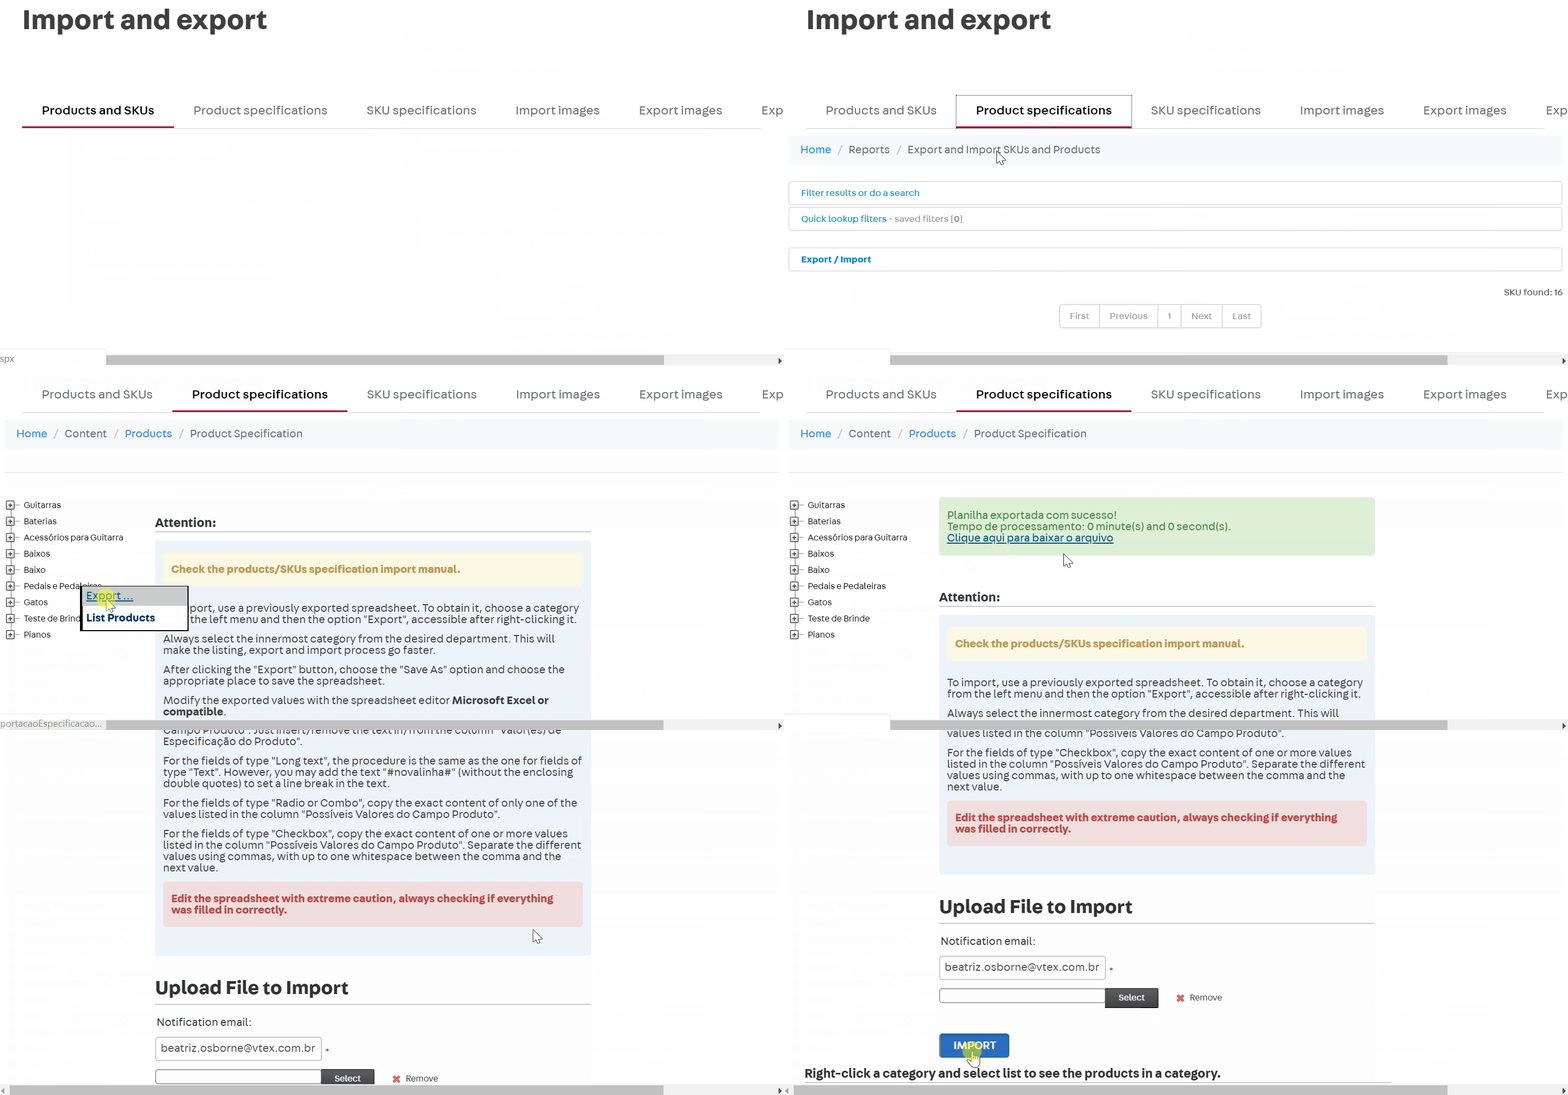
In the VTEX Admin, go to Catalog, or type Catalog in the search bar at the top of the page.
-
Click Import and Export.
-
Click the Product Specifications tab.
-
Right-click on the desired category.
-
Click on Export....
A green rectangle will appear on the screen.
-
Click Click here to download the file to export the spreadsheet.
-
Open the spreadsheet file and fill in the rows with the product specification data.
Change only the
SpecificationValuecolumn in the spreadsheet with the value for the field listed in each row. The other columns should remain unchanged because their values will be used to validate the data. -
In the VTEX Admin, still under Catalog > Import and Export > Product Specifications, scroll down the page to Upload File for Import.
-
Click Select to select the file with the completed spreadsheet on your computer.
-
Click
Import.
