The new offer area in VTEX Sales App features two main types of offers: specific products or search results. This flexibility allows merchants to adapt their marketing strategies based on their specific needs and goals, promoting individual products or groups of related products.
To customize a store's window display, merchants can add an Offers by store page by specifying the store ID in the Master Data to which the offer will be linked, allowing them to create personalized offers for each store.
In this document, we will provide detailed instructions on how to install, configure, and use the new offer area. Follow the steps below to set up this tool and boost your online sales.
- Install VTEX dependencies
- Configure the Headless CMS app
- Create an offer page
- Activate the offer menu in VTEX Sales App
- Access ads in the VTEX Sales App
Installing VTEX dependencies
Before installing the dependencies, you must have VTEX IO CLI installed. With VTEX IO CLI installed, execute the following commands in your computer's command prompt to install the necessary dependencies:
-
vtex login {account}
-
vtex install vtex.admin-cms@1.x vtex.admin-cms-graphql@0.x vtex.admin-cms-graphql-rc@1.x vtex.admin-releases@0.x vtex.cms-builder-sf-jamstack@1.x
Configuring the Headless CMS app
To create an offer page for VTEX Sales App, follow the steps below:
- In the VTEX Admin, go to Apps > App Management, or type App Management in the search bar at the top of the page.
- Click the CMS (alpha) item's
Settings. - Click
Add More. - In the Project ID field, type
assisted-sales-app. - In the Sections URL field, type
https://instore--instore.vtex.app/assisted-sales/cms/sections.json. - In the Content types URL field, type
https://instore--instore.vtex.app/assisted-sales/cms/content-types.json. - Click
Save.
Creating an offer page
To create an offer page for VTEX Sales App, follow the steps below:
- Access the VTEX Admin URL:
https://{main_account}.myvtex.com/admin/new-cms/assisted-sales-app - Click Create New and select Ads.
- Click Untitled to edit and include the desired name. We recommend using the name Offers.
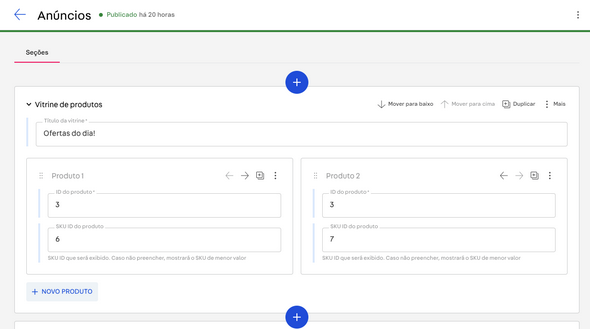
- In the Sections tab, click the + button to add a new section. Each section is a collection of products or search terms. Each section will be displayed as a carousel. You can reorder custom displays by clicking the Move down or Move up buttons.
- Select an offer type, either products or search results.
- Product custom display: It will display each product and SKU (optional) that you specify. Add the following information: - Custom display title: Name of the custom display that will be displayed on the page. - Product ID: Identifier number of the product you want to display. Required field. - Product SKU ID: Iidentifier number of the product's SKU you want to display. Optional field.
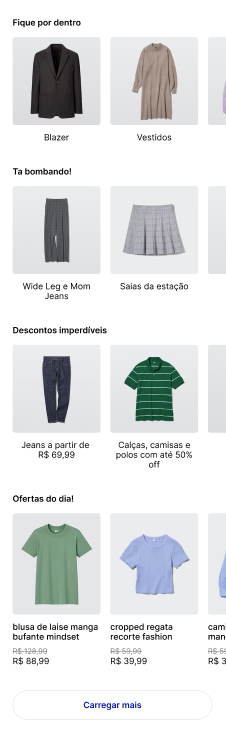
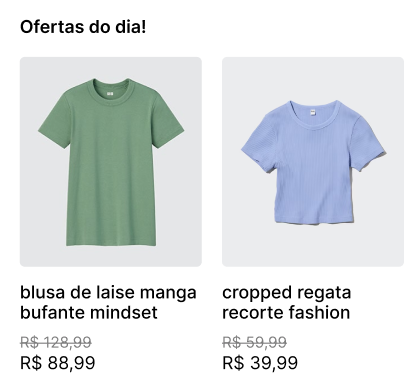
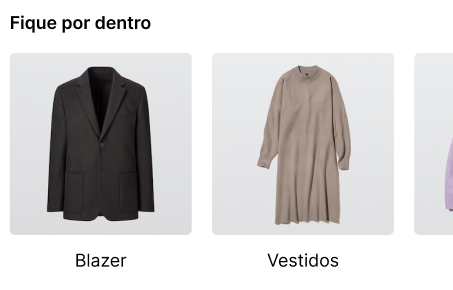
After completing the fields, the product image will be displayed with the "starting at" price. If you include the SKU, the price and promotion of the indicated SKU will be displayed. You can add more products by clicking + NEW PRODUCT. You can add up to 10 products in each custom display. The result of the product custom display will be displayed as shown in the image below.
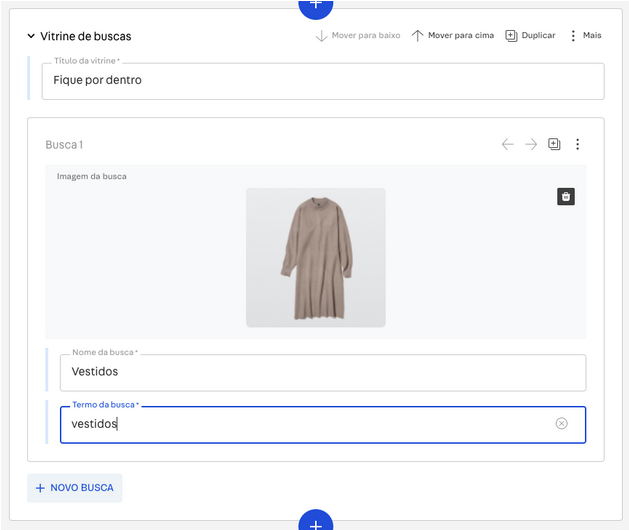
- Search results custom display: It will display products from a search result that you define. Add the following information:
Custom display title: Name of the custom display that will be displayed on the page.
- Search image: image that will represent the selection of products in the showcase.
- Search name: Name of the search that will be displayed on the page.
- Search term: Search term: Search term that will be used as a reference for the products.
When the seller clicks the search term, they will be directed to the search result determined in the Search term. You can also include up to 10 searches in each custom display. See the result in the image below:


- After creating the sections, click
Save, then clickPublishandPublish Nowto finalize.
The publication of the custom display will enter the indexing queue and will be published within a few seconds.
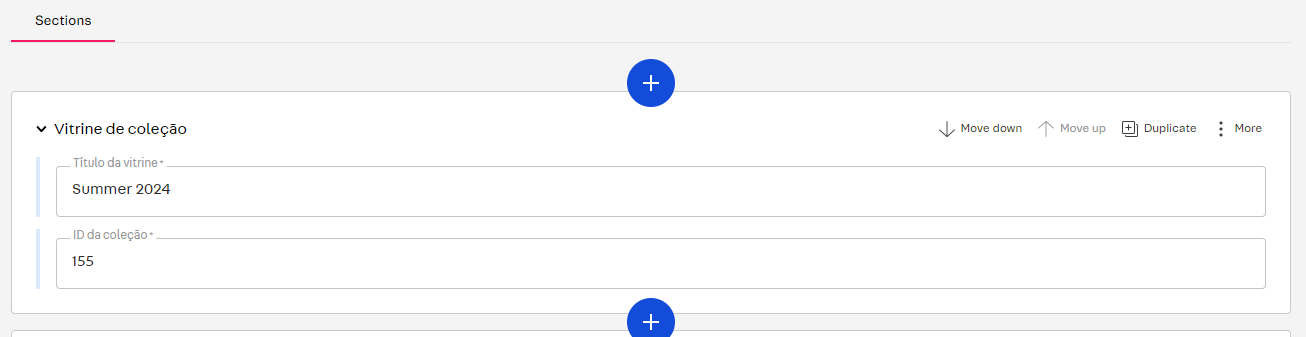
- Collection custom display: It will display products from a specified collection. Please add the following details:
- Custom display title: Name of the custom display as it will appear on the page.
- Collection ID: The collection identifier number that will be displayed on the page.
Activate the offer menu in VTEX Sales App
Access the technical settings of VTEX Sales App at:
https://{main_account}.myvtex.com/admin/portal/#/sites
- Click the button.
- Select the Code tab.
- Select the
checkout-instore-custom-jsfile in the side tab.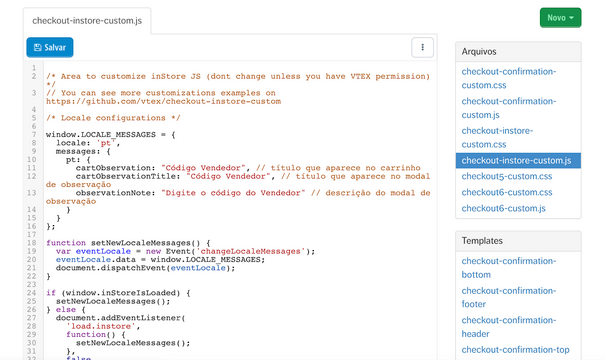
- In the
window.INSTORE_CONFIGobject, add the flagenableExplore: true,.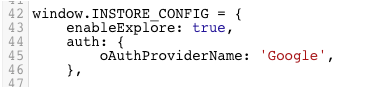
- Click
Save. - Optionally, you can set the offer page as the seller's homepage. To do this, add the flag
initialPage: 'advertisements',to thewindow.INSTORE_CONFIGobject.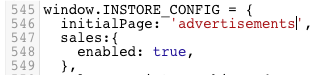


Accessing offers in VTEX Sales App
In VTEX Sales App, the seller will can access the offer page in two different ways:
-
Homepage: If the store administrator previously set the offer page as the seller's homepage, upon logging into the platform, the seller will be directed straight to the offer page. This configuration ensures that sellers are always up-to-date with relevant offers and promotions as soon as they access the system.
-
Explore Menu: If the offer page is not set as the seller's homepage, it can still be easily accessed through the Explore menu. To access the offer page, the seller should click the Explore menu. This will directly take the seller to the offer page, where they can view and interact with the available products and promotions.