For a product to be displayed on the product listing page, it needs to be available for sale, which happens when the following settings are correctly configured:
- The product and its SKUs are added to the Catalog.
- The product has a price.
- The logistics settings make it possible to ship the product to customers, which includes configuring the warehouse, loading dock, shipping policies, etc.
- Regarding inventory, the product must meet one of the following conditions:
- There is stock available for sale (reserved items are not considered available).
- Unlimited inventory is configured for the product.
- The option to display the product when it is sold out is active.
- The store Content Management System (CMS) templates are configured.
You must adjust one or more of these settings when a product is not displayed on the product listing page.
This article explains how to investigate and fix product unavailability errors on the product listing page. The sections are divided as follows:
After adjusting the product and SKU details or changing logistics settings, wait for the product to be indexed. You can track the status via the indexing queue in the VTEX Admin, under Catalog > Reports > Indexed Products. Once indexing is complete, we recommend accessing the product page on the store website using an anonymous browser tab to view the updated, uncached version.
There are cases in which the product is displayed on the product listing page but becomes unavailable when added to the cart. This may be due to different logistics configurations. Learn more in the article Which logistics settings can impact the product availability in the cart?.
Catalog
We recommend beginning the investigation with Catalog. To check the Catalog settings, follow the steps below.
-
Access the VTEX Admin and go to Products > Catalog > Products and SKUs to check the products listed in your store.
-
Find the product you want to display in the list, as illustrated below.

-
Follow the instructions described in the next sections to check this information:
Product
To check the product settings, you must follow the steps below.
-
In Products > Catalog > Products and SKUs, click
Updatenext to the product you want to check. -
Check the following information in the form:
-
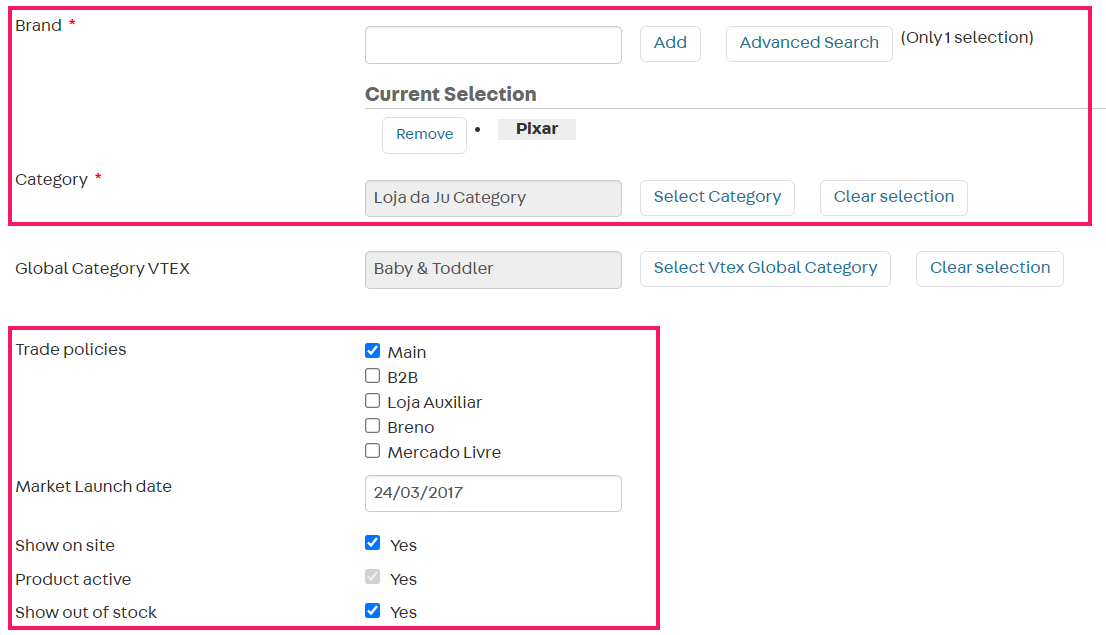
Brand: Check the brand associated with the product and make sure it is active.
-
Category: Check the category associated with the product and make sure it is active.
When adding a new product, you must associate it with a brand and a category that are active before it can be activated for the first time. However, once a product has been added and is active, deactivating the category and brand will not deactivate it completely. Products with inactive categories and brands become invisible in the store, which means they are not displayed in the search results and do not have their own pages. To make them unavailable, you must reset their quantity in stock to zero.
- Trade policies: Check if the product is associated with a trade policy. If it's not, use the selection box to choose the trade policy with which you want to associate it.
- Market launch date: Check if the date for the product launch on market is correct. If the date is set in the future, the product will only be displayed on the website at the mentioned date.
- Show on site: Check if the Yes option is selected. Otherwise, the product will not be displayed on the website.
- Product active: Check if the Yes option is selected. Otherwise, the product will not be displayed.
- Show out of stock: Check if the Yes option is selected — in this case, the expected behavior is that out-of-stock products will be shown in the store featuring a Notify me button. If this option is not enabled, the product may not be displayed in the store because it is not available in stock.
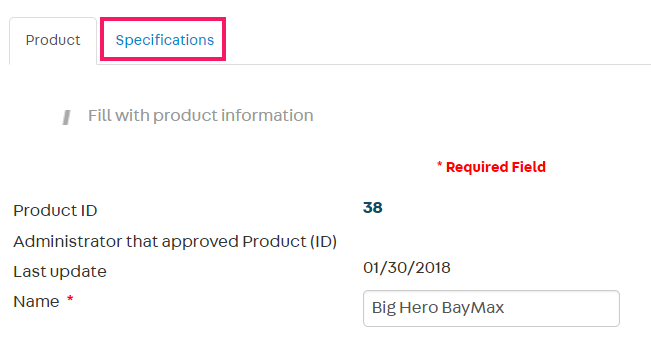
- If the product contains specifications, check the Specifications tab to see if they are filled in.
-
-
After each change, click
Save.
SKUs
On the SKUs page, in Products > Catalog > Products and SKUs, follow the instructions below to find out which field might be causing problems.
-
In Products > Catalog > Products and SKUs, find the SKU you want to investigate in the list.
Next to each SKU, you will find shortcuts that can help your investigation:
Button Description 
Allows you to access the Price list to check if the desired trade policy has a valid price associated with the product SKUs. For more information, check the Prices section. 
Allows you to access the Inventory management page to check if the SKU is available in stock. For more information, check the Logistics section. 
Allows you to view each **Seller ** selling the SKU, the trade policy (Policy), the price (Value) and the SKU quantity in inventory (Quantity). -
On the row displaying the product with the SKU you want to verify, click the down arrow , next to the
Updatebutton. -
Click the SKU option to access the SKUs detailed list.
-
In the Status column, check if the indicated situation is
Active. If the SKUs are active, go to step 7. -
If a SKU appears as
Inactive, clickUpdateto view the SKU detailed information.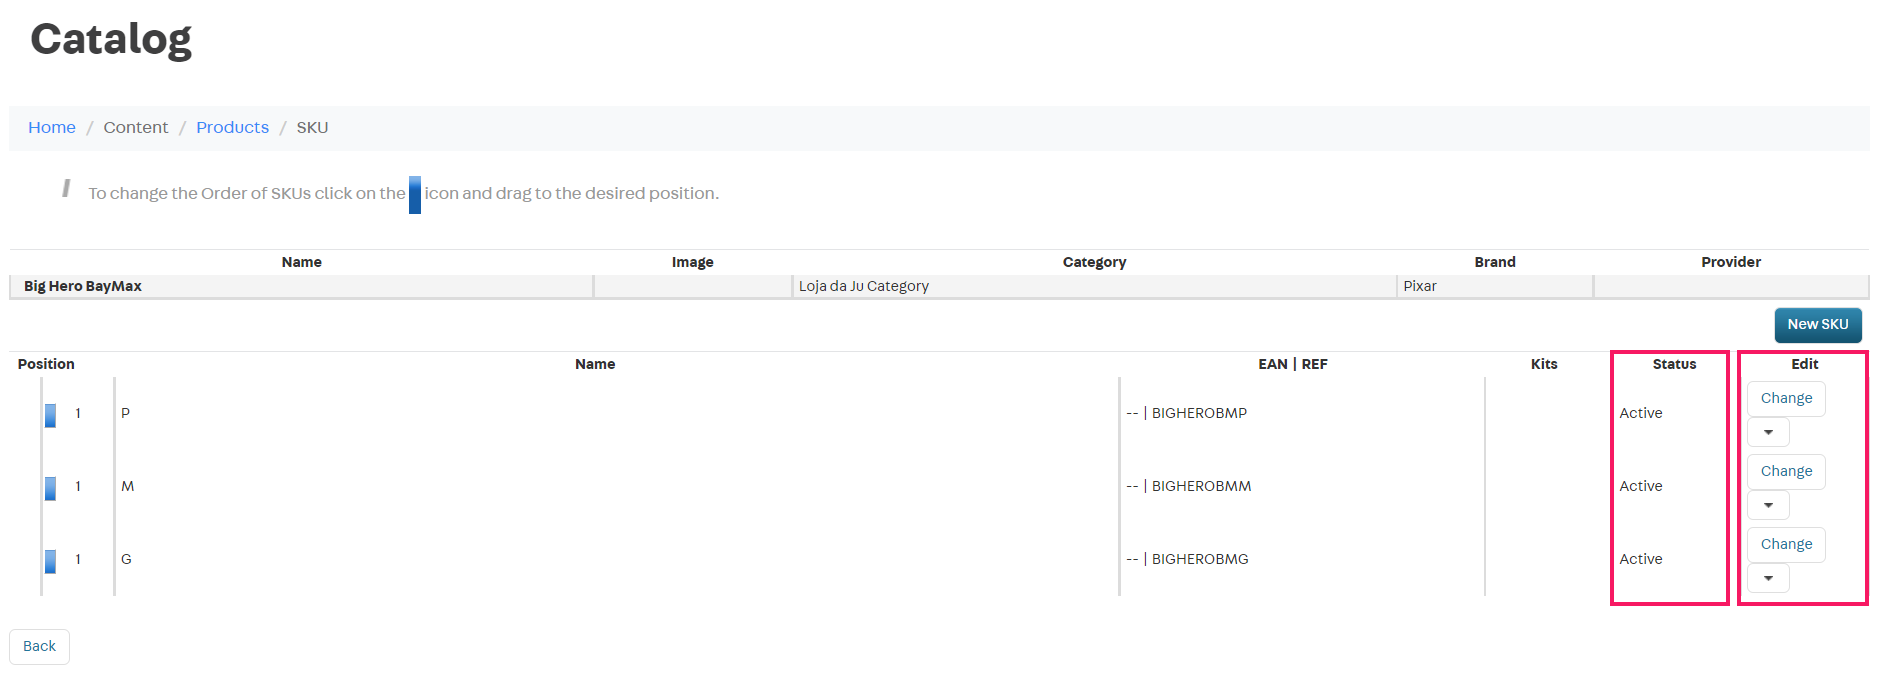
-
On the SKU information page, continue checking the items listed below.
- Activate SKU if possible: Check if this option is selected. Otherwise, the SKU will not be displayed. When you activate this option, you determine that the SKU will be activated if it meets the necessary requirements:
- Is associated with an active brand and category.
- Has at least one image associated with the SKU.
- Has the specifications filled out (if specifications have been added).
- If the SKU is a kit: It’s associated with an active component.
- SKU Activated?: Check if this option is enabled. Otherwise, the SKU will not be displayed.
- Activate SKU if possible: Check if this option is selected. Otherwise, the SKU will not be displayed. When you activate this option, you determine that the SKU will be activated if it meets the necessary requirements:
-
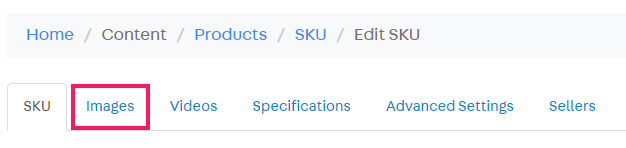
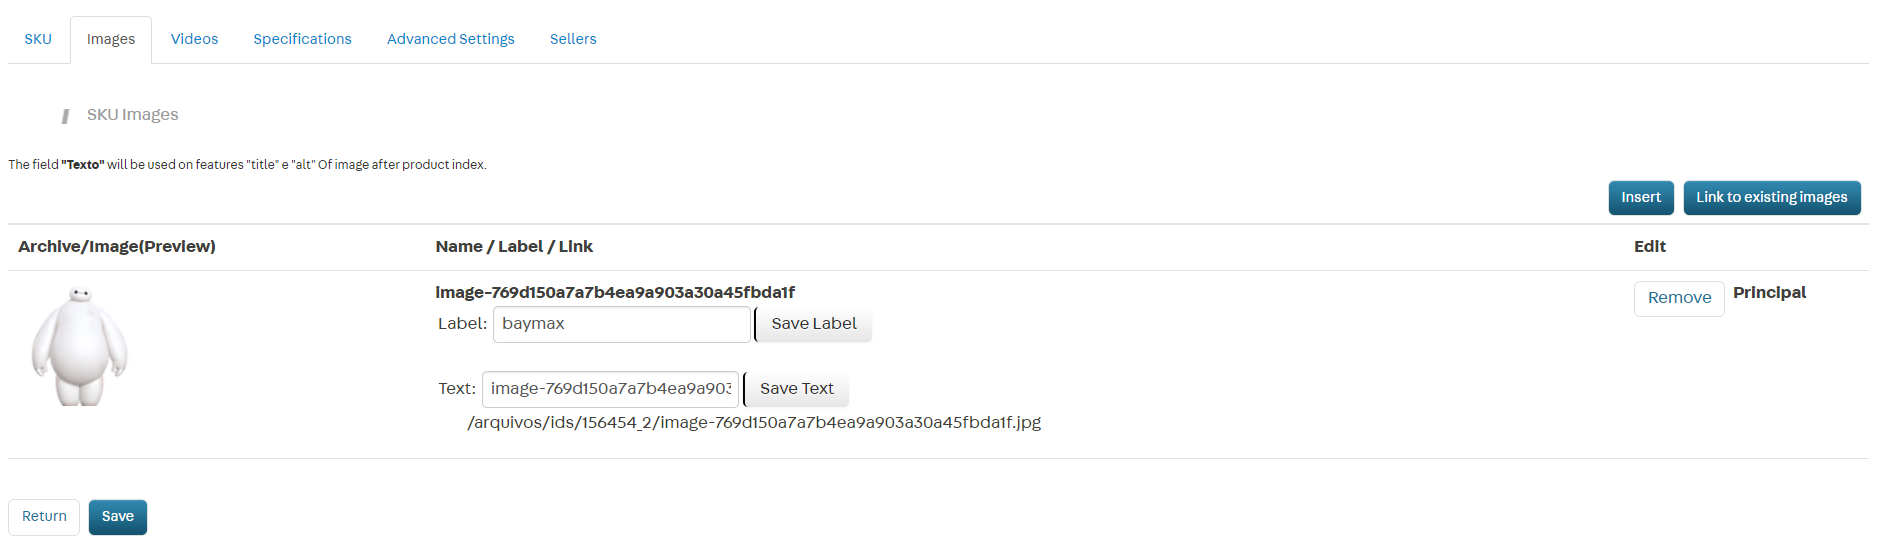
Click the Images tab.
-
Check if the SKU contains at least one image. If it does not, the SKU will not be activated — follow the next step to correct this problem.
-
Click
Insertto upload a new image. If you prefer, clickAssociate existing imagesto include an image already used for another SKU.
Indexed Info
For a product to be displayed on the website, it needs to be indexed. The Catalog indexer allows you to view detailed information about each product and SKU indexing, following the steps below.
- In Products > Catalog > Products and SKUs, find in the list the SKU you want to investigate.
- On the row of the desired SKU, click the down arrow next to the
Editbutton. - Click the Indexed info option to check information on the product indexing.
The indexing list displays each product SKU status. If any issue is detected, the index indicates SKU is UNAVAILABLE and mentions the cause of error.
In the example below, you can conclude that the SKU is unavailable because there are no items in stock:

Based on this information, you can take action to correct the issue. In this example, you should adjust the item quantity in stock in the Logistics system.
An active SKU without errors will appear in the index, similar to the one illustrated below:

If no reason is given for the product’s unavailability and if you do not find any issues in the product/SKUs, reindexing the product may solve the problem. To do this, you can edit one of the fields within the product or SKUs information page and save the changes. This will force a reindexing.
Prices
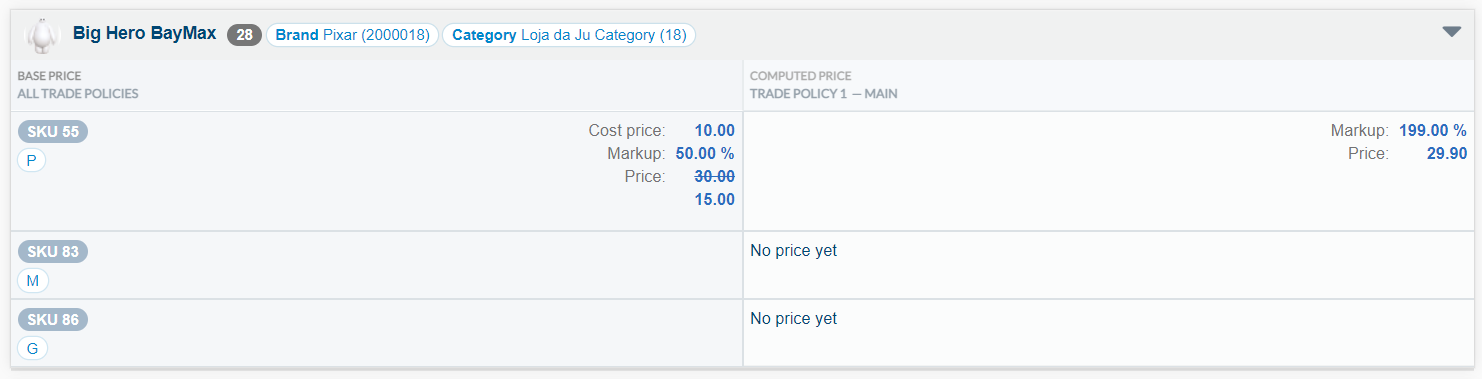
In the Prices module, it's important to verify if your product SKU contains base prices.
- Access Products > Prices > Price list.
- Check each SKU row and the column corresponding to the desired trade policy.
- If a price is displayed, the issue is not in the Prices module, so you can jump the next steps in this section.
- But if the displayed information is No price yet, this means that you must create a base price.
In the example illustrated below, there are two SKUs without a base price. This is why there is no calculated price in the trade policy column — only the information No price yet is displayed.
Creating a base price
To create a base price in the VTEX Admin, follow the steps below:
-
In Products > Prices > Price list, click the row of the desired SKU, in the first column. A side bar will be displayed.
-
In the Cost price field, fill in the SKU cost.
-
In the Initial markup field, fill in the profit percentage you will obtain from selling the SKU.
The base price will be automatically calculated based on the data provided in the previous steps.
-
Click
Xor in the area outside the side bar to save the price.
You can also create base prices using a spreadsheet or the Pricing API. For more information, please see the steps described in the article Adding a base price.
Logistics
Different aspects of logistics can cause the product's unavailability on the product listing page. The product may be unavailable because the store shipping strategy does not allow shipping to the customer's location or because there is not enough quantity of the product in the inventory.
If the product is displayed as available on the product listing page but becomes unavailable when added to the cart, see the article Which logistics settings can impact the product availability in the cart?.
Shipping Simulator
One way to test if there is a feasible delivery route is using the Shipping Simulator to validate the store's logistical settings and check your inventory.
To simulate shipping an item to a location, in the VTEX Admin, go to Shipping > Shipping Simulator. You can find the instructions in the article Shipping Simulator.
When investigating the availability of an item through the Shipping Simulator, we recommend using an address covered by all your shipping policies. If the item is unavailable for this location, it won't be available for any other.
When the logistics settings for the shipping policy, warehouse, and loading dock are configured correctly, and the shipping policy covers the customer's location, the item may not be displayed on the product listing page due to its inventory, as explained below.
Inventory
By adopting any of the following inventory strategies, you can ensure product availability on the product listing page:
- Ensure sufficient item count for sales (reserved items are not considered available).
- In the VTEX Admin, go to Catalog > Inventory > Inventory Management, change the value in the Update Count column in the product row, and click
Save.
- In the VTEX Admin, go to Catalog > Inventory > Inventory Management, change the value in the Update Count column in the product row, and click
- Activate the unlimited inventory option for the product.
- In the VTEX Admin, go to Catalog > Inventory > Inventory Management, activate the toggle in the Unlimited inventory column in the product row, and click
Save.
- In the VTEX Admin, go to Catalog > Inventory > Inventory Management, activate the toggle in the Unlimited inventory column in the product row, and click
- Configure the product to be displayed on the product listing page when out of stock.
- In the VTEX Admin, go to Catalog > All Products, and click a product to go to its configuration page. In the Product tab, check the
Yesoption in theShow when out of stockfield.
- In the VTEX Admin, go to Catalog > All Products, and click a product to go to its configuration page. In the Product tab, check the
If future inventory is configured for the SKU, the supply of this item could take longer than expected. In this period, the product unavailability on the product listing page could be due to a lack of stock.
If your store has franchise accounts, for the inventory of these accounts to be available for sale, the products must be linked to the same trade policy used in your storefront.
CMS
If your product is still not visible on the website even after checking all the Catalog, Prices and Logistics settings, you must check your store CMS. See below to learn how to investigate if your store's binding is correct and check the specific settings for Legacy CMS Portal and VTEX IO.
To perform the CMS investigation described below, you must ask your store's developer team for support.
Binding
Regardless of which CMS your store uses — Legacy Portal or VTEX IO — you must confirm that the binding is configured, i.e. that your website and its folder structure are correctly associated with your VTEX account.
-
In the VTEX Admin, go to CMS > Layout.
-
Click the CMS folder.
-
Click the Sites and channels folder.
-
Check the color of the icon displayed next to your website's name.
If the icon is blue, it means the binding is correct, you don’t need to do anything.
If the icon is yellow, there is an error in the binding. In this case, you must follow the steps in the article Website with error: how to fix it? to correct the error.
Legacy CMS Portal
If your store uses the CMS Legacy Portal, we recommend that your store's developers check if the product search result control (<vtex.cmc:searchResult/>) is being used in the page templates for Department, Category and Search, in CMS > Layout. If not, the products will not be displayed.
CMS VTEX IO
If your store is developed with VTEX IO, your store's developers must check the Pages settings and the blocks declared in the store templates.
Pages
In CMS > Pages > Pages, it is important to check if the page uses a custom template, because it allows using a template declared in the code with a different name and URL.
Follow the steps below to check the template your page is using.
-
In CMS > Pages > Pages, click the pencil icon on the row of the page you want to verify.
-
Scroll down to the Templates section.
-
Check the template name in the Default field and in the Conditional field, if available.
In the example below, the default template is
vtex.curbside-pickup@0.x:store.curbside-pickupand there is no conditional template.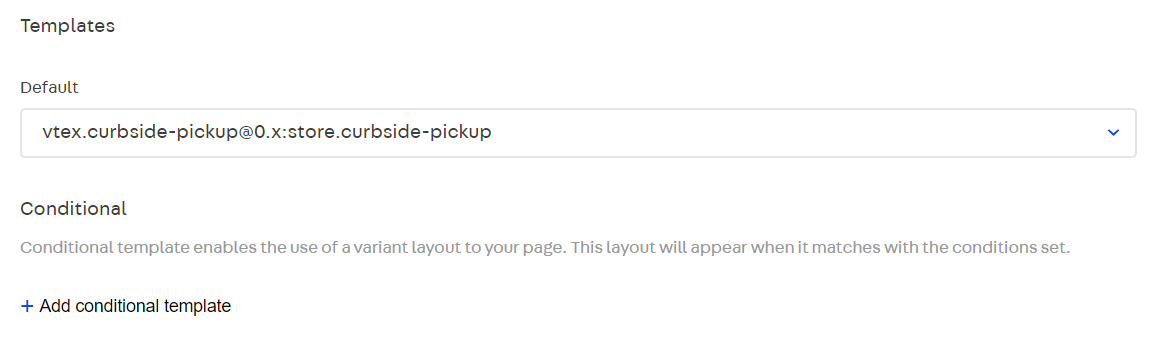
-
Next, you must check the blocks declared in the used template, as described in Templates.
Templates
For stores developed with VTEX IO, you need to check the following items in your store theme files.
- Check if the product page (
product.jsonc) is declared with all the necessary blocks for a correct functioning —product-images,product-price,product-nameandbuy-button— as described on the Product page. - Check if the Search Result app and its
search-result-layoutblock are properly declared in the template code, as indicated in the Search Result documentation.