Menú
Feedback
Comienza aquí
Tutoriales


Tutoriales
Integraciones
Creando un Canal de Slack
2 min de lectura

Aprende a crear un canal en Slack

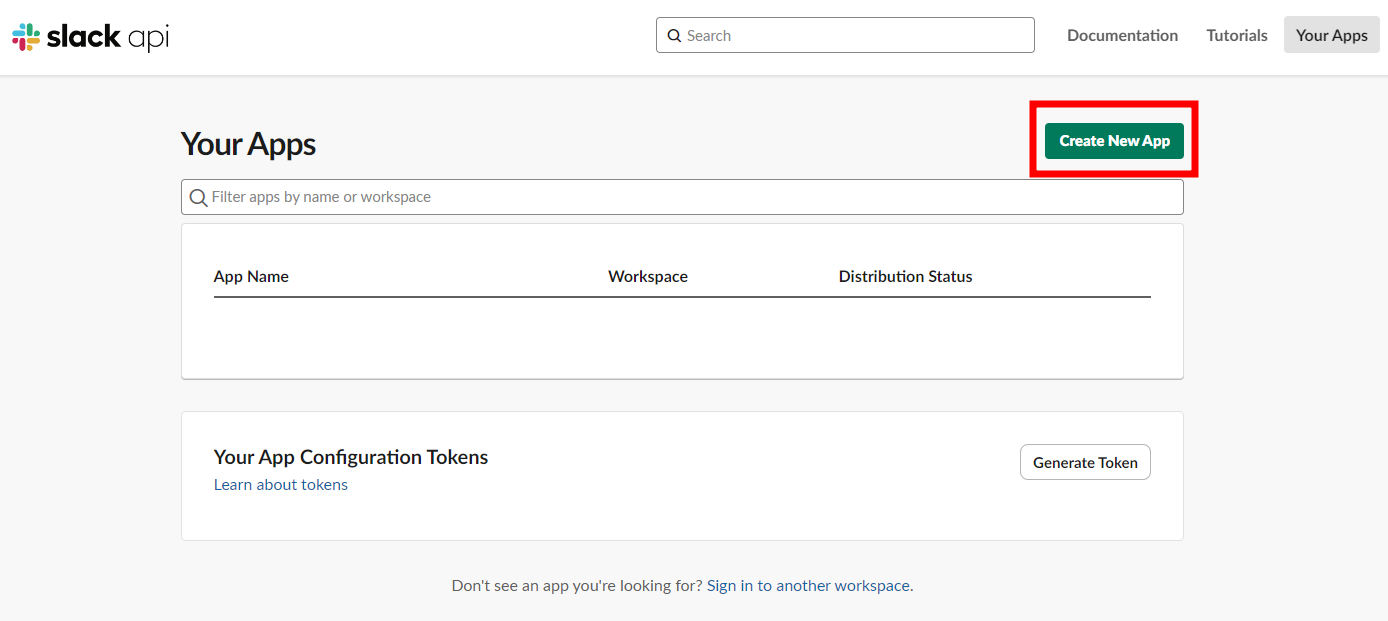
  1. Con tu cuenta y workspace ya creados, accede a https://api.slack.com/apps y pulsa el botón para crear una nueva aplicación.

{"base64":"data:image/png;base64,iVBORw0KGgoAAAANSUhEUgAAAAQAAAACCAIAAADwyuo0AAAACXBIWXMAAAsTAAALEwEAmpwYAAAAJUlEQVR4nAEaAOX/AH9/f9zc3IaFhSMiIgC9vb3MzMzd3d7Q0NC5dQ+sjI8bPQAAAABJRU5ErkJggg==","img":{"src":"https://raw.githubusercontent.com/vtexdocs/help-center-content/refs/heads/main/docs/es/tutorials/weni-by-vtex/integraciones/creando-un-canal-de-slack_1.png","width":1388,"height":621,"type":"png"}}

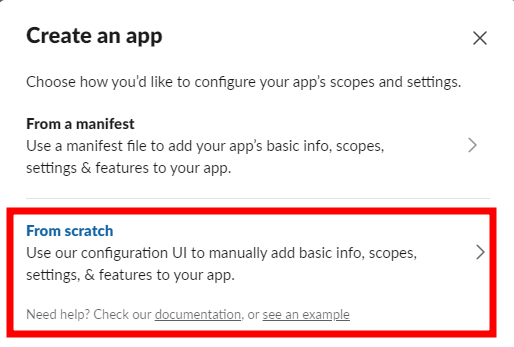
  1. Selecciona la opción From scratch.

{"base64":"data:image/png;base64,iVBORw0KGgoAAAANSUhEUgAAAAQAAAADCAIAAAA7ljmRAAAACXBIWXMAAAsTAAALEwEAmpwYAAAAMElEQVR4nGNobmnZtm3bh8+fX71+zaCrqBwXHNxRUzOvv59BVVAoytu7KisnOywMAI9xEZT6vm4iAAAAAElFTkSuQmCC","img":{"src":"https://raw.githubusercontent.com/vtexdocs/help-center-content/refs/heads/main/docs/es/tutorials/weni-by-vtex/integraciones/creando-un-canal-de-slack_2.png","width":514,"height":347,"type":"png"}}

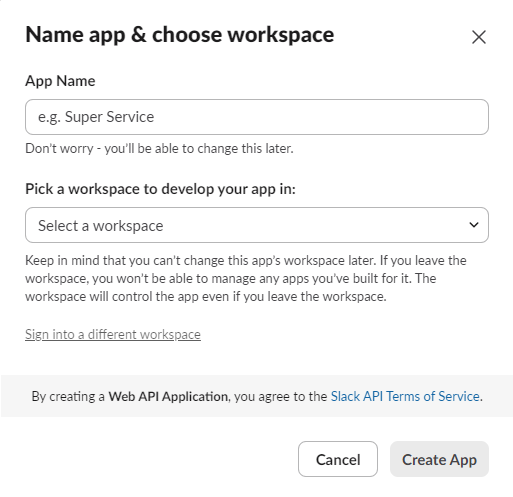
  1. Nombra la aplicación y selecciona el workspace.

{"base64":"data:image/png;base64,iVBORw0KGgoAAAANSUhEUgAAAAQAAAAECAIAAAAmkwkpAAAACXBIWXMAAAsTAAALEwEAmpwYAAAAOklEQVR4nGNQUlLS09NrbGx89+4dgwcYrFu37u7dOwx6enri4uJhYWH79u1jWL9+w7p163p6exOTkgEdjBZ96l8qKQAAAABJRU5ErkJggg==","img":{"src":"https://raw.githubusercontent.com/vtexdocs/help-center-content/refs/heads/main/docs/es/tutorials/weni-by-vtex/integraciones/creando-un-canal-de-slack_3.png","width":513,"height":497,"type":"png"}}

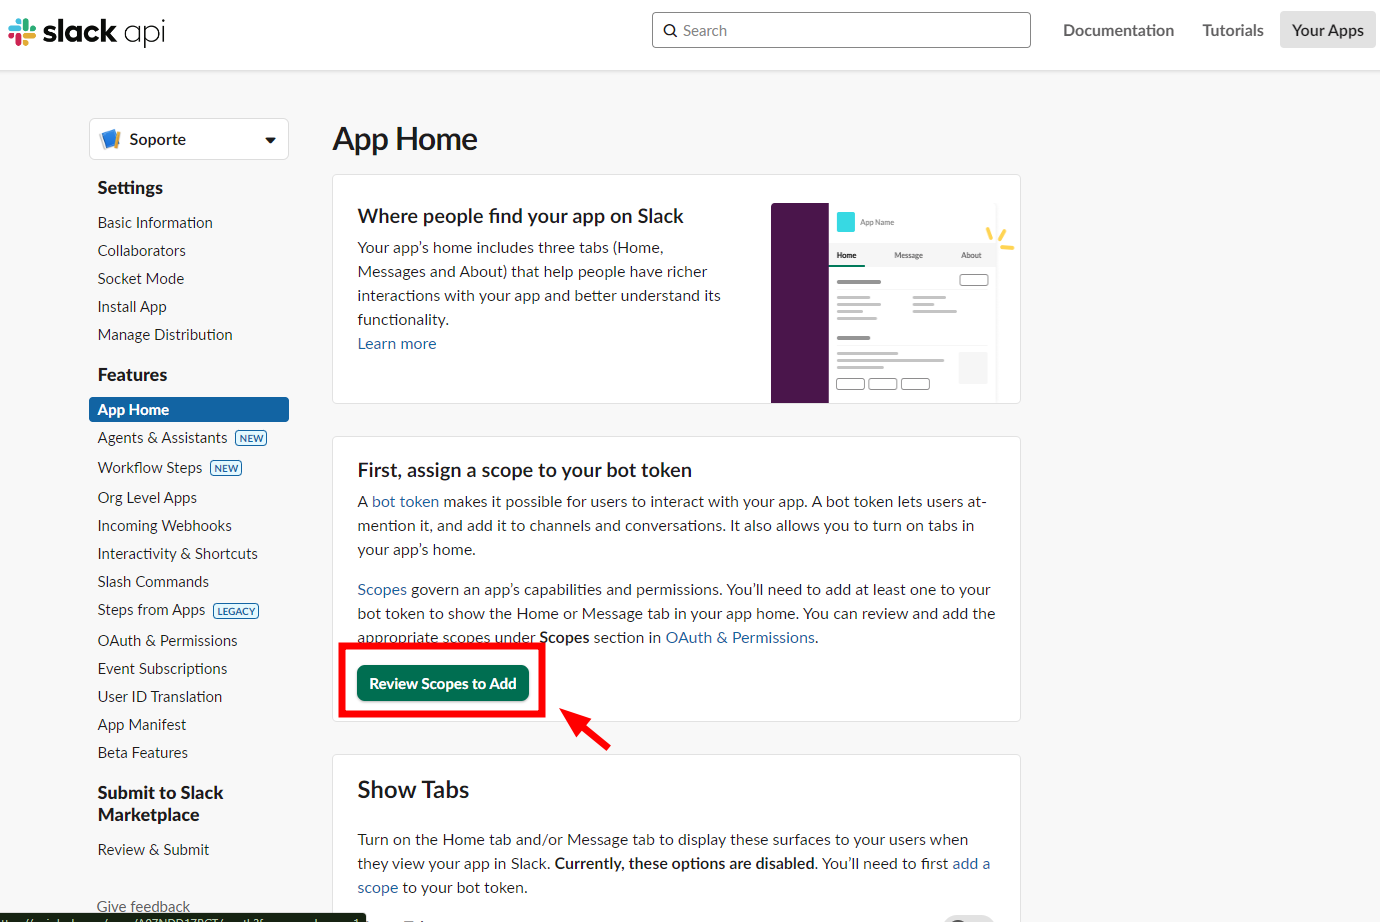
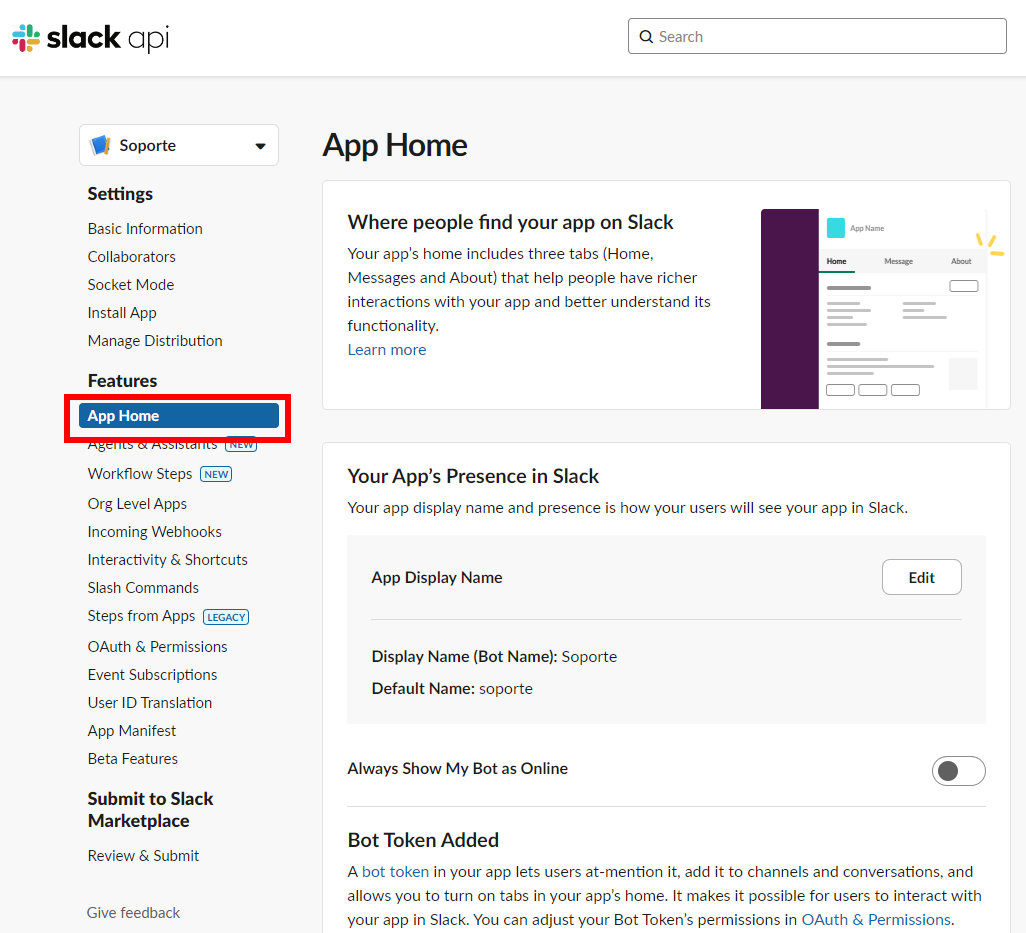
  1. En App Home, haz clic en el botón indicado.

{"base64":"  ","img":{"width":1380,"height":922,"type":"png","mime":"image/png","wUnits":"px","hUnits":"px","length":146161,"url":"https://raw.githubusercontent.com/vtexdocs/help-center-content/refs/heads/main/docs/es/tutorials/weni-by-vtex/integraciones/creando-un-canal-de-slack_4.png"}}

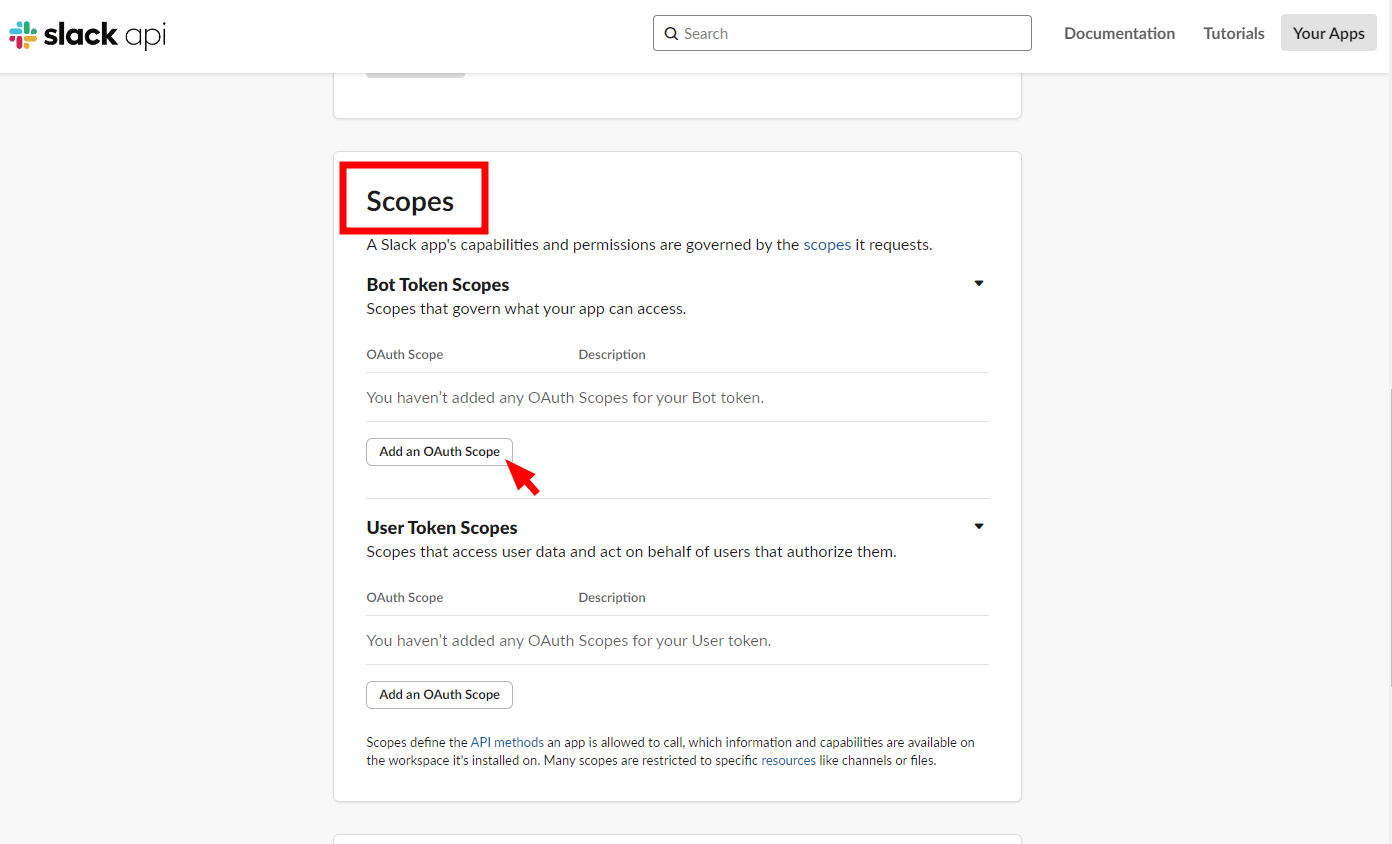
  1. Se abrirá una nueva ventana, desplázate hacia abajo hasta **Scopes** y haz clic en el botón indicado.

{"base64":"  ","img":{"width":1392,"height":844,"type":"png","mime":"image/png","wUnits":"px","hUnits":"px","length":81475,"url":"https://raw.githubusercontent.com/vtexdocs/help-center-content/refs/heads/main/docs/es/tutorials/weni-by-vtex/integraciones/creando-un-canal-de-slack_5.png"}}

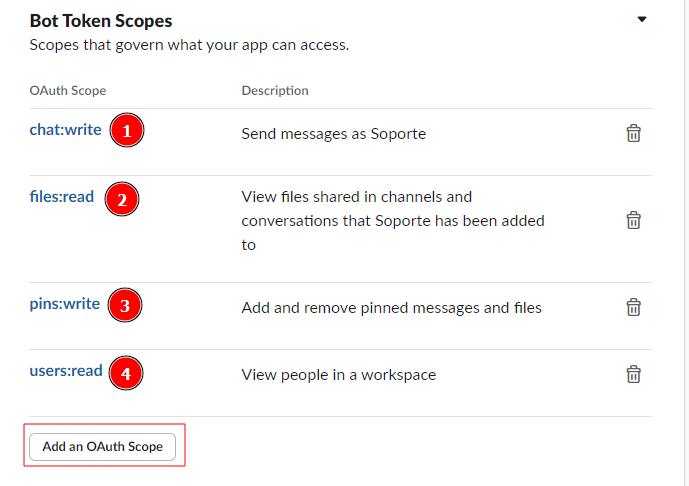
  1. Para el Bot Token Scopes, añade los siguientes permisos: chat:writefiles:readfiles:writeusers:read.

{"base64":"data:image/png;base64,iVBORw0KGgoAAAANSUhEUgAAAAQAAAADCAIAAAA7ljmRAAAACXBIWXMAAAsTAAALEwEAmpwYAAAAL0lEQVR4nGMQ5OYuKy29dfv2u3fvGEy1taPCwmrr6s6dO8dgYWi0bcuWV69fA2UAXmYUmV6svuYAAAAASUVORK5CYII=","img":{"src":"https://raw.githubusercontent.com/vtexdocs/help-center-content/refs/heads/main/docs/es/tutorials/weni-by-vtex/integraciones/creando-un-canal-de-slack_6.png","width":689,"height":486,"type":"png"}}

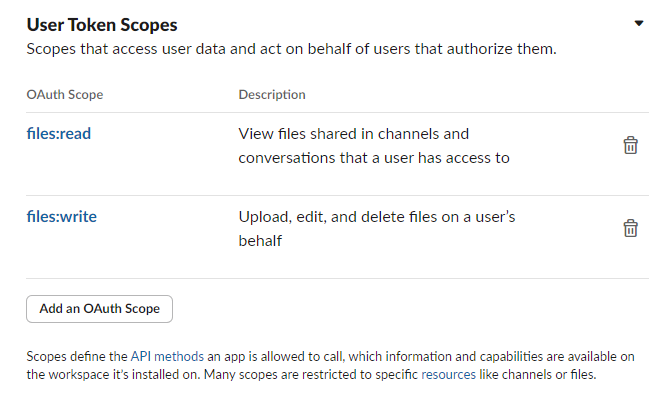
  1. Para el User Token Scopes, añade los siguientes permisos: files:read e files:write.

{"base64":"data:image/png;base64,iVBORw0KGgoAAAANSUhEUgAAAAQAAAACCAIAAADwyuo0AAAACXBIWXMAAAsTAAALEwEAmpwYAAAAIklEQVR4nGOIj4+PjY319PA8d+4cQ3x8vKeHp6mp6fz58wF/IwnsNjfncAAAAABJRU5ErkJggg==","img":{"src":"https://raw.githubusercontent.com/vtexdocs/help-center-content/refs/heads/main/docs/es/tutorials/weni-by-vtex/integraciones/creando-un-canal-de-slack_7.png","width":670,"height":401,"type":"png"}}

  1. Desplázate hacia arriba hasta encontrar el botón Install to Workspace y haz clic en él para instalar la aplicación del bot en tu workspace.

{"base64":"  ","img":{"width":981,"height":836,"type":"png","mime":"image/png","wUnits":"px","hUnits":"px","length":106602,"url":"https://raw.githubusercontent.com/vtexdocs/help-center-content/refs/heads/main/docs/es/tutorials/weni-by-vtex/integraciones/creando-un-canal-de-slack_8.png"}}

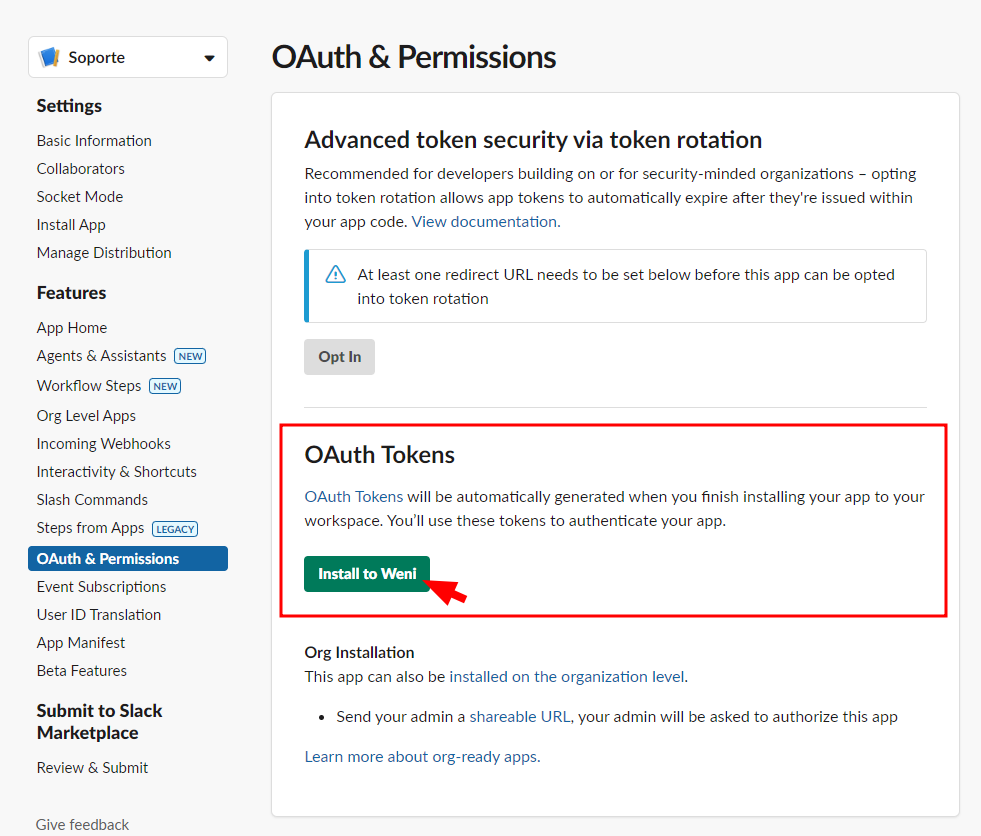
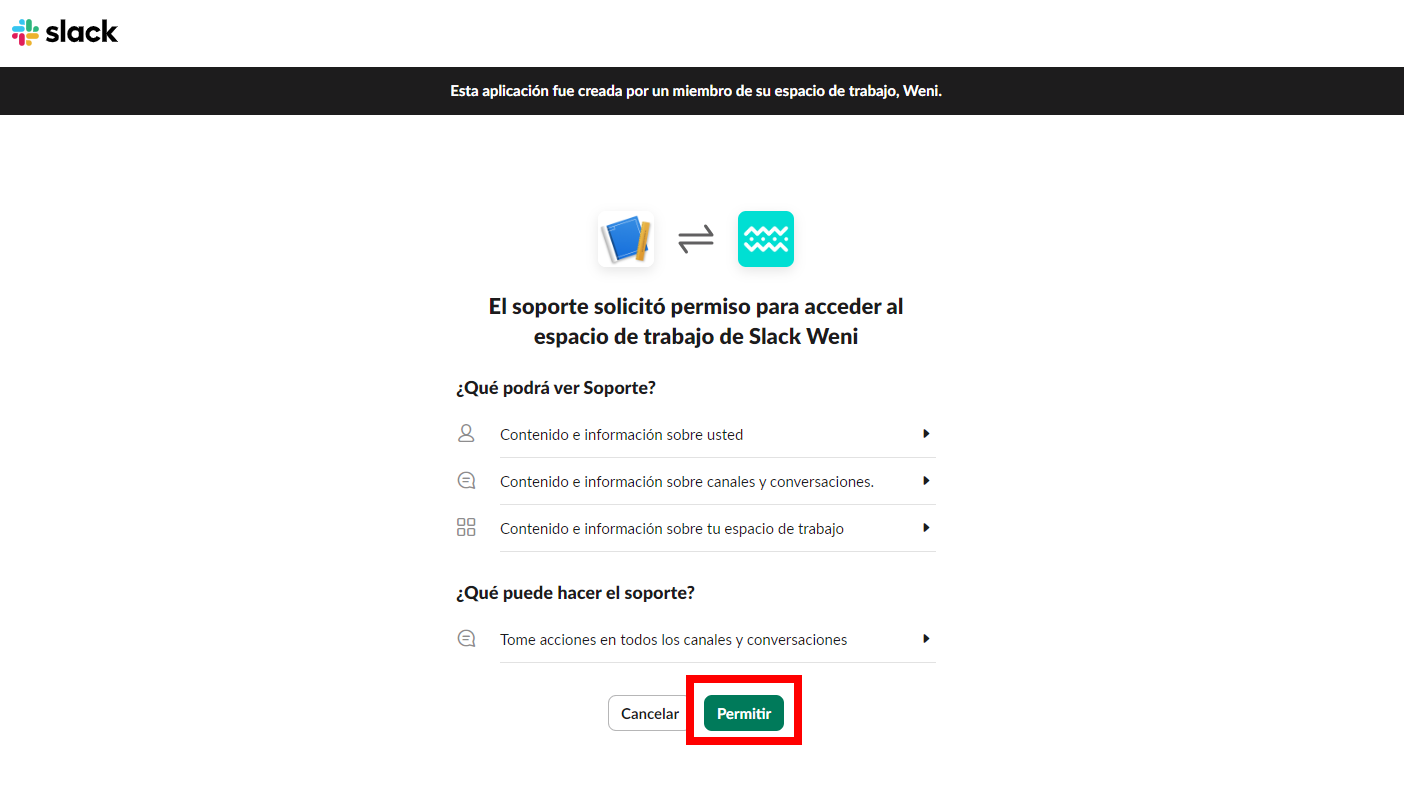
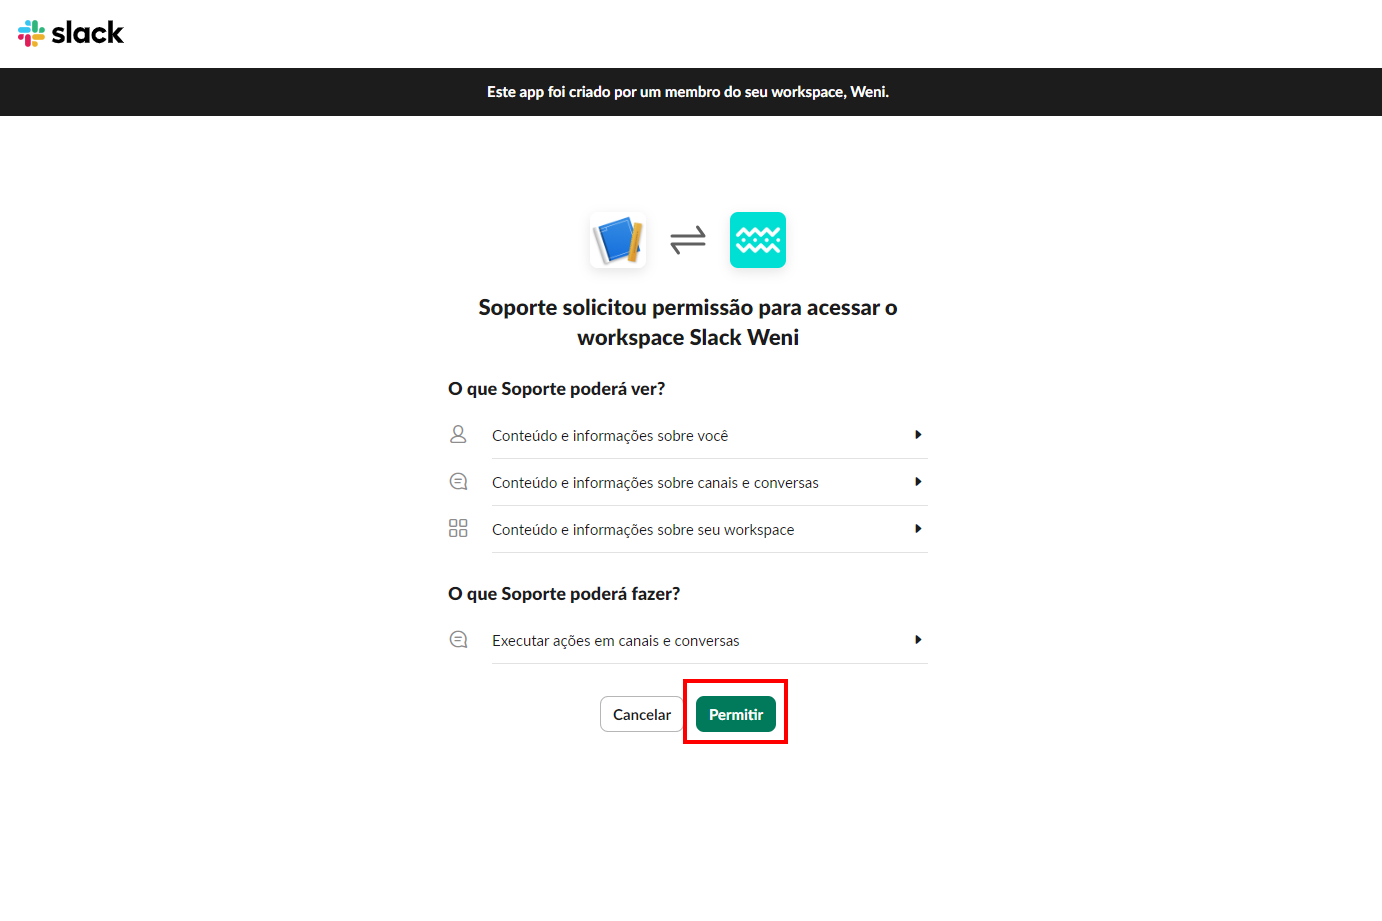
  1. Se abrirá una nueva ventana. Haz clic en el botón Permitir.

{"base64":"data:image/png;base64,iVBORw0KGgoAAAANSUhEUgAAAAQAAAACCAIAAADwyuo0AAAACXBIWXMAAAsTAAALEwEAmpwYAAAAI0lEQVR4nGMwNjbm5uUVlZBwcLBn+P///+5du3bv2vX//38AZMAMG47uR20AAAAASUVORK5CYII=","img":{"src":"https://raw.githubusercontent.com/vtexdocs/help-center-content/refs/heads/main/docs/es/tutorials/weni-by-vtex/integraciones/creando-un-canal-de-slack_9.png","width":1404,"height":789,"type":"png"}}

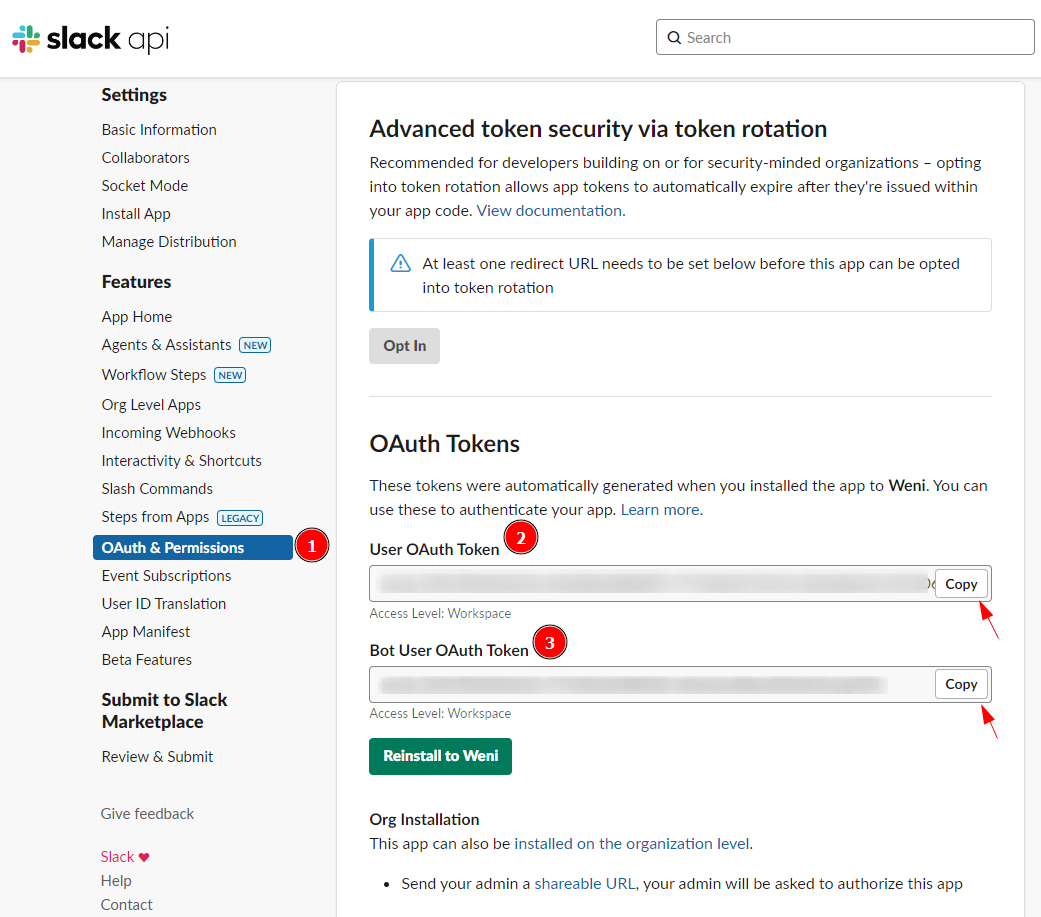
  1. En OAuth & Permissions, copia y guarda el Bot User OAuth Token y el User OAuth Token.

{"base64":"data:image/png;base64,iVBORw0KGgoAAAANSUhEUgAAAAQAAAAECAIAAAAmkwkpAAAACXBIWXMAAAsTAAALEwEAmpwYAAAAPUlEQVR4nGNoa2u9eu3aypUrb9y4wRAVHVNYWHTgwIGPHz8yqKhpcnJxdbS0gGTWr11bUllx7MSJr1++AADu3B1XZM2pJQAAAABJRU5ErkJggg==","img":{"src":"https://raw.githubusercontent.com/vtexdocs/help-center-content/refs/heads/main/docs/es/tutorials/weni-by-vtex/integraciones/creando-un-canal-de-slack_10.png","width":1041,"height":917,"type":"png"}}

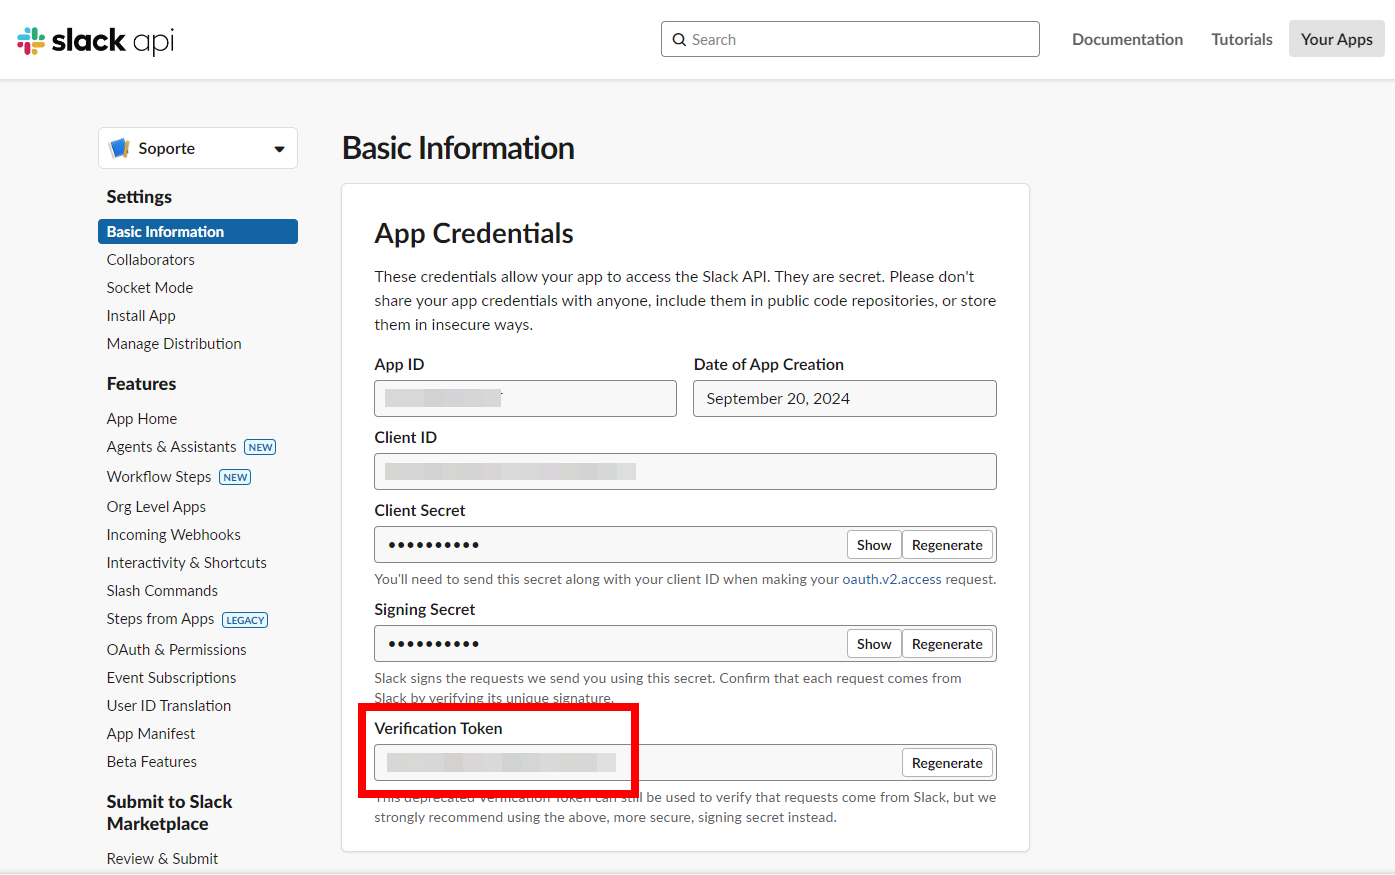
  1. En Basic Information, copia y guarda el Verification Token.

{"base64":"data:image/png;base64,iVBORw0KGgoAAAANSUhEUgAAAAQAAAADCAIAAAA7ljmRAAAACXBIWXMAAAsTAAALEwEAmpwYAAAAMElEQVR4nGOIiU88dfr0////r1y5wqBnYODh4XHgwIHnz58zZGZmqsnJXblyBcgBAK7HFh8ZK09WAAAAAElFTkSuQmCC","img":{"src":"https://raw.githubusercontent.com/vtexdocs/help-center-content/refs/heads/main/docs/es/tutorials/weni-by-vtex/integraciones/creando-un-canal-de-slack_11.png","width":1395,"height":875,"type":"png"}}

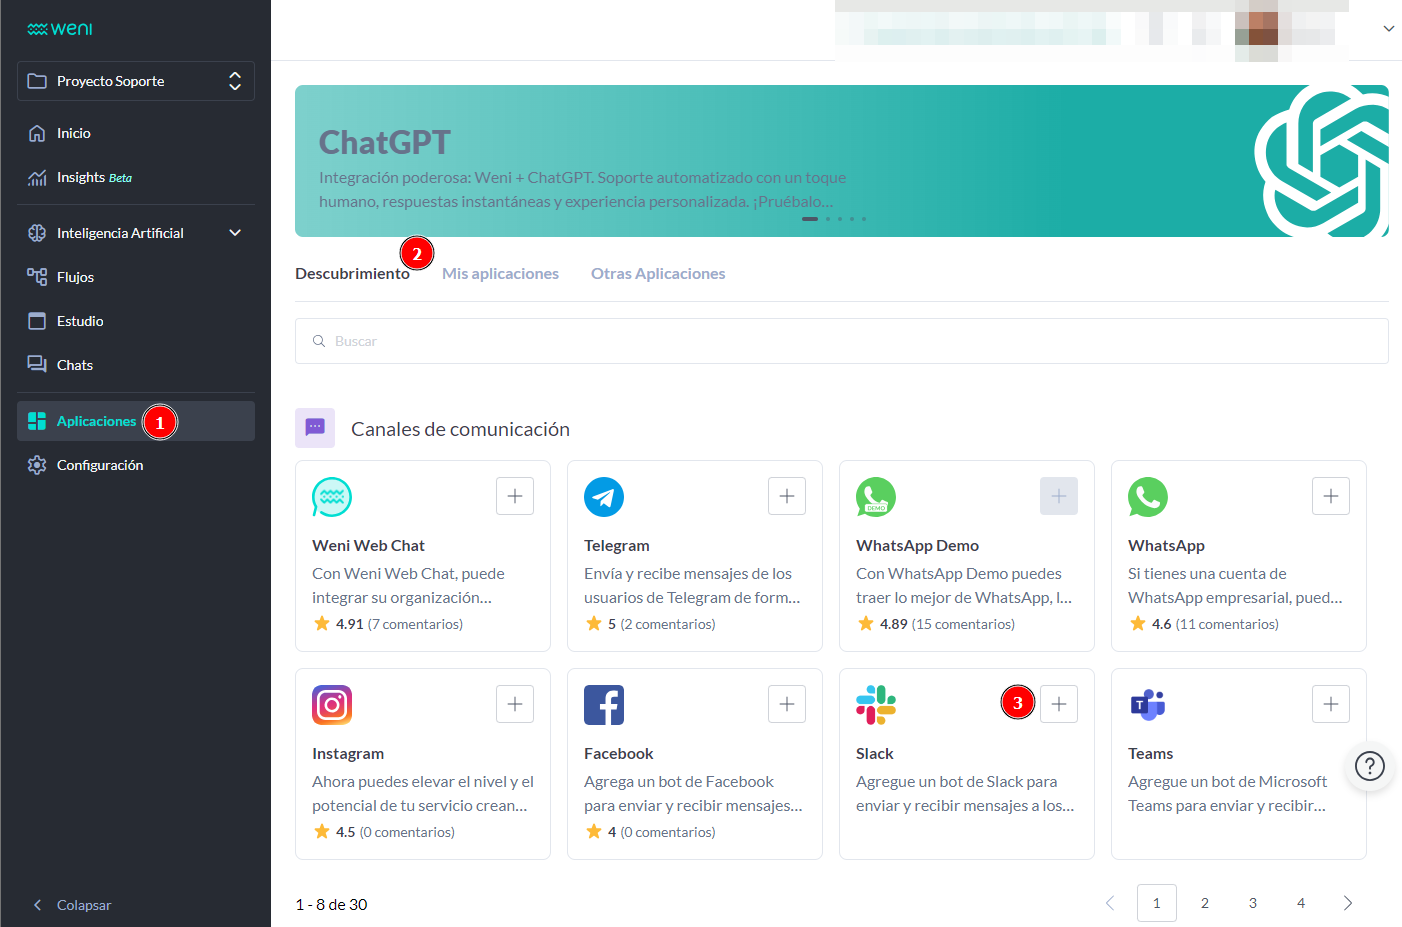
  1. En la plataforma, accede a tu proyecto, haz clic en Aplicaciones > Descubrimientos > App Slack > Añadir.

{"base64":"  ","img":{"width":1402,"height":927,"type":"png","mime":"image/png","wUnits":"px","hUnits":"px","length":200183,"url":"https://raw.githubusercontent.com/vtexdocs/help-center-content/refs/heads/main/docs/es/tutorials/weni-by-vtex/integraciones/creando-un-canal-de-slack_12.png"}}

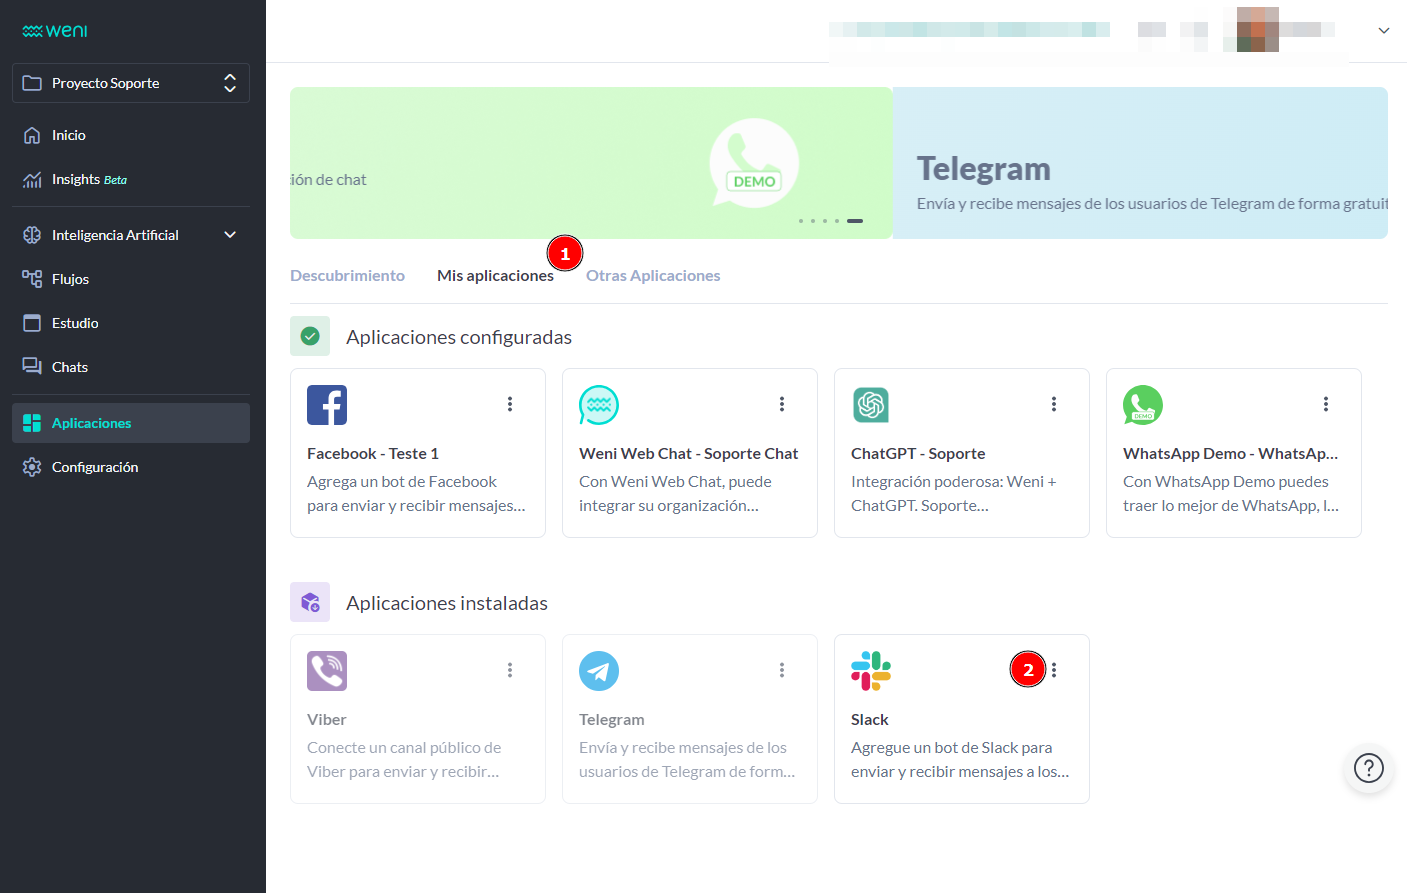
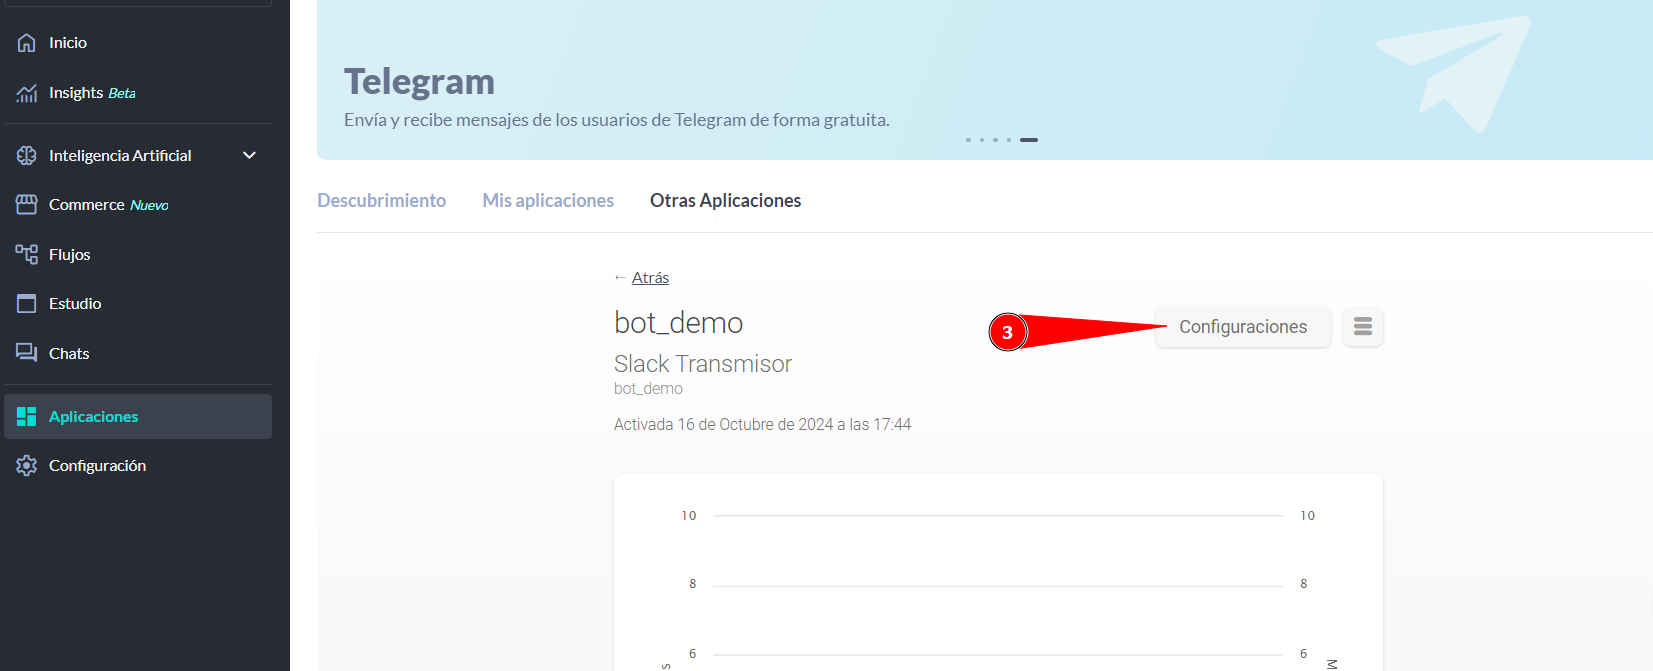
  1. Después de añadir la aplicación, ve a Mis Aplicaciones y haz clic en el App. Se abrirá una nueva ventana.

{"base64":"  ","img":{"width":1407,"height":893,"type":"png","mime":"image/png","wUnits":"px","hUnits":"px","length":204362,"url":"https://raw.githubusercontent.com/vtexdocs/help-center-content/refs/heads/main/docs/es/tutorials/weni-by-vtex/integraciones/creando-un-canal-de-slack_13.png"}}

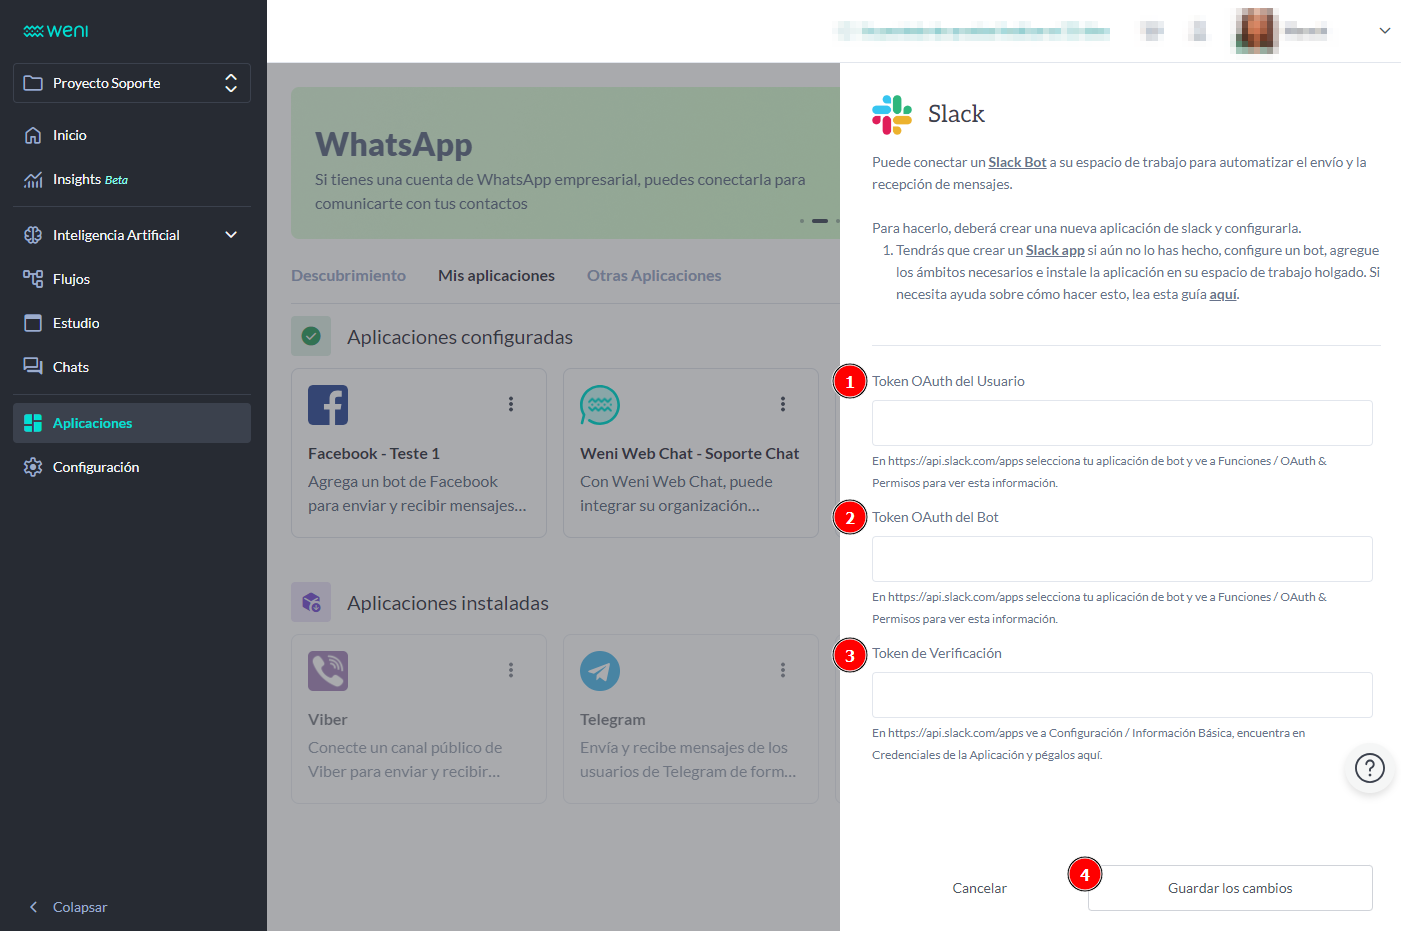
  1. Rellena el formulario con la información que copiaste durante la configuración del bot en Slack.

{"base64":"data:image/png;base64,iVBORw0KGgoAAAANSUhEUgAAAAQAAAADCAIAAAA7ljmRAAAACXBIWXMAAAsTAAALEwEAmpwYAAAAMElEQVR4nGPgE5Xsnznp9MWzv37+YmBgEyosLj+w/8D///8ZGFgE6+pbTpw4AeQAAHKTFOddI3vcAAAAAElFTkSuQmCC","img":{"src":"https://raw.githubusercontent.com/vtexdocs/help-center-content/refs/heads/main/docs/es/tutorials/weni-by-vtex/integraciones/creando-un-canal-de-slack_14.png","width":1401,"height":931,"type":"png"}}

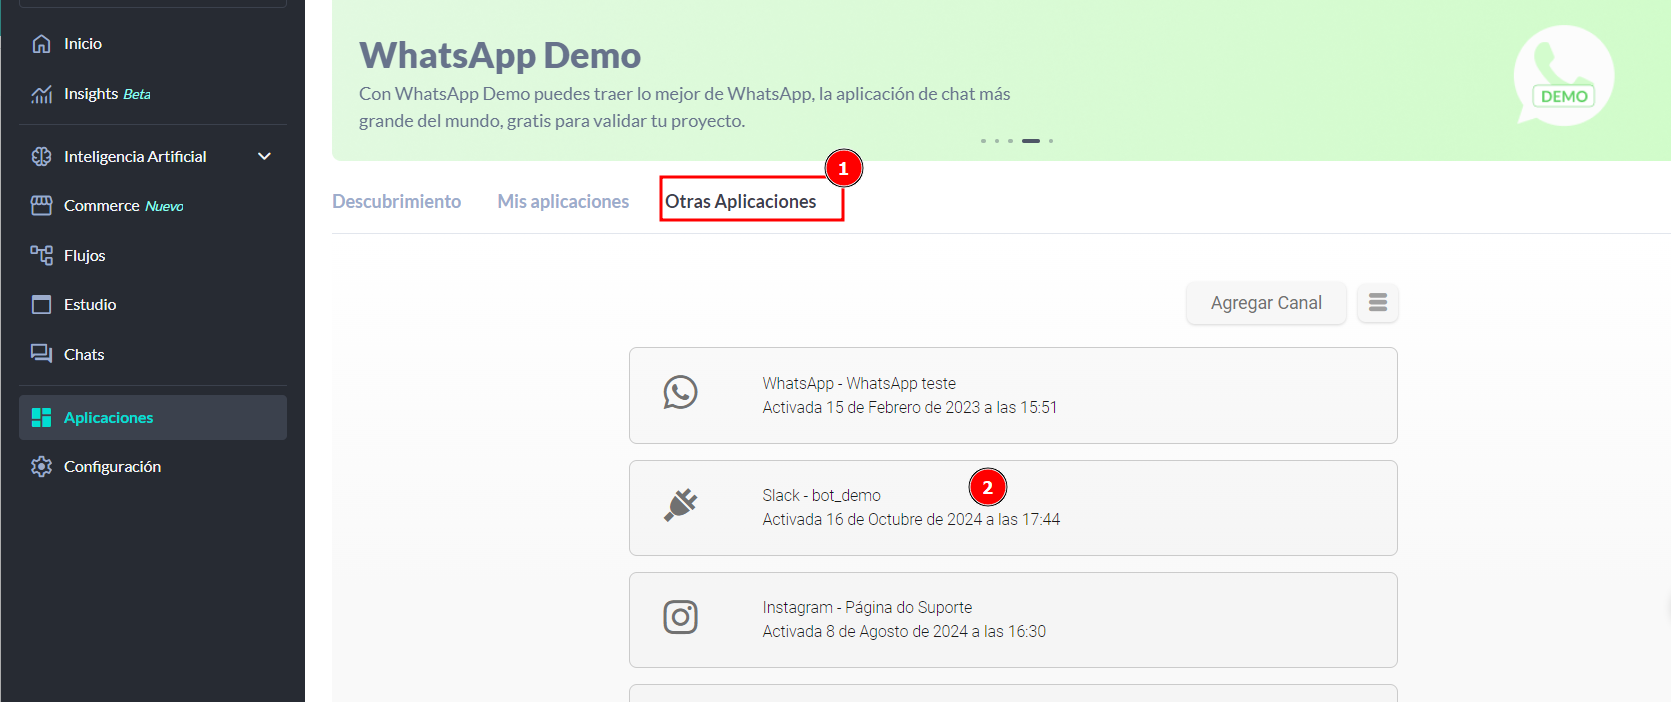
  1. Después de completar el formulario de registro, copia la URL que aparecerá en la pantalla de configuración del canal en la pestaña ""Otras aplicaciones"".

{"base64":"  ","img":{"width":1671,"height":702,"type":"png","mime":"image/png","wUnits":"px","hUnits":"px","length":213675,"url":"https://raw.githubusercontent.com/vtexdocs/help-center-content/refs/heads/main/docs/es/tutorials/weni-by-vtex/integraciones/creando-un-canal-de-slack_15.png"}}

{"base64":"  ","img":{"width":1653,"height":671,"type":"png","mime":"image/png","wUnits":"px","hUnits":"px","length":107226,"url":"https://raw.githubusercontent.com/vtexdocs/help-center-content/refs/heads/main/docs/es/tutorials/weni-by-vtex/integraciones/creando-un-canal-de-slack_16.png"}}

{"base64":"data:image/png;base64,iVBORw0KGgoAAAANSUhEUgAAAAQAAAACCAIAAADwyuo0AAAACXBIWXMAABYlAAAWJQFJUiTwAAAAI0lEQVR4nGMoKiqaMnnypYsX7927x+Dl4qqlrKKuqFRTVg4AqS4LNnDOxZ0AAAAASUVORK5CYII=","img":{"src":"https://raw.githubusercontent.com/vtexdocs/help-center-content/refs/heads/main/docs/es/tutorials/weni-by-vtex/integraciones/creando-un-canal-de-slack_17.png","width":773,"height":304,"type":"png"}}

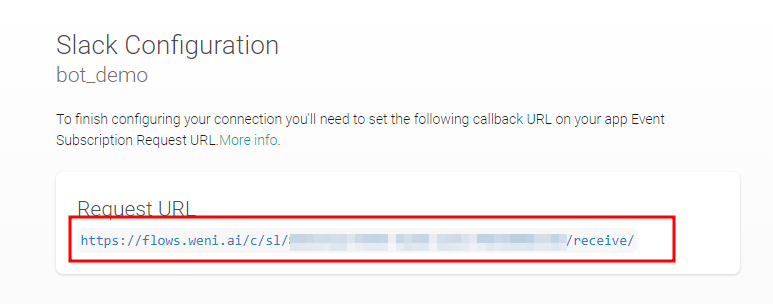
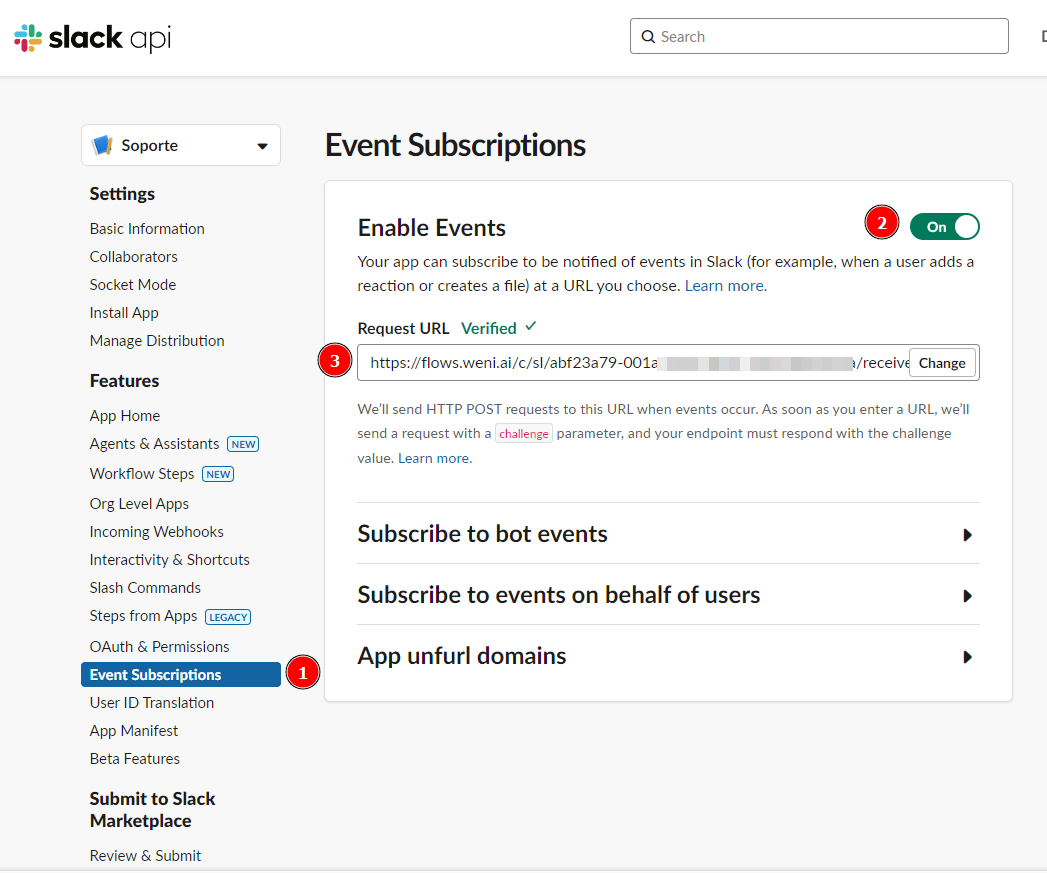
  1. En las configuraciones del bot en Slack, haz clic en Event subscription > Habilita el botón > Pega la URL.

{"base64":"data:image/png;base64,iVBORw0KGgoAAAANSUhEUgAAAAQAAAADCAIAAAA7ljmRAAAACXBIWXMAAAsTAAALEwEAmpwYAAAAMklEQVR4nAEnANj/AJKSkn9+fqCfn6CfnwBcXF1samrAwMDY2NgADxMWZmZowMDA8fHxf50UigSFfEwAAAAASUVORK5CYII=","img":{"src":"https://raw.githubusercontent.com/vtexdocs/help-center-content/refs/heads/main/docs/es/tutorials/weni-by-vtex/integraciones/creando-un-canal-de-slack_18.png","width":1047,"height":873,"type":"png"}}

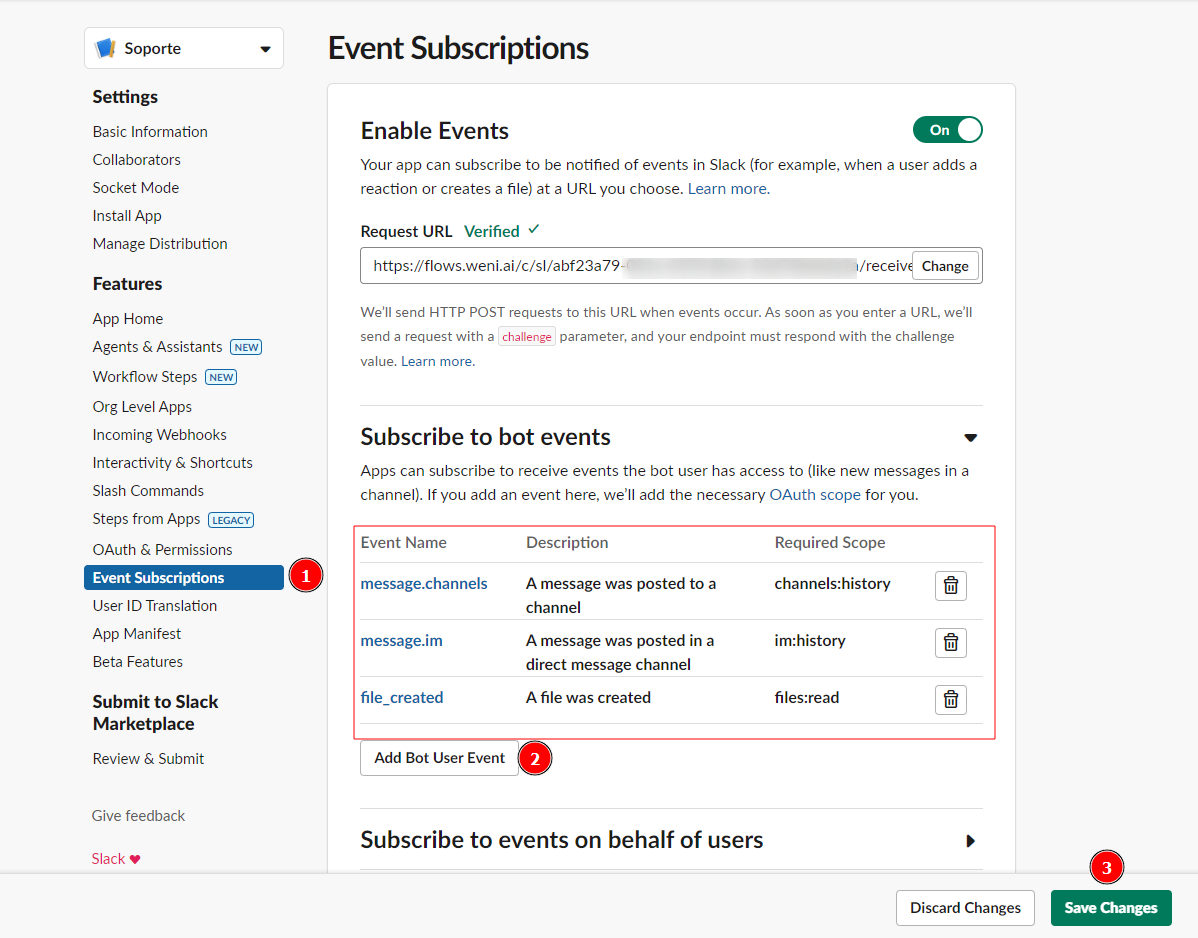
  1. Haz clic en Subscribe to bot events y añade los siguientes eventos:

{"base64":"  ","img":{"width":1198,"height":938,"type":"png","mime":"image/png","wUnits":"px","hUnits":"px","length":150266,"url":"https://raw.githubusercontent.com/vtexdocs/help-center-content/refs/heads/main/docs/es/tutorials/weni-by-vtex/integraciones/creando-un-canal-de-slack_19.png"}}

  1. Después de guardar los cambios, aparecerá una barra amarilla. Haz clic en el enlace indicado.

{"base64":"  ","img":{"width":1010,"height":549,"type":"png","mime":"image/png","wUnits":"px","hUnits":"px","length":106101,"url":"https://raw.githubusercontent.com/vtexdocs/help-center-content/refs/heads/main/docs/es/tutorials/weni-by-vtex/integraciones/creando-un-canal-de-slack_20.png"}}

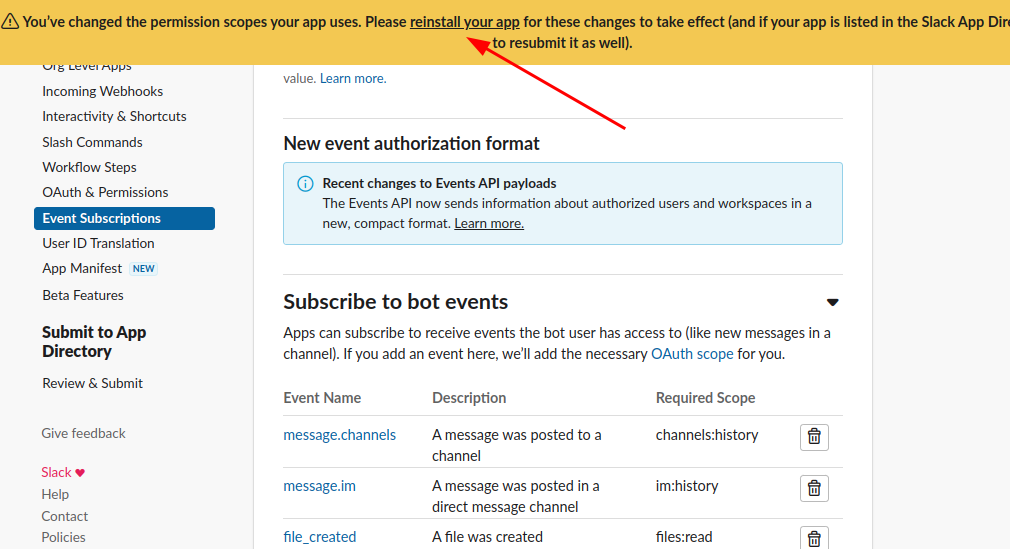
  1. Se abrirá una nueva ventana. Haz clic en Permitir.

{"base64":"data:image/png;base64,iVBORw0KGgoAAAANSUhEUgAAAAQAAAADCAIAAAA7ljmRAAAACXBIWXMAAAsTAAALEwEAmpwYAAAAMklEQVR4nAEnANj/AAQEAw8QEQoODxMSEwD////IyMjY2dn///8A8/Pz4ODg2tra8/P0LUIWWE55K3gAAAAASUVORK5CYII=","img":{"src":"https://raw.githubusercontent.com/vtexdocs/help-center-content/refs/heads/main/docs/es/tutorials/weni-by-vtex/integraciones/creando-un-canal-de-slack_21.png","width":1382,"height":921,"type":"png"}}

  1. Haz clic en App Home, desplázate hacia abajo y marca la casilla indicada.

{"base64":"  ","img":{"width":1026,"height":933,"type":"png","mime":"image/png","wUnits":"px","hUnits":"px","length":119804,"url":"https://raw.githubusercontent.com/vtexdocs/help-center-content/refs/heads/main/docs/es/tutorials/weni-by-vtex/integraciones/creando-un-canal-de-slack_22.png"}}

{"base64":"  ","img":{"width":715,"height":567,"type":"png","mime":"image/png","wUnits":"px","hUnits":"px","length":42665,"url":"https://raw.githubusercontent.com/vtexdocs/help-center-content/refs/heads/main/docs/es/tutorials/weni-by-vtex/integraciones/creando-un-canal-de-slack_23.png"}}

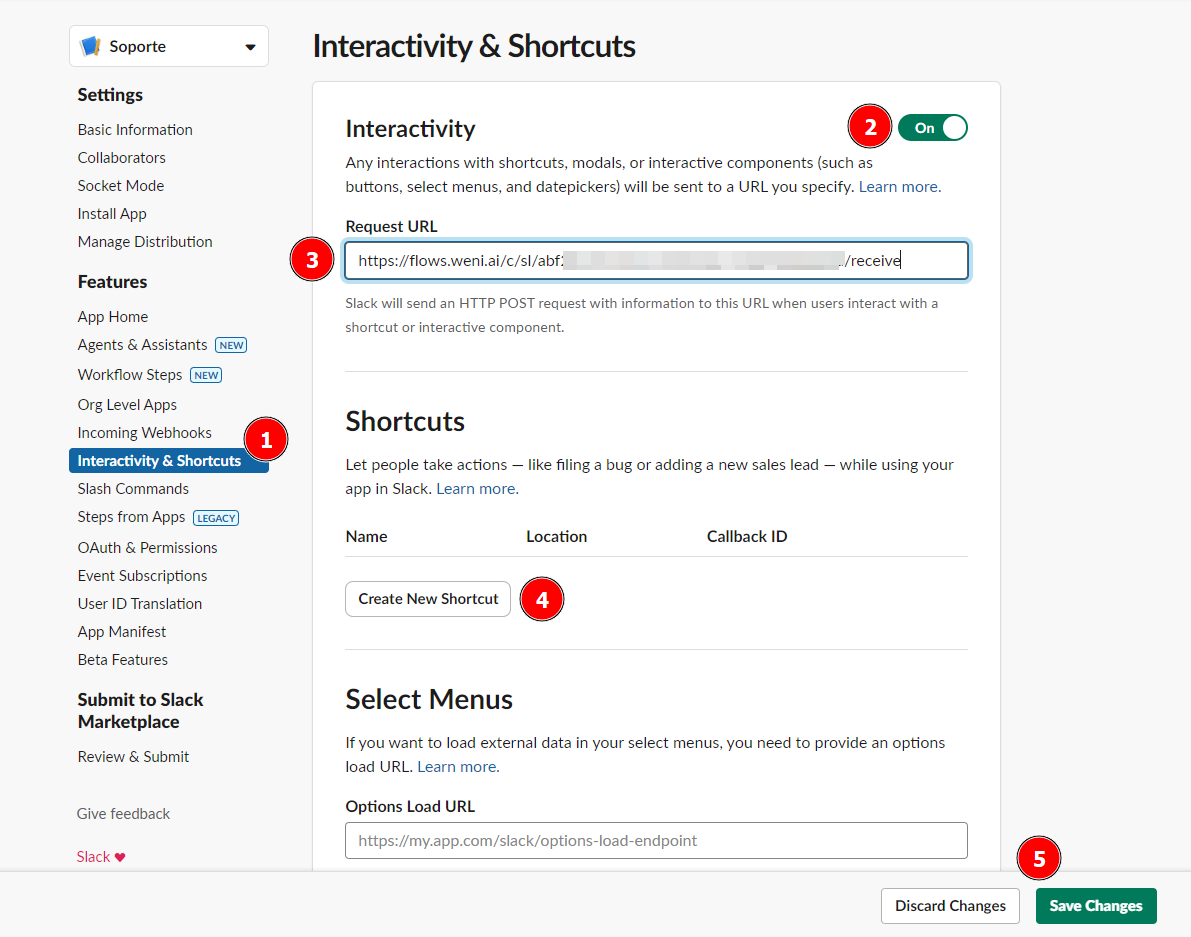
Cómo activar respuestas rápidas/botones en Slack

En Slack, debes habilitar el envío de respuestas rápidas. Ve a Features > Interactivity & Shortcuts. En la pestaña de Interactivity, añade en el campo Request URL la URL de callback del Flows.

{"base64":"  ","img":{"width":1191,"height":937,"type":"png","mime":"image/png","wUnits":"px","hUnits":"px","length":132073,"url":"https://raw.githubusercontent.com/vtexdocs/help-center-content/refs/heads/main/docs/es/tutorials/weni-by-vtex/integraciones/creando-un-canal-de-slack_24.png"}}

Contribuidores
1
Photo of the contributor
+ 1 contributors
¿Te ha parecido útil?
No
Sugerir cambios (GitHub)
Agregando campos de creación de ticket en Zendesk
« Anterior
Creando un Canal de Slack
Siguiente »
Contribuidores
1
Photo of the contributor
+ 1 contributors
En esta página
¿Tienes otras preguntas?
Pregunta a la comunidad
Encuentra soluciones y comparte ideas en VTEX Community
Únete a nuestra comunidad
Solicita soporte a VTEX
Recibe asistencia personalizada de nuestros especialistas
Abre un ticket de soporte
GitHubDeveloper PortalComunidadFeedback