Tutorial valid only for Legacy CMS Stores.
Learn how to set up a Kit Look or Lookbook in VTEX.
Before talking about the Kit look, it is important to remind you that you should know how to create a Kit. To do so, access the article Kit registration.
Differences between kit and kit look:
Kit: In a kit, the component products may only be sold in the kit, i.e., they cannot be sold separately. This means that in the event the product “Shirt” is in the “Beach” kit, even searching for the product Shirt on the website, it will not be sold outside the kit – with the other components.
Kit Look: In a kit look, all component products may be found on the website and sold outside the kit, i.e., even on the page of the look kit product, it is possible to buy the items either separately or all together. See our customization documentation for the look kit.
What is the Kit Look?
This term is widely known in the Fashion Segment. A Kit Look is a way through which you can buy several products viewing only one product screen.
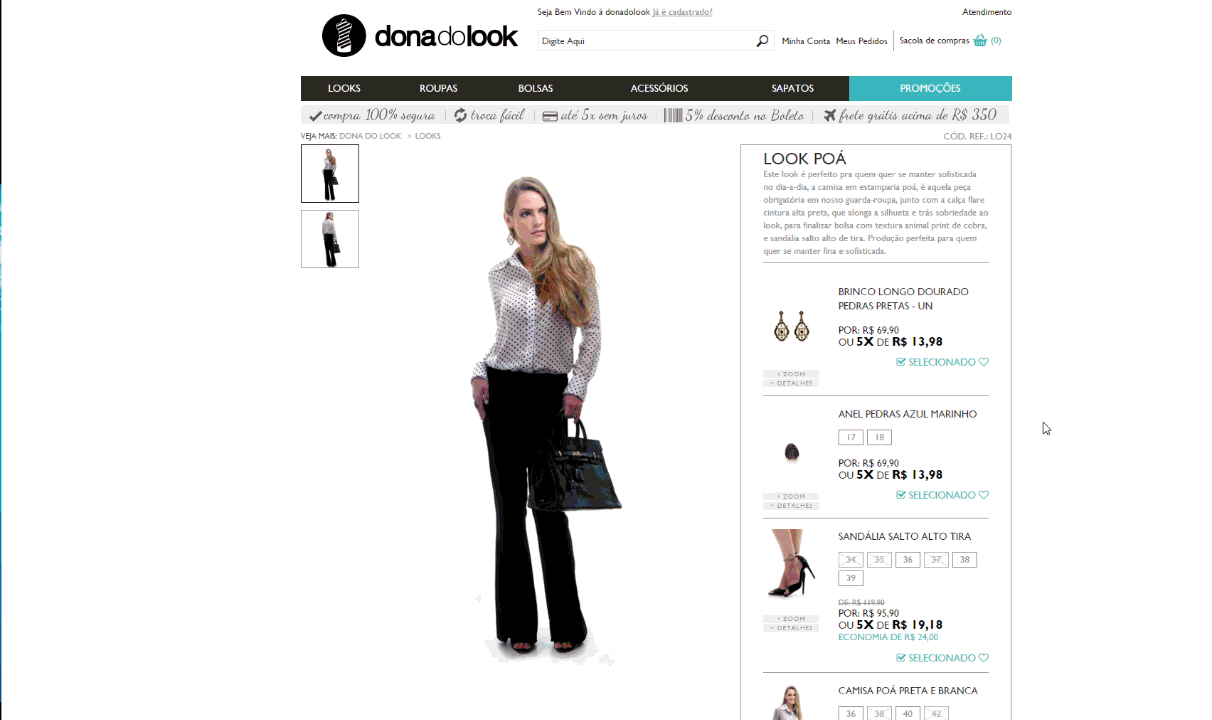
In the layout above, it is possible to choose the kit items the customer would like to buy and then click on “Comprar Produtos Selecionados”.
Alternatively, if you prefer, you may buy the complete kit, with all selected items.

In this layout, for each item there is a button “Comprar Separadamente”.
If you prefer to buy the complete kit, just click on “Comprar Look”.
By clicking on Comprar, regardless of the layout, all kit components will be added to your cart automatically and individually, i.e., if the kit has 4 items, the 4 items will be added.
In the layout it is possible to define the amount of default items for each component.
Implementation of Kit pages
<div id="top-right"> <span id="selecione-kit">SELECIONE AS PEÇAS DO LOOK</span> <div class="kit clearfix"> <div class="kit-info"> <div class="kit-image"> <vtex.cmc:ProductImage productIndex="1" /> </div> <div class="tpl-right"> <div class="nome-kit"><h2><vtex.cmc:productName productIndex="1" /></h2></div> <div class="skuSelection"> <vtex.cmc:skuSelection changeImage="1" productIndex="1" /> </div> <div class="dv-buy-button clearfix"> <vtex.cmc:BuyInPage productIndex="1" /> </div> <div class="preco-kit"> <vtex.cmc:skuPrice productIndex="1" /> </div> </div> </div> </div> <div class="kit clearfix"> <div class="kit-info"> <div class="kit-image"> <vtex.cmc:ProductImage productIndex="2" /> </div> <div class="tpl-right"> <div class="nome-kit"><h2><vtex.cmc:productName productIndex="2" /></h2></div> <div class="skuSelection"> <vtex.cmc:skuSelection changeImage="1" productIndex="2" /> </div> <div class="dv-buy-button clearfix"> <vtex.cmc:BuyInPage productIndex="2" /> </div> <div class="preco-kit"> <vtex.cmc:skuPrice productIndex="2" /> </div> </div> </div> </div> <div class="kit clearfix"> <div class="kit-info"> <div class="kit-image"> <vtex.cmc:ProductImage productIndex="3" /> </div> <div class="tpl-right"> <div class="nome-kit"><h2><vtex.cmc:productName productIndex="3" /></h2></div> <div class="skuSelection"> <vtex.cmc:skuSelection changeImage="1" productIndex="3" /> </div> <div class="dv-buy-button clearfix"> <vtex.cmc:BuyInPage productIndex="3" /> </div> <div class="preco-kit"> <vtex.cmc:skuPrice productIndex="3" /> </div> </div> </div> </div> </div>
The BuyInPage control, described in the code above, will work only with the AmountItemsInCart control (in the template itself or in any related sub template).
To understand the relationship between these controls see the Complete List of Controls.
changeImage=”1″: indicates which field will change the sku image when selected.
This template should be associated with a new Product Page Layout to be applied only in the category where the Kits are registered. In order to not create multiple templates, just insert the same code more often - changing the value of productIndex.
Example 1: If you have a kit product with the 3 components and another kit product with 5 components, and you wish to use this Look Kit functionality for both kit products, it is not necessary to create a template for each quantity. You may create a template with 5 component control groups (productIndex=maximumNumber). Understanding that maximumNumber is the value of the kit with the largest number of components.
Example 2: When productIndex=0, is used, information on the Kit itself will be displayed. On the product page that contemplates a kit with 2 components, only the 2 components will be shown. If there is a kit with 4 components, the 4 will be displayed.
In summary, the store may create a template with the quantity of product index it wants. Only the number of components in each kit will be displayed on the product page.