This guide is intended to provide solutions to problems that may arise with Facebook Integration. Please use the table of contents below for navigation.
- How to troubleshoot SKU issues with bridge errors. Error message: "Unsupported post request. Object with ID “XXXXX” does not exist.”
- How to troubleshoot SKU issues with bridge errors. Error message: "The SKU does not have a sales price on VTEX. This is a required value”.
Ads and Products
How to solve SKU problems with bridge errors. Error message: "Unsupported post request. Object with ID “XXXXX” does not exist.”
It is necessary to confirm with the client if the information in the Facebook setup card, such as affiliate email or Business Manager Id, is valid.
How to solve SKU problems with bridge errors. Error message: "The SKU does not have a sales price on VTEX. This is a required value”.
The first step in this scenario is to investigate whether the SKU in fact does not have a price added for Facebook’s trade policy.
If the SKU does have a price, check its status, as the error may also be related to its active/inactive status. The best way to do this is by performing a checkout simulation:
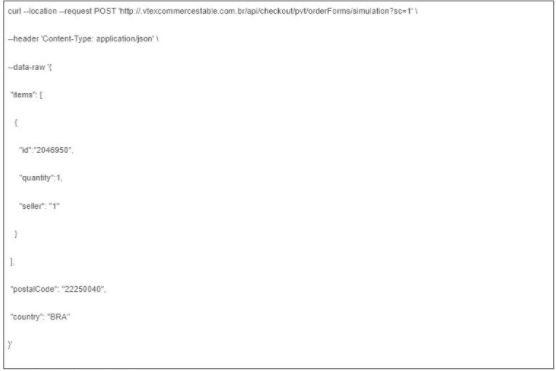
In this simulation, it is important to analyze the following fields:
- Message
- Price
- Inventory
If everything is correct, open a ticket.
Settings
How to redo the authentication process
This process is recommended for authentication issues concerning the Facebook integration, or for permission errors when sending or updating the catalog.
Deleting VTEX integration app on Facebook
- Deleting VTEX integration app on Facebook
- In the upper right corner of the screen, click the button

- Select Settings and Privacy, then click on Settings.
- Click on Business integrations.
- Select VTEX Integration and click Remove.
Deleting an existing VTEX catalog
- Go to Facebook Business Manager.
- Click on Settings.
- Click on Business Settings.
- Select the VTEX catalog you would like to delete and click on the trash can icon

- Click Confirm.
Deleting Facebook integration on VTEX
- Log in to the Admin and click on Integrations.
- Click Settings.
- In the Facebook integration, click on the gear icon
- Choose the option Edit config.
- Under Integration, select Deactivate.
- Click Save configuration.
Reconfiguring the Facebook integration on VTEX
- In the Admin menu, click on Integrations.
- Click Settings.
- In the Facebook card, click on Integrate.
- Fill in the fields in the modal window (see field details)
- Click Save configuration.
When authenticating with Facebook, after reconfiguring the integration, it is important that the permissions requested by the APP are granted without exceptions.
How to configure login with Facebook and Google
It is not necessary to create an account or log in to VTEX to make a purchase. However, if the customer wants to change the data informed during their first purchase, they need to confirm the email ownership.
The platform natively offers login options with email and password, and also login with an access code sent to the client's email. We also offer optional native integrations with Google and Facebook, which need to be set up.
Registering with the providers
Before setting up our Google and Facebook login integrations, you need to create OAuth 2.0 credentials (the protocol used for integration) in these services. To do this, follow the instructions in the articles below:
Setting up the integration in your store
After completing the Facebook and/or Google registration, you need to set up in your store the option to log in through these providers. In both cases, you need to have a Client ID and a Client Secret generated.
- To access the VTEX ID module, in your store admin click on Account Settings > Authentication.
- Select the provider and click Edit.
- Fill out the form with the
Client IDandClient Secret. - Enable the provider by clicking the toggle.
Validate the configuration
With everything set up, you can now test your configuration. We recommend that you test the configuration with the final URL through which users will access your store. When trying to log in, the options referring to the active providers must be available and the process should be carried out without problems.