The Affiliates Program is an app that is only supported by VTEX IO stores and is not available for stores that use Legacy Portal CMS or Headless CMS. Please visit the Affiliates Program app developer guide to install and configure the app on your VTEX store.
In the Affiliates Program app, an affiliate is someone who partners with your VTEX store to promote sales in exchange for a commission. The term is, therefore, different from the usual concept of an affiliate at VTEX.
The Affiliates Program app generates a specific URL from your VTEX store to your registered affiliates. When the affiliate shares the URL with a customer who buys using the link, the affiliate gets a commission.
The app creates two page groups after being installed in your VTEX environment:
Affiliate Pages
The app creates three types of affiliate pages, available to them without any access to your store's VTEX Admin, as shown in the table below:
| Type | URL |
|---|---|
| Affiliate page | {storeName.com}/affiliates/{affiliateSlug} |
| Affiliate profile page | {storeName.com}/affiliates/{affiliateSlug}/profile |
| Registration form page | {storeName.com}/affiliate/form |
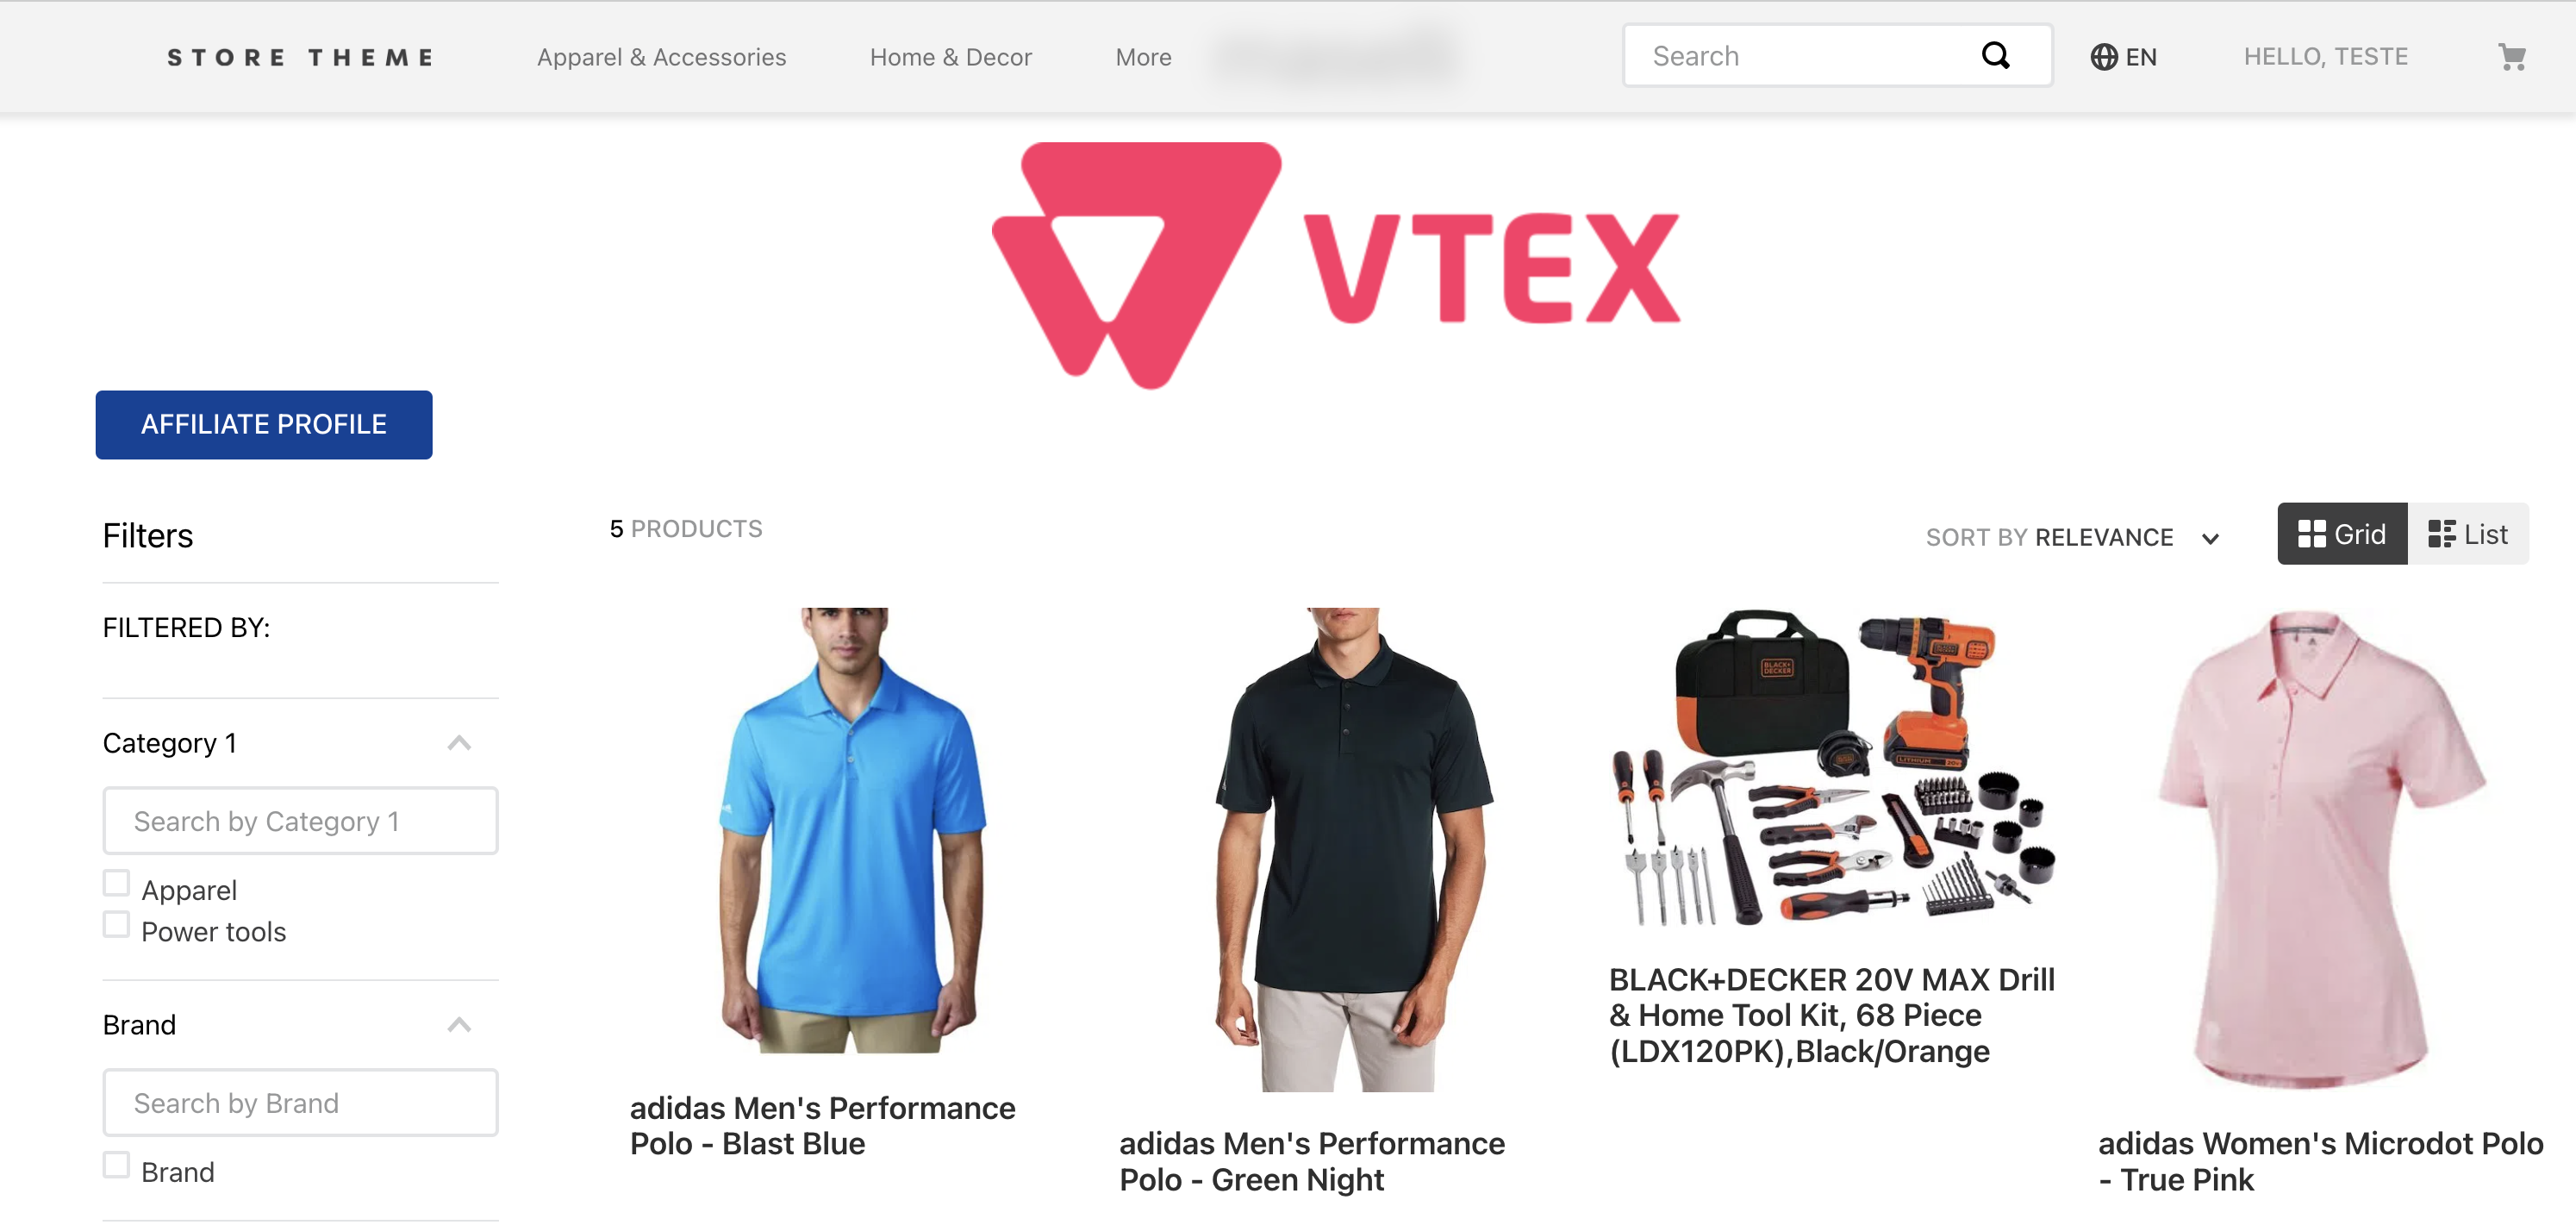
The affiliate page is the VTEX store URL that they will share with the customers. The following image shows an example:
The affiliate profile page is an interface where the affiliate can track and manage their orders and commissions. The image below shows an example:

The registration page allows those who are interested in becoming affiliates to fill in their information to apply for VTEX store registration.
The affiliate pages are customizable. Learn more in the Affiliates Program app developer's guide.
VTEX Admin pages
The Affiliates Program app creates interfaces in the VTEX Admin for you to manage all affiliate-related content.
After installing the app, the following pages become available in your VTEX Admin under Other > Affiliates:
If your store uses the New VTEX Admin, go to Apps > Affiliates.
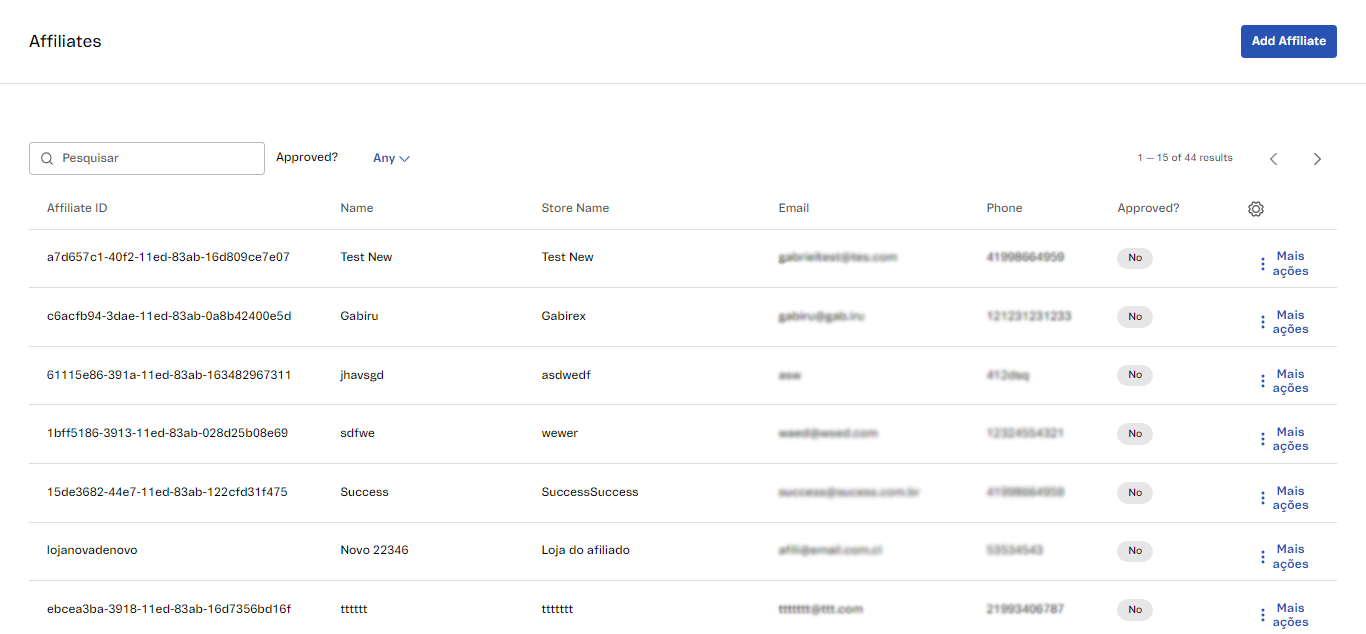
Affiliate Management
The Affiliate Management page allows you to do the following:
Adding an affiliate
Click the Add Affiliate button to create a new affiliate, fill in the fields displayed, and click Save.
The following fields are required: Name, Email, URL identifier, and Phone.
Searching for affiliates
Enter any of the following information in the search bar to search for an affiliate: Affiliate ID, Name, Store Name, Email, or Phone.
In the Affiliates Program app, not only is the term affiliate different from the usual VTEX affiliate concept, but the
Affiliate IDdoes not correspond to the default code. In the app, theAffiliate IDis an alphanumeric code automatically generated when you create a new affiliate.
Filtering affiliates
To filter the affiliate search, click All and select the desired option. The default All option searches all of your affiliates, and the other options are approval-related: Yes for approved affiliates and No for non-approved ones.
Viewing affiliate details
To view affiliate details, on the affiliate row, click More actions, and then click Details. You will be redirected to a page where you can view information about the affiliate and also do the following:
- Activate affiliate: Click the toggle under
Active?. - Access the Order Management page of the affiliates: Click the
Order Managementbutton. - Edit affiliate: Click the
Editbutton.
Editing an affiliate
If you need to edit an affiliate and change its information, follow the steps below:
- In the row related to the affiliate, click More actions.
- Click Edit.
- Change the information added.
- Click
Save.
Order Management
The Order Management page allows you to do the following:
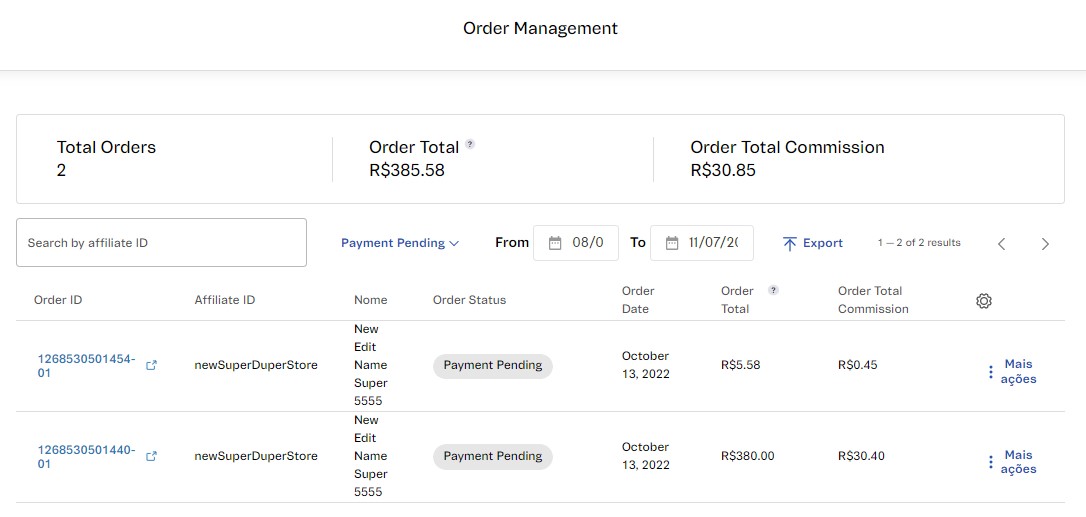
Monitoring data
At the top of the page, you see the following metrics about orders placed through the links of one or more affiliates:
- Total Orders: Total number of affiliate orders.
- Order Total: Sum of the order values, calculated from the item prices without shipping costs.
- Order Total Commission: Sum of the amounts of affiliate commissions on orders.
To track an order flow, click the
Order ID. This will redirect you to the VTEX Admin under Orders > All Orders.
Searching for orders
Type the affiliate ID related to the order into the search bar to find an order. You can do this by using filters, as seen below.
Filtering orders
You can filter the order search by the following criteria:
- Order status: The default option is to show all orders. To choose a status, click All Orders and select one of the options: Created, Payment approved, Payment Pending, Invoiced, or Canceled. Learn more in Order Flow and Status.
- Order Date: Filter from a range of days and hours when the orders were created. To do so, the
Fromfield sets a start date and theTofield sets the end date.
Exporting the order list
The Affiliates Program app allows you to export a list with a CSV extension of your affiliate orders.
To enable the list export function, you must first set up email templates described in the Affiliates Program app developer's guide.
After configuration, click Export on the Order Management page to export the list. The following confirmation message will be displayed:
The report is being generated and will be sent to your email.
The generated file will be sent to the email address of the user who is currently logged in. The exported content refers to the total of orders in the list at the time of export. If a filter is active, only the selected offers will be exported.
Viewing order details
To see an order data, in the row for the order click More Actions, and then click Details.
Commission Management
The Commission Management page allows you to do the following:
- Search for commissions
- Edit commissions
- Export commission spreadsheet
- Import commissions
- Download last import
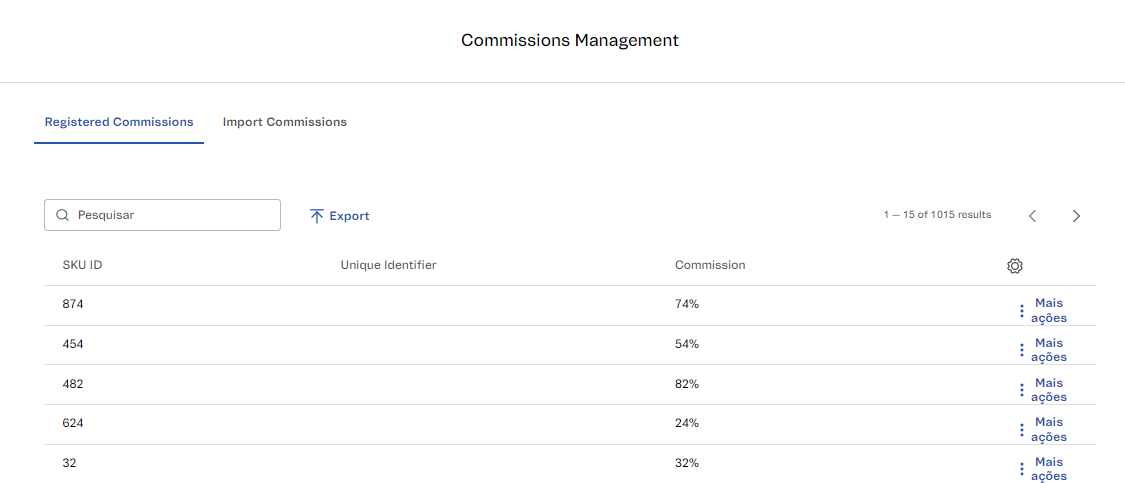
Searching for commissions
To search for order commissions, in the search bar of the Commissions tab, type the SKU ID of the order, which is the SKU identification number.
Editing commissions
You can change the commission percentage by following the steps below:
- On the Commissions tab, in the row for the commission you want to edit, click More actions.
- Click Edit.
- In the modal that opened, enter the desired commission number. Decimals are not accepted.
- Click
Confirm.
The following message will be displayed:
Commission updated successfully
Exporting commission spreadsheet
To export a SKU commission spreadsheet with a CSV extension, at the top of the Commission Management page, click Export. The following confirmation message should be displayed:
The report is being generated and will be sent to your email.
The file will be sent to the email address of the user who is currently logged in.
The exported content refers to the list SKU commissions at the time of export. Only the selected SKU commissions will be exported if a filter is active.
Importing commissions
You can update commissions in bulk by SKU by following the steps below. You can use a sample template by clicking XLSX Template.
- Go to the Import Commissions tab.
- Drag and drop the CSV or XLSX file format into the dotted area, or click
Choose a file. - Click
Send File.
Check if the following message is displayed:
The file is being processed
The name of the submitted fileadded file name will appear next to the Last Import field.
You can identify the import information and the user by hovering over the
?symbol next toLast Import.
Downloading the last import
The last imported file isavailable for download. To download it, go to the Import Commissions tab, find the file next to Last Import and click it.