Integrations normally begin with back-office software, which allows the management of essential parts of the operation related to Catalog, Pricing, Logistics, and Orders. The main types of software in the back office are:
- ERP (Enterprise Resource Planning)
- WMS (Warehouse Management System)
- PIM (Product Information Manager)
- CRM (Customer Relationship Management)
In addition to the back office, you can integrate the ecommerce platform with other systems that add new features. One example is payment providers, which allow you to communicate with providers to process payments and include additional payment methods in the checkout.
ERP integration
A store's back-office integration setup begins with the ERP software. Other types of software may be used in the back office for specific purposes, such as PIM for managing product data, and WMS for managing inventory.
ERPs and other types of software may have native integrations with VTEX. If not, you will need to implement your own middleware using VTEX APIs to integrate the software with your VTEX account.
The setup process consists of two phases: initial setup and middleware configuration. After completing these phases, the operational workflow, used for the store's daily operations, will be visible. Learn more about setup in the Back office integration guide (ERP/PIM/WMS).
Initial setup
In this phase, all necessary procedures are conducted to ensure the VTEX account is furnished with all the product information. This includes integrating the catalog, products, prices, and store inventory. Generally, there are three methods to configure this phase:
- Integrating with external tools.
- Importing spreadsheets.
- Manual input via the VTEX Admin.
You must follow the setup steps for this phase in the order shown below. Detailed descriptions of each step can be found in the respective subsections of the Integrations section of this article.
a. Category tree
b. Brands
c. Specifications (groups and fields)
a. Importing products
b. Importing product specifications
c. Adding products to the trade policy
d. Importing SKUs
e. Importing SKU specifications
f. Importing SKU images
a. Defining base prices
b. Defining fixed prices for specific contexts
a. Creating warehouses
b. Updating SKU inventory
Middleware configuration
In this phase, all necessary procedures enable the store to process orders. This includes integrating notifications about changes to orders and actions to process orders. The integrations can be performed in two ways:
- Platform integration: This option involves using a third-party platform, known as Platform-as-a-Service (PaaS), which offers a ready-made solution to integrate with VTEX, requiring minimal development effort.
- In-house development: This option involves developing and maintaining your own integration software. The middleware must be capable of handling scalability issues that may arise during sales peaks, such as those experienced during sales events like Black Friday.
You must follow the setup steps for this phase in the order shown below. A detailed description of each step can be found in the respective subsections of the Integrations section.
a. Configuring a feed or hook
a. Change order
b. Cancellation
c. Invoicing
d. Tracking
ERP integration behavior
After configuring the store and integrating with the middleware, the general flow of information will follow this format:
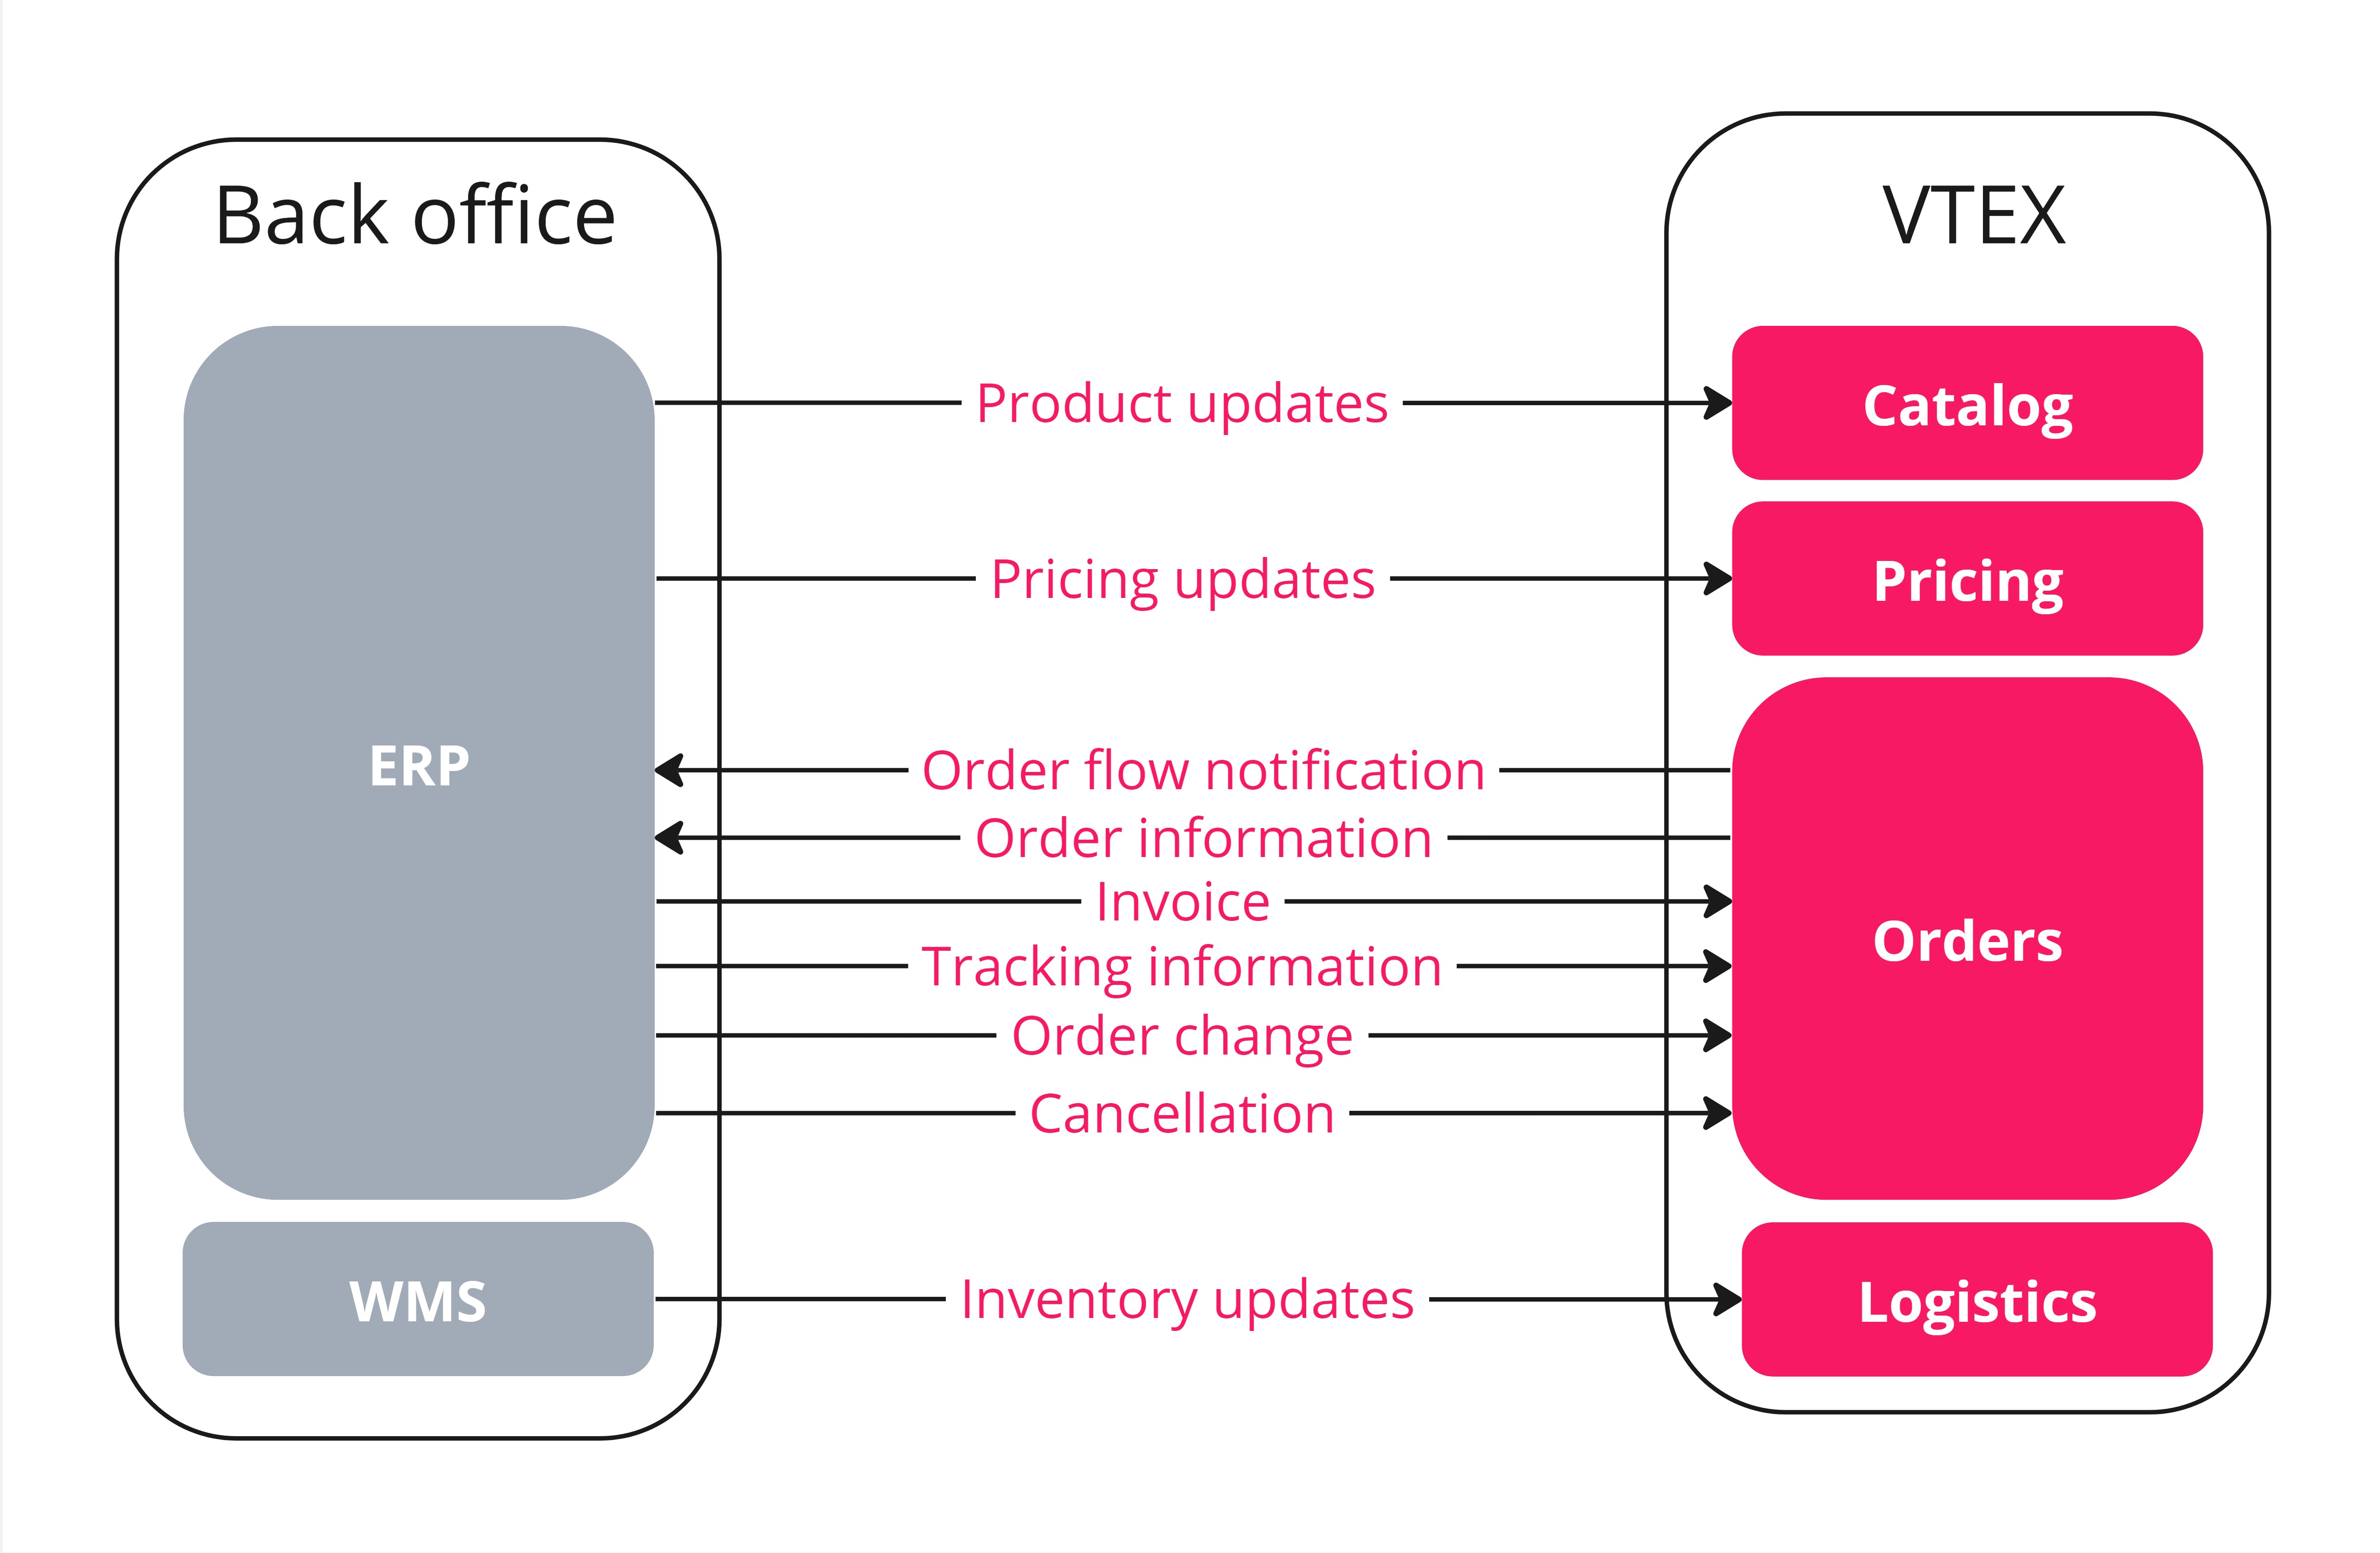
Each request or process represented by the arrows in the diagram above is triggered by a different type of event in the operation of an ecommerce store. Learn more about this flow in the Back office integration guide (ERP/PIM/WMS).
Integrations
In this section, we will cover the main integrations necessary for running a VTEX store. These integrations encompass a wide range of aspects, including catalog and customer data integration, order management, and single sign-on (SSO). Each integration will be detailed in the sections below.
Catalog architecture
On VTEX, Catalog is the module used for configuring the characteristics of the store's products to make them available to customers. You must create your catalog in the following order:
- Creating the category tree.
- Adding the brands.
- Adding the specifications (optional).
- Importing products.
- Importing SKUs.
- Associating specifications with products and SKUs.
Learn more about Catalog and back office configuration in the Catalog and Set up catalog articles.
Category tree
After understanding and planning the store's catalog architecture, you can create categories in the following ways:
- VTEX Admin: Create each category through the user interface. For more details, see Creating Categories.
- Catalog API: Create each category by making API calls. For more details, see Catalog API.
- Back-office integration: Import categories from an external back-office software (ERP or PIM) integrated with VTEX. The software may already offer native integration with VTEX or require the development of middleware that uses the Catalog API. See Category migration from ERP for more details.
When importing categories from external software, the category structure in the software may differ from that of VTEX. In this case, we recommend creating an inactive "mock" category. This category will remain invisible on the storefront and serve as a temporary repository to receive all products and SKUs during the import process. Once the import is complete, you can manually organize the products within the VTEX Admin to match the desired category tree.
There are some limitations to be aware of when managing categories:
- Moving categories: Although it is possible to move categories to different levels (higher/lower) and/or different departments, this is very risky due to the specifications attached to the category. This action can negatively affect product information since products inherit both previous and new specifications.
- Deleting categories: Deleting a category requires a complete clean-up of the store's catalog.
For more information about importing categories into the back office, check the Categories article.
Brands
Brands are product attributes that help customers identify both the product and the company behind it. A product must be associated with a single brand, which means that creating brands is a mandatory step in configuring the catalog. Brands can be created through:
- VTEX Admin: Create each brand using the user interface. Learn more in Registering Brands.
- Catalog API: Create each brand by making API calls. Learn more in Catalog API.
- Back-office integration: Import brands from an external back-office software (ERP or PIM) integrated with VTEX. The software may already offer native integration with VTEX or may require the development of middleware that uses the Catalog API. Learn more in Creating Brands in the Catalog configuration guide for back-office.
If the back-office system has no brand information, you can apply the same approach as mentioned previously for category migration by creating an inactive "mock" brand to be used exclusively for migration purposes. Subsequently, product information can then be manually entered.
For more information on importing brands into the back office, check the Brands article.
Specifications
Specifications are additional properties that can be assigned to products and SKUs in the store. They will be used when creating search filters and distinguishing SKUs and products on the product page. Specifications can be created through back-office integrations by using the Catalog API.
There are three types of specifications, which should be created in the following order:
- Specification groups
- Specification fields
- Specification values
The diagram below illustrates this procedure.
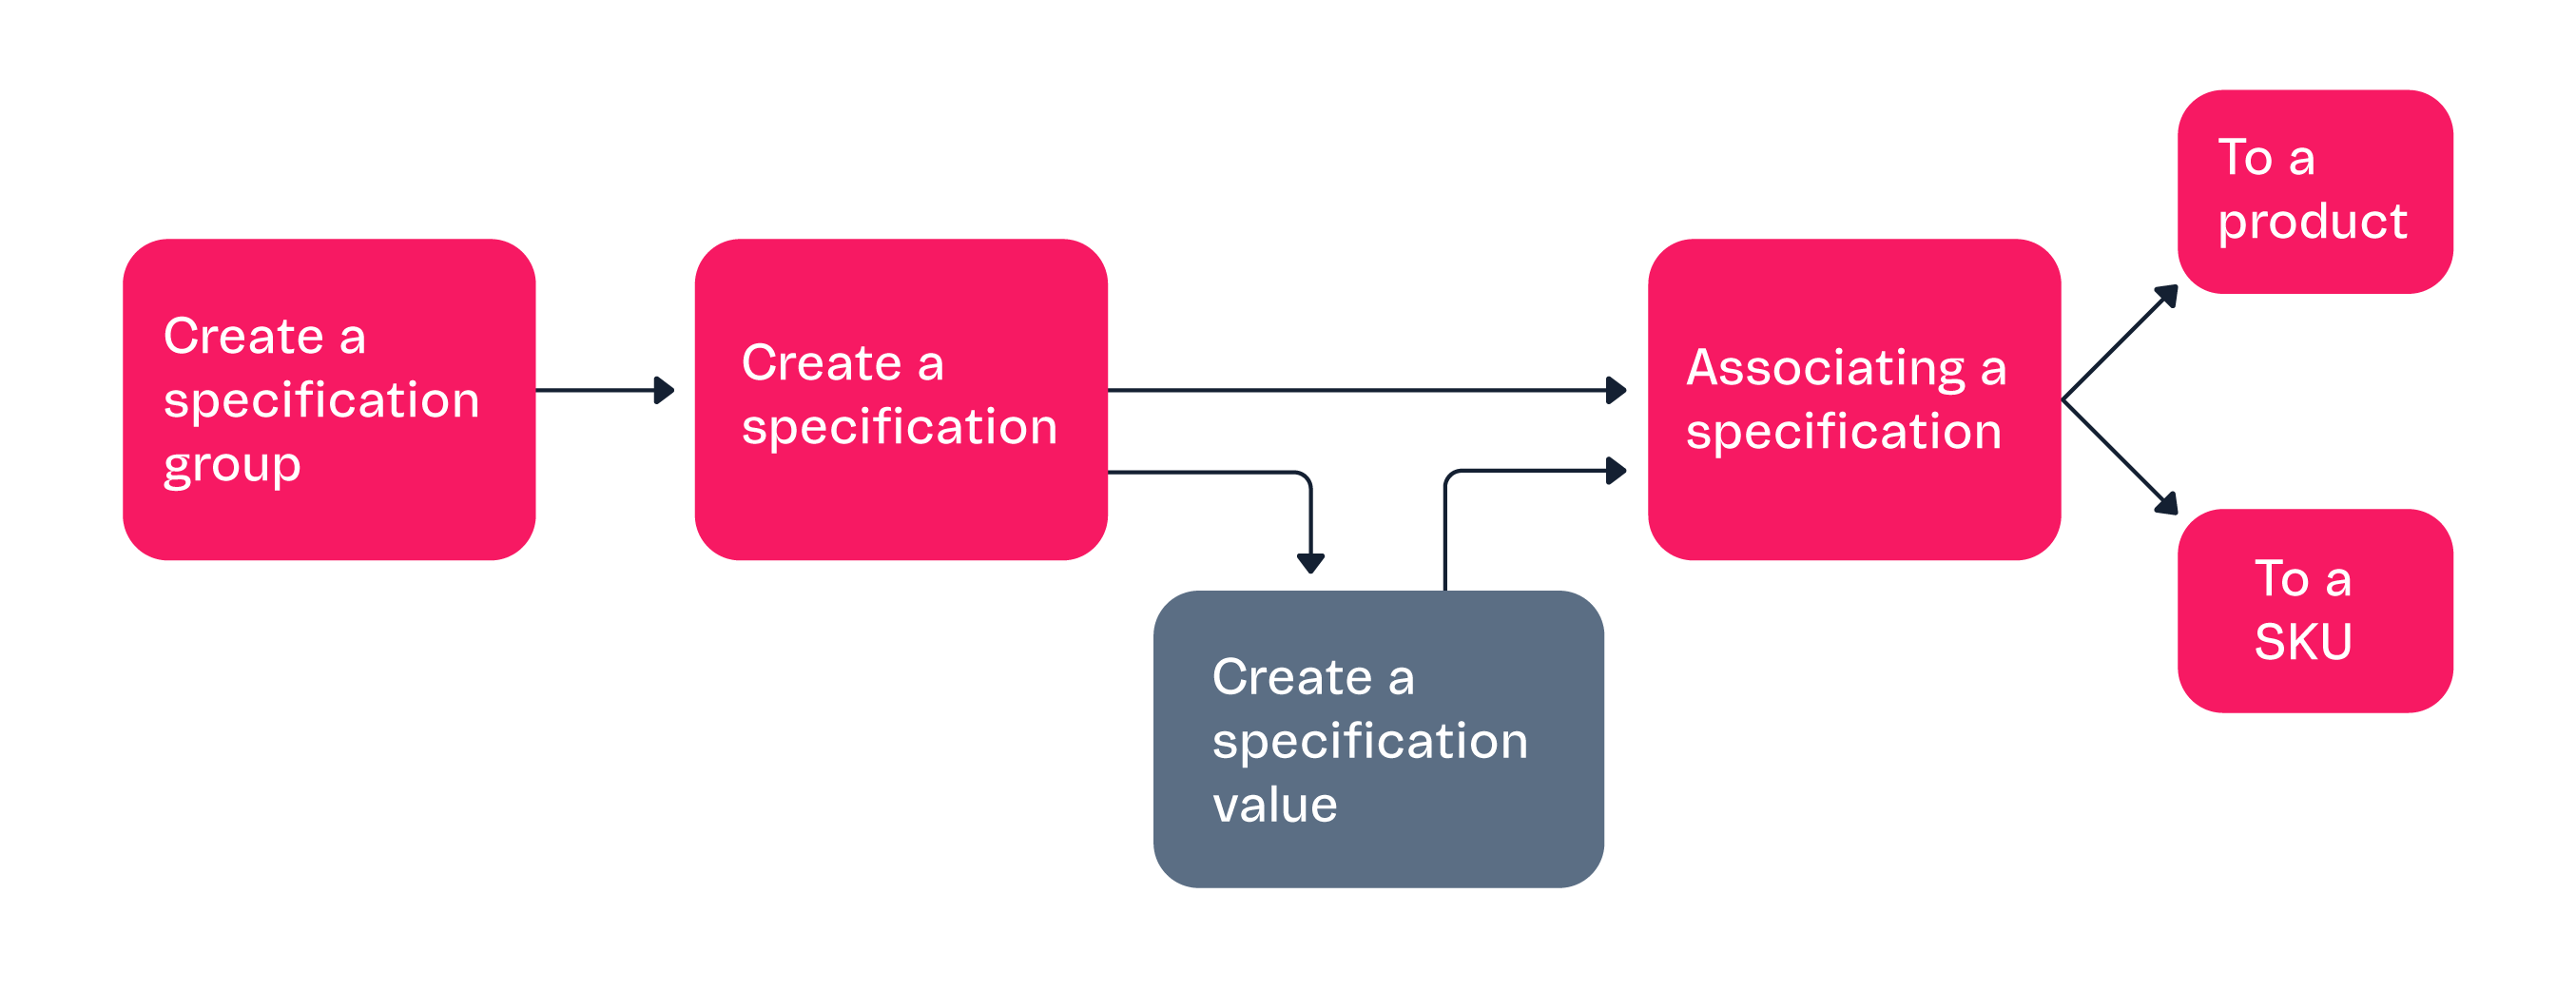
Specifications follow the Catalog hierarchy. When a group is created within a department or category, it will be inherited by the subsequent lower levels.
After creating groups, fields, and values, specifications must be associated with products and SKUs. These procedures are described in the next section: Importing products.
To learn more about importing specifications into the back office, check the Specifications article.
Importing products
Importing products refers to the act of transferring all relevant product information from an ERP or PIM system to the VTEX platform. This step keeps the product catalog up to date and synced with the store. Whether managing a wide variety of products, SKUs, or different variations, effective product importing is essential to the customer experience.
On VTEX, it is important to understand the distinction between products and SKUs:
- Product: Abstract catalog unit, visible on the store shelves.
- SKU: Concrete catalog unit in stock, representing specific variations of a product, such as color, size, and other attributes. SKUs are displayed as individual items on product pages. SKUs are displayed as individual items on product pages.
The way in which products and SKUs are structured directly influences the customer's shopping experience.
You should import products in the order shown in the table below:
| Action | Description | Methods |
|---|---|---|
| 1. Import products | Add products to the catalog. |
|
| 2. Import product specifications | Complete the product specifications in the catalog. |
|
| 3. Add the products to the trade policy | Associate products with their respective trade policies by defining specific rules (pricing, payments, shipping strategy, etc.) based on the sales channel or audience. Ensure that all products are at least added to the main trade policy. |
|
| 4. Import SKUs | Add SKUs to the products in the catalog. |
|
| 5. Import SKU specifications | Complete the SKU specifications in the catalog. |
|
| 6. Import SKU images | Add images to the SKUs. |
|
The product information in the ERP is often not suitable for use and display in the ecommerce store. For this reason, the information will need to undergo an enhancement process. This can include restructuring categories and creating more descriptive and appealing product descriptions.
After the import, it's also important to ensure that product and SKU information is kept up to date. You can check the instructions in the Update or delete information article.
For more information about importing products into the back office, check the Import products article.
Prices
Prices are the sales value of SKUs and are stored in price tables. To ensure that your store products are competitively priced and tailored to various sales channels, you need to understand how pricing information is integrated into the VTEX platform.
In sales operations, it is common to delegate price calculation to the ERP, from which this data can be imported. Prices have a base value defined for each SKU and can vary depending on the context. The steps for importing prices are as follows:
- Define the base price: The base price is used as a reference for determining the price of a product in the VTEX pricing system. The base price of a SKU can be imported via integration using the Pricing API or created through the VTEX Admin.
- Define fixed prices for specific contexts: The base price can be adjusted or modified based on specific rules, calculations, or fixed prices to arrive at the SKU's final retail price in different contexts. These contexts include the trade policy, customer group, promotion, among other factors. Fixed prices for specific contexts can be imported by integration using the Pricing API, imported via spreadsheet, or created through the VTEX Admin.
After importing, it's also important to ensure that the pricing information is kept up to date. You can check the instructions in the Update or delete information article.
For more information about importing prices into the back office, check the Import prices article.
Inventory
In the VTEX Logistics module, inventory consists of the relationship between a store's sales items (SKUs) and the locations where these items are stored, known as warehouses. Efficient management of this inventory when importing data into VTEX is crucial to provide customers with accurate product availability, thereby enhancing the logistics and shipping process.
These are the steps for importing inventory:
- Create warehouses: Define the physical or virtual locations where the SKUs will be stored. Warehouses can be imported via integration using the Logistics API or created through the VTEX Admin.
- Update SKU inventory: Enter the available quantity of each item in the warehouses. Warehouses can be imported via integration using the Logistics API, via spreadsheet, or updated through the VTEX Admin.
After importing, it is also important to ensure that the price information is kept up to date. You can check the instructions in the Update or delete information article.
For more information about importing inventory into the back office, check the Import inventory article.
Customer data
Importing customer data into VTEX facilitates the integration of information from external systems, such as CRM applications. By default, VTEX stores customer data in Master Data V1.
Within Master Data, the information is structured into data entities, akin to tables in database systems, containing documents that are similar to rows or records. Customer profile data is stored in the CL entity, while customer addresses are stored in the AD entity.
These are the steps for importing customer data:
- Create new customer profiles: Create documents in the
CLentity containing customer profile data, such as name, email, phone number, among others. This data can be imported via integration using the Master Data API. - Create addresses: Create documents in the
ADentity containing customer addresses, including information such as street, city, postal code, etc. Each address is associated with a customer, and a customer can have several addresses. This data can be imported via integration using the Master Data API.
For more information about importing customer data into the back office, check the Import customer data article.
Order integration
On the VTEX platform, orders are generated when a customer places the order by clicking the place order button. Each order includes various details, such as the items in the cart, the purchase amount, the chosen payment method, and other relevant information.
Order integration enables communication between the back-office application, ERP, or WMS, and VTEX's OMS (Order Management System). This integration plays a key role in:
- Handling events related to order status changes.
- Obtaining order details.
- Transmitting information related to order processing.
Receiving order updates
With the back office receiving order updates, it is possible to accelerate and automate the procedures involved in order processing, including invoicing and cancellations.
There are two ways of tracking order status changes on VTEX:
- Feed v3: This is a list of events about order updates. For this type of integration, VTEX provides an endpoint that allows the back office to query the items on the list, process the orders, and then remove the items from the list.
- Hook: This is a channel for automatically sending notifications about order updates. For this type of integration, the back-office application provides an endpoint for VTEX to send notifications regarding order updates. After receiving a notification, the back office proceeds to process the order.
For both types of integration, you can apply filters to select the types of events that the back office should process.
For most cases, VTEX recommends integrating orders via Feed v3 due to its resilience.
Obtaining order details
In addition to status changes, the operation may need to obtain additional information about an order. You can obtain detailed information about an order via the Orders API, which can be used in an integration with the desired back-office system.
Order details are used in various procedures in order processing, such as the order items for handling and the purchase amount for invoicing purposes.
Order handling
After the order details have been submitted to the back office, the final step before starting order processing is to change the order status to Start handling. This procedure can be integrated with the back office via the Orders API.
For more information on back-office integration of orders, see Set up order integration and Feed v3.
Order processing
In this step, the integration is configured to send order updates from the back office, ERP, or WMS to VTEX. During order handling, various actions can be applied, including changes, cancellations, and invoicing.
Below are the events that the back office can transmit to VTEX. The integration between VTEX and the back office for transmitting these events is done via the Orders API.
- Change order: Change order items or amounts.
- Cancel order: Cancel the order and the payment.
- Invoice order: Add the invoice to the order. This is the indication that the order has been successfully completed and is ready for shipment.
- Track order: Send the tracking information. This could include the carrier's tracking code or URL, or updates about the order's tracking status.
For more information about configuring order processing for the back office, check the Set up order processing and Change order articles.
Single Sign-On (SSO)
Single sign-on is a method that allows users to authenticate on the platform using a single set of login credentials, eliminating the need to log in separately to each application. VTEX supports integration with external identity providers. Besides native integrations with services like Google, it also allows you to create new integrations with other providers.
VTEX ID is the service that identifies users on the platform. This service operates based on the audience, the business rules, and the type of persona that can interact with each VTEX module. The available audiences are:
| Audience | Context | Technology |
|---|---|---|
| VTEX Admin | Identification in the VTEX Admin for store administrators and operators. | SAML 2.0 (Security Assertion Markup Language). |
| Webstore | Identification in the VTEX storefront, intended for store customers. | OAuth 2.0 (Open Authorization). |
Learn more in the Login (SSO) article.
Payments
VTEX Payment systems offer extensive features to support various payment methods, conditions, and integrations. Payments on VTEX have the following purchase flow options:
- Transparent: The payment process is integrated directly into the checkout, where the buyer chooses the desired payment method.
- Redirect: Opens a new window in the buyer's browser, where the payment is processed by an external service. After completing the payment, the buyer is redirected back to the checkout to place their order.
- Payment App: Opens a modal window on the checkout page. When the payment is completed, the window closes and the purchase flow continues on the checkout page. This flow can also be used for the 3D Secure 2 (3DS2) authentication method.
You have the following options to add payment options to a VTEX store:
- Natively supported payment provider: If VTEX offers integration with the desired payment provider, you must have a contract with the provider and configure the payment options through the VTEX Admin. You can find more details in the Payments article and the payment providers supported by VTEX in the List of Payment Providers by Country.
- Custom payment provider: If the desired payment provider does not have an integration with VTEX, you will need to implement your own payment connector using the Payment Provider Protocol. This protocol includes the API endpoints to connect to VTEX's payment gateway. The connector can be implemented by a VTEX partner agency. Once developed, the connector must be tested and go through the homologation process before it can be made available on VTEX.
For more information about integrating a new payment provider, see Integrating a new payment provider on VTEX.
Gift cards
On VTEX, gift cards can be used as a payment option at Checkout, and as part of loyalty programs. VTEX provides a native gift card solution and also supports integrations with external gift card providers. To add gift cards to a VTEX store, you have the following options:
- Native gift card solution: If you want to use VTEX's native gift card solution or an existing integration, you must configure the gift cards via the VTEX Admin by following the steps in the article Setting up Gift cards.
- Custom gift card provider: If the desired gift card provider does not have an integration with VTEX, you must implement your own integration using the Gift Card Provider Protocol. Through this protocol, providers can develop an integration containing the endpoints described in our Gift Card Provider Protocol API and connect to our Gift Card Hub.
Anti-fraud solution
The anti-fraud solution is a system specialized in analyzing purchases made on websites in order to identify fraudulent transactions. On VTEX, the payment operator first approves the purchase, and then the anti-fraud system evaluates the order.
To add an anti-fraud system to the payments of a VTEX store, you have the following options:
- Natively supported anti-fraud system: If there is already an integration with the desired anti-fraud system in VTEX, you must have a contract with one of the partner companies and configure it in the VTEX Admin. You can learn more in the Configuring the anti-fraud and What is anti-fraud? articles.
- Custom anti-fraud system: If the desired anti-fraud system does not have an integration with VTEX, you will need to implement your own anti-fraud integration using the Anti-fraud Provider Protocol containing the Anti-fraud Provider API endpoints.
Extensions and apps
In addition to the core services offered by VTEX, you can enhance the features of VTEX stores by adding extensions. These extensions are tools that expand the capabilities of the VTEX platform. They offer a range of possibilities, such as adding payment and marketplace providers, customizing the storefront, building custom backend services, and creating new applications for the VTEX Admin.
One way to add new features to the VTEX platform is by creating apps using VTEX IO, our development platform that provides high-performance management, scalability, and robust security. With VTEX IO, developers can focus on designing business solutions without worrying about infrastructure issues.
What is an app on VTEX?
An app on VTEX refers to an application built using VTEX IO. Apps are a type of extension, i.e., they extend the features of the VTEX platform. Development can be local using custom code and then integrated into the stores operating on our infrastructure. In addition, apps can be offered and purchased through the VTEX App Store.
These are the types of apps available on VTEX:
- Storefront: Store themes developed with Store Framework.
- Frontend: React components that compose store themes developed with Store Framework.
- Admin VTEX: Modules and features for the VTEX Admin.
- Services (backend): Node or .NET Core services capable of handling events and triggers, exporting HTTP routes, and exposing GraphQL resolvers.
- Pixel: Scripts from third-party services that run on the frontend, providing solutions such as sales monitoring, user support, data collection, and marketing services.
- Edition: Set of settings, policies, backend, and frontend apps encapsulated and exported by a Sponsor Account.
To learn more about the options for implementing apps, check out the list of builders.
You can find more information in the What is a VTEX App article.
Before installing an app in your store
Before starting the process of developing a new app, we recommend exploring solutions that are ready to be installed in your store. You can find these solutions in the Extensions Hub, the VTEX Admin section that centralizes extension management. The following pages are available in the Extensions Hub:
- App Store: Marketplace where apps developed by VTEX and third parties are available. On this page, you can view, purchase, and install apps for a VTEX account. There are free and paid apps, which have different billing methods.
- App Management: Page that allows you to install, uninstall, remove, and configure apps in the store.
Here are some examples of solutions available on the App Store:
- Assembly Options: Adds attachment options for customizing SKUs. For example, adding a phrase to a T-shirt or ingredients to a sandwich.
- Gift List: Allows you to create gift lists, which can be shared so that others can purchase items for gifting. It is useful for events such as birthdays, weddings, and baby showers. The purchased items are converted into store credits, which can be used to buy any available items in the store.
- Live Shopping: Enables live streaming on the store's website to engage customers in real time. It creates opportunities to promote products and includes several components besides the video player, such as the number of viewers, a like button, live chat, and a sidebar for presenting products.
- Customer chat apps: Add a chat component to interact with customers. They can have a chatbot for automatic interaction, as well as providing human support. Some examples of apps are JivoChat, Tawk.to, and Zendesk Chat.
- Analysis and review apps: These apps add components for customers to review store products, usually with a numerical rating or with a review. Some examples of apps are Reviews and Ratings by VTEX, Bazaarvoice, and PowerReviews.
- Social media apps: These apps allow interaction with social media. For example, they allow promoting store products through ads on the media platform. Examples of such apps include TikTok for Business and Facebook Business Extension.
Before creating an app for your store
If you can't find an app that meets the needs of your VTEX store, you can develop a custom solution. When developing apps for VTEX, there are several aspects to consider:
-
Who will develop and maintain the app? Apps can be developed and maintained by the company's in-house development team or by a VTEX-certified agency. You can find VTEX implementation partners on our Partner Portal (available only in Portuguese). In addition to development, the team or agency will also be responsible for maintaining and updating the app.
-
What kind of app should be developed? It is important to know the context in which the desired solution will operate. As previously described, various types of apps are available. To assist in the development process, we have development guides for certain types of apps, such as storefront, service, and Pixel apps.
-
How do you develop an app? Developing an app takes several stages. In general, the development process follows these steps:
a. Prepare the development environment: The main requirements before starting to develop an app are to install the VTEX IO CLI (command-line interface) and create a development workspace in the store account.
b. Interact with the code: Development usually starts with an initial template, followed by local implementation in the code. The template should be chosen based on the type of app you want. You can check the available templates by running the CLI command
vtex init. Additionally, you'll need to configure the manifest.json file. This configuration involves defining various parameters such as the app name, the developer or vendor name, and the required permissions. Once the code is edited, the app is deployed into the development workspace using the CLI command vtex link for testing purposes.c. Package the code into a new version: After testing, you must follow the steps for launching a new version of the app and publishing an app. This allows the code to be saved in the VTEX infrastructure and installed in production workspaces.
d. (Optional) Validate whether the app meets your business needs: Once the version has been published, it may be beneficial to install the app in a production workspace and conduct an A/B test in order to compare the sales conversion rate before and after using your new app.
If you're interested in learning more about app development, we recommend visiting our Learning Center.
- Considering making your app publicly available? You can make the app available in the App Store, allowing other accounts to leverage the solution you've developed.
- Do you want to make your app available on the App Store? There are some advantages to making your app available on the App Store, such as increasing its visibility and the potential for monetization. To do this, you need to follow a few steps and comply with certain rules. In summary, you must become a registered developer, ensure the app code is stored in a GitHub repository, develop the app in accordance with the App Store's best practices, and submit it to the homologation process. Once it is approved, your app will be available on the App Store.