In some circumstances, you may want to create an additional authentication in VTEX with your own login database. For example:
- A customer "loyalty club", with login and password created on your own platform.
- Employee login for purchases in your "staff store".
To match those needs, VTEX provides a VTEX ID integrated authentication OAuth2 .
As this is a complicated technical matter, we recommend that you consult a partner or IT team.
About OAuth2
OAuth is an authorization protocol used mostly in scalable web applications. The latest version is the 2.0, which uses tokens to access your data in another system.
What is OAuth2 used for
OAuth2's main benefit for VTEX stores is the possibility of using logins and passwords previously created in external systems which are integrated with VTEX. This speeds up the authentication process when necessary, and works in the same way as authentication via Facebook or Google+, for example.
Official reference guide
Have a look at the OAuth2 protocol official guide on https://tools.ietf.org/html/rfc6749
Integrating OAuth2 with VTEX ID
Based on the official documentation, have a look at the illustration below explaining how to integrate OAuth2 with VTEX ID:
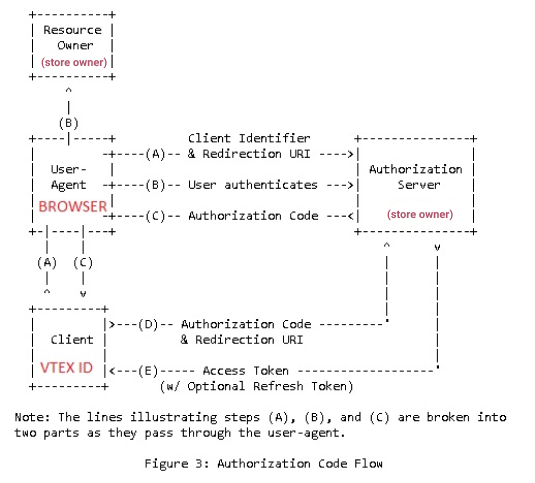
Keeping the illustration in mind, let's have a closer look at some of the things you'll need to know.
Bear in mind that any part of the process takes place exclusively through HTTPS.
1. Authorization URL (getAuthorizationCode)
The user (store customer) will see the VTEX ID login screen and will choose the appropriate external identity provider.
VTEX ID will redirect the user to an authorization URL belonging to the identity provider, this being a requisition using the GET method on that server.
The authorization URL is supplied by the retailer and has at least three parameters (querystrings):
- Client ID: VTEX ID identifier for the identity provider. The parameter's name can be set to anything (we suggest using
client_id) and its value is set by the provider; - Return URL: will be used in the next steps of the flow. Its value is set by VTEX ID but its parameter name can be set to anything (we suggest using
return_url); - State: used together with the return URL, having its name and value set by VTEX ID, neither of which should be altered.
You can include additional parameters in VTEX ID by setting their values and name of their keys.
From the authorization URL, the user will move on to the authentication process of the external identity provider.
Once successfully authenticated, the provider will redirect the user back to VTEX ID. The destination URL should include:
- the return URL sent by VTEX ID;
- the state parameter, keeping its original value;
- a new parameter which will represent the authentication code generated by the identity provider. The parameter name can be set to anything, we recommend using
auth_code.
2. URL for changing authorization code with access code (getAccessCode)
When the user returns to the return URL, VTEX ID captures the authorization code to obtain an access code from the backend servers.
This access code will be used to securely obtain customer data and create cookies that identify the user within VTEX services.
This URL warrants the use of the POST method.
The authorization code must be sent with in the requisition body, either in JSON format (content-type application/json) or form-urlencoded (content-type application/x-www-form-urlencoded). You should let us know both the desired method and the name of the key that will represent that method.
Additional parameter can be sent to the querystring and/or body. If warranted, indicate the keys and values, which will be fixed.
For the security of the process, VTEX ID needs the Client ID and the Client Secret (the ID is the same as the one at the beginning of the process, functioning as appKey and appToken, respectively). The Client ID and Client Secret can be sent with a header entitled "Authorization" or with the URL parameters (keys whose name can be set to anything).
As response we expect to receive the access code in the body, either in JSON format or as form-urlencoded (just as the requisition); you can pass a property name for mapping, the name range being free.
Additional parameters can be part of the response but are usually not useful.
3. URL to obtain user data (getUserInfo)
This URL should only be used with the GET method.
The user should be recognized according to their own access code, which will be sent either as an Authorization Bearer or as a querystring.
You may also include additional parameters in VTEX ID by indicating the key names and their respective values.
The expected response is the user's email and their identity provider ID, along with the user's name, however this last part is optional. Data can be delivered in either JSON format or as form-urlencoded.
Additional information can be part of the response but are usually not useful.
Important: The email is the sole VTEX platform key. The identity provider may request other type of information for authentication (such as ID number, company registration number, login, phone number, etc.) but what should be sent to VTEX integration is the email that was authenticated. This scenario is valid for B2B, B2C and B2E.
With this step concluded, the user will receive a cookie containing an authorization token that will identify them within VTEX services.
Use cases
The following examples show the process of using an OAuth2 integration with Google as the identity provider:
getAuthorizationCode
Request:
GET https://accounts.google.com/o/oauth2/auth?redirect_uri=https://vtexid.vtex.com.br/VtexIdAuthSiteKnockout/ReceiveAuthorizationCode.ashx&scope=https://www.googleapis.com/auth/userinfo.profile%20https://www.googleapis.com/auth/userinfo.email&access_type=offline&response_type=code&client_id={clientId}&state={state}
getAccessCode
Request:
POST https://accounts.google.com/o/oauth2/tokenBody: redirect_uri=https://vtexid.vtex.com.br/VtexIdAuthSiteKnockout/ReceiveAuthorizationCode.ashx&grant_type=authorization_code&client_id={clientId}&client_secret={clientSecret}&code={authorizationCode}
Response:
{ "access_token" : {accessToken}, "expires_in" : 3600, "id_token" : {jwt}, "token_type" : "Bearer"}
getUserInfo
Request:
GET https://www.googleapis.com/oauth2/v1/userinfo?access_token={accessToken}
Response:
{ "id": {id}, "email": {email}, "verified_email": true, "name": "John Smith", "given_name": "John", "family_name": "Smith", "link": "xxxxxx", "picture": "xxxx", "gender": "male", "locale": "en-US"}
Conclusion
As soon as the service is developed and published, you can send the above-mentioned data to VTEX (by opening a ticket). VTEX will then be able to complete environment integration with VTEX ID, providing your store with another login option.
If you have multiple stores (subaccounts) listed in Account Settings > Account management > Account, please note that each one will require their own OAuth2 Identity Provider configuration.
Important things to remember:
- all endpoints are enabled through HTTPS
- credentials (Client ID and Client Secret, or equivalent)
- credentials (username/email and password) for configuration test
- desired name for the identity provider, which in the final result will be displayed as the text of the "Sign in as {provider name}" button
For getAuthorizationCode:
- requisition URL (GET method)
- parameter name for Client ID
- parameter name for response URL
- additional parameters (if any, indicate key and value)
- key containing the authorization code (in the response)
For getAccessCode:
- requisition URL (POST method)
- authorization code format (JSON or form-urlencoded body)
- additional URL parameters (if any)
- additional body parameters (if any)
- credentials format (Authorization header)
- response format (JSON or form-urlencoded body)
- key containing the access code (in the response)
For getUserInfo:
- requisition URL (GET method)
- additional parameters (if any)
- key containing the user ID (in the response)
- key containing the email (in the response)
- key containing the name (in the response, if any)